4-079-943-22 DIRECTV ™ Receiver with UltimateTV Service from Microsoft ® ® Digital Satellite Receiver/Recorder Installation Guide Before you begin using your DIRECTV Receiver with UltimateTV service: • Make sure your Satellite Dish Antenna is properly installed. • Follow the steps in “Connecting Your DIRECTV Receiver” on pages 7-12. • Activate DIRECTV ® programming and UltimateTV by calling: 1-800-DIRECTV (347-3288) SAT-W60 © 2000 by Sony Electronics Inc.
WARNING To prevent fire or shock hazard, do not expose the Satellite Receiver to rain or moisture. This symbol is intended to alert the user to the presence of uninsulated “dangerous voltage” within the product’s enclosure that may be of sufficient magnitude to constitute a risk of electric shock to persons. This symbol is intended to alert the user to the presence of important operating and maintenance (servicing) instructions in the literature accompanying the appliance.
SONY SOFTWARE LICENSE AGREEMENT ATTENTION: USE OF THE SOFTWARE IS SUBJECT TO THE SONY SOFTWARE LICENSE TERMS SET FORTH BELOW. USING THE SOFTWARE OR THE PRODUCT IN WHICH IT IS INCORPORATED INDICATES USER’S ACCEPTANCE OF THESE LICENSE TERMS. IF THE USER DOES NOT ACCEPT THESE LICENSE TERMS, THE USER MAY IMMEDIATELY RETURN THE ENTIRE PRODUCT IN ITS ORIGINAL PACKING FOR A FULL REFUND OF THE PURCHASE PRICE. License and Restrictions Sony Electronics Inc.
Export Requirements and U.S. Government Restricted Rights User may not export or re-export the Software or any copy or adaptation in violation of any applicable laws or regulations. The Software and documentation have been developed entirely at private expense and are provided as "Commercial Computer Software - Restricted Rights" in accordance with FAR 52.227-19 (1987) or limited rights in technical data in accordance with FAR 52.227-14 (1987).
Contents Connecting Your Satellite Receiver ................................... 7 Package Contents ................................................................................7 Cables and Jacks..................................................................................8 Connection Overview ......................................................................9 Step 1: Connecting the Antenna .....................................................10 Step 2: Connecting Your Phone Line .................
Connecting Your Satellite Receiver Package Contents Make sure you have received all of the following items in your Satellite Receiver package. POWER TV MUTING TV/VIDEO SAT FUNCTION SAT TV WINDOW PIP MENU 3 2 1 EXIT 6 5 4 RECENT 9 8 7 TV/WEB ENTER .
Below is a description of the jacks and cables you can use to make connections. Note that not all cables come with your Satellite Receiver. VHF/UHF Jacks and Coaxial (RF) Cable Use the VHF/UHF IN jacks to receive signals from a TV antenna or from a cable TV connection. You can also use the VHF(SAT)/UHF OUT jack to send audio and video signals to your TV. SATELLITE IN Jacks and RG-6 Coaxial cable Use the SATELLITE IN jacks to receive signals from your Satellite Dish Antenna with RG-6 coaxial cable.
Connecting Your Satellite Receiver Connection Overview Follow the procedures or make the connections in each of the steps to connect your Satellite Receiver.
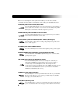
Step 1: Connecting the Antenna Satellite Receiver 1 2 Connect the SATELLITE IN jack to your Satellite Dish Antenna using RG-6 coaxial cable. 1 2 Connect the 2nd signal if you have Dual LNB. Advance Set Up for dual output. Step 2: Connecting Your Phone Line Satellite Receiver 1 10 1 Connect the TELEPHONE LINE jack to a telephone line wall jack using the supplied telephone cord.
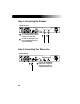
Connecting Your Satellite Receiver Step 3: Connecting Your TV Set Satellite Receiver 1c 1a TV VHF / UHF 1b IN VIDEO 1 VIDEO 2 S VIDEO VIDEO L (MONO) AUDIO R 1a If your TV has A/V input jacks Connect the VIDEO OUT jacks on your Satellite Receiver to the A/V input jacks on your TV using the supplied A/V cable. (Be sure to match the colors on the jacks with the colored plugs on the A/V cable.) If your TV has only one audio input, connect it to the L(MONO) jack on the Satellite Receiver.
Step 4: Connecting the AC Power Satellite Receiver 1 After all other connections are complete, connect the AC Power Cord to the Satellite Receiver. Then connect the AC Power Cord to a power outlet. AC Power Cord 1 to power outlet Step 5: Checking the Access Card Satellite Receiver 1 1 Open the access door by applying gentle pressure to the latch and releasing. Make sure the DIRECTV Access Card is firmly inserted into the front left hand slot of the Satellite Receiver.
Connecting Your Satellite Receiver Advanced Connection: Connecting Your VCR Satellite Receiver 1c 1a 1b IN LINE IN OUT LINE OUT S VIDEO VIDEO AUDIO 1a If your TV and VCR have A/V jacks Connect the VIDEO OUT jacks of your Satellite Receiver to the A/V input jacks of your VCR using the supplied A/V cable. Then, connect the A/V output jacks of your VCR to the A/V input jacks of your TV using an A/V cable. (Be sure to match the colors on the jacks with the colored plugs on the A/V cable.
Advanced Connection: Connecting Your IR Blaster Satellite Receiver 1 1 To allow the Satellite Receiver to control your VCR Connect the IR Blaster to the VCR CONTROL jack on the Satellite Receiver. VCR (front) IR Sensor 2 2 In front of the VCR 1 2" / z Tip If the infrared sensor is not marked on your VCR, shine a flashlight into the front panel of the VCR to locate the sensor. 14 to 1" Place the IR Blaster under and in front of the VCR.
Connecting Your Satellite Receiver Advanced Connection: Connecting an Audio System 1 Audio Receiver LINE OUT OPTICAL IN AUDIO LINE IN If you have a digital or Dolby Digital audio system Connect the DIGITAL OUT (OPTICAL) of the Satellite Receiver to the optical digital input of your audio system. 1 Satellite Receiver z Tip If you connect your Satellite Receiver to a Dolby Digital receiver, set the Dolby Digital option of the Audio display to Auto Select.
Advanced Connection: Connecting a Printer Connecting a printer to your Satellite Receiver enables you to print Web pages and e-mail messages. The Satellite Receiver is not compatible with all printers. Check the on-line instructions for a list of the latest compatible printers. Satellite Receiver To print screens DB-25 Male Connect the printer port on the Satellite Receiver to the port on the printer. Note Unplug the Satellite Receiver and printer before you begin connecting.
Using the Remote Control and Basic Functions Although the Satellite Receiver’s remote control is preset to operate Sony brand TVs, you can program the remote control to operate other manufacturer’s TVs. This will enable you to operate your TV when viewing regular broadcast TV using the remote control. Batteries for the Remote Control Insert two size AA batteries (supplied) into the remote control as shown.
Selecting Items In on-screen displays such as the TV Home Screen and program guide, you must first move the highlight to the item you want, then select the item. MUTING TV/VIDEO PIP MUTING SAT POWER TV TV/VIDEO FUNCTION SAT TV WINDOW PIP EXIT RECENT . BACK 7 9 8 ENTER TV/WEB . 0 MY SHOWS BACK HOME 9 8 ENTER MY SHOWS OPTIONS 1 SCROLL CODE SET RM-Y804 Press the V/v/B/b buttons to move the highlight to the item you want.
Using the Remote Control and Basic Functions MUTING TV/VIDEO POWER TV FUNCTION TV SAT PIP WINDOW 1 2 3 4 5 6 7 8 Muting Press to mute the sound. Press again, or press VOL +, to restore the sound. (For the TV only) TV/VIDEO Cycles through the video inputs of your TV. TV POWER Turns your TV on and off. SAT POWER Turns your Satellite Receiver on and off. PIP Turns the Picture-in-Picture features of the Satellite Receiver on and off.
OPTIONS Displays the OPTIONS panel. RECENT Displays and allows you to access the most recently viewed Web pages or the last TV channel. SCROLL V/v Buttons Moves the page up or down when the page is too long to be displayed on the screen. HOME Displays the Web Home or TV Home screen. BACK Displays the last screen viewed, or hides the on-screen keyboard. TV/WEB Switches between TV and Internet modes.
Using the Remote Control and Basic Functions Setting up the Remote Control MUTING TV/VIDEO POWER TV SAT FUNCTION TV SAT PIP WINDOW 1 2 3 4 5 6 7 8 MENU EXIT 9 The remote control can be programmed to operate most brands of televisions. 1 Find the code(s) for the manufacturer of the TV you want to operate with this remote control. You can find these codes on page 22. 2 Press the CODE SET button. The function indicators begin flashing. RECENT CODE SET ENTER TV/WEB .
Manufacturer Codes TV Codes Manufacturer Portland Code 103, 108 Manufacturer Code Quasar Radio Shack 110, 107 102, 112, 124, 123 Sony 101 RCA/Proscan Admiral (M. Wards) ABC 102, 114, 109 Samsung 102, 103, 104, 105,106, 107, 108 126, 112, 113, 103 Sanyo Scott 125 123, 112 Sharp Signature 2000 (M. Wards) Sylvania 114, 113, 115 114, 109 111, 112, 108 Symphonic Tenika 123, 139 109 Toshiba Videch 119, 114 131, 103, 112 Wards Zenith 113, 103, 115, 112 108, 110 112 Bell & Howell (M.
Other Information Front Panel Controls & Terminals Satellite Receiver GUIDE HOME PUSH SATELLITE RECEIVER SAT-W60 1 2 3 4 5 0 6 8 7 qa 9 Feature Description 1 Power Button Turns your Satellite Receiver on and off 2 POWER Indicator Indicates whether the Satellite Receiver is on or off. 3 CONNECTED Indicator Flashes while the Satellite Receiver is connecting to the WebTV service and while receiving new information. Remains lit while in use.
Back Panel Terminals Satellite Receiver 7 8 65 4 0 Connector 1 3 qa 2 qs qs 9 Description 1 TELEPHONE LINE Connects your Satellite Receiver to a telephone jack. 2 VCR CONTROL Allows you to connect your IR Blaster for easy control of your cable box and/or VCR through the Satellite Receiver. 3 PRINTER PORT Allows you to connect your Satellite Receiver to a printer. 4 AUDIO (R)/(L) IN/OUT Connects your Satellite Receiver to the right and left audio inputs and outputs of your TV.
Other Information Specifications Terminals Video In (2) Video Out (2) Audio (R/L) In (2) Audio (R/L) Out (2) S-Video In (1)/Out (1) Tel Line (1) Microphone In (1) Printer Port (DB25) (1) VCR Control (1) Digital Audio Out (1) USB Port (2) Satellite In (2) CH3-CH4 Switch (1) VHF/UHF In/Out (1) AC In (1) Dimensions 430 mm x 70 mm x 290 mm (w/h/d) (17” x 2 3/4” x 11 1/2”) Weight 4.3 kg (9.
Troubleshooting Symptom Possible Cause and remedies TV POWER button doesn’t turn on TV. The remote control has not been properly programmed. See “Setting up the Remote Control” on page 21. The batteries in the remote control or wireless keyboard could be weak. Check the batteries and replace them if necessary. No picture, no sound. Make sure the AC Power Cord is connected. Check that the TV/VIDEO switch is set correctly. Make sure the Satellite Receiver is properly connected.
Other Information Symptom Possible Cause and remedies The Satellite Receiver gets extremely hot. Check the placement of the Satellite Receiver. Place the Satellite Receiver in a location with adequate ventilation. Do not place the Satellite Receiver in a cabinet or on a TV. If the heat is excessive, contact your Sony dealer. The Satellite Receiver turns off and on by itself. This is often caused by static build up. Turn off the Satellite Receiver and disconnect the AC Power Cord from the power outlet.
Limited Warranty Satellite Receiver SONY ELECTRONICS INC. (“SONY”) warrants this Product against defects in material or workmanship as follows: 1. Labor: For a period of 90 days from the original date of purchase, if the Product is determined to be defective, SONY will repair or replace the Product at no charge. After this 90 day period, you must pay for all labor charges. 2.
Other Information addition, if you enter into a service contract with the SONY Partnership within 90 days of the date of sale, the limitation on how long an implied warranty lasts does not apply to you. This warranty gives you specific legal rights, and you may have other rights which vary from state to state. For your convenience, SONY ELECTRONICS INC.
FCC Regulations and Information FCC Registration Information Your Satellite Receiver has been registered by the Federal Communication Commission (FCC) as not being harmful to the telephone network when connected directly to the telephone lines. In order to fully comply with the Rules of the FCC, the following instructions should be read carefully and followed completely where applicable: FCC has established Rules which permit this device to be directly connected to the telephone network.
Contact Sony with your questions and comments www.sel.sony.com/SEL/feedback.htm Sony Electronics Inc. Printed in the U.S.A.