4-093-821-01(3) (EN) TFT LCD Color Computer Display Operating Instructions SDM-P232W © 2002 Sony Corporation US
Owner’s Record The model and serial numbers are located at the rear of the unit. Record these numbers in the spaces provided below. Refer to them whenever you call upon your dealer regarding this product. Model No. Serial No. WARNING To prevent fire or shock hazard, do not expose the unit to rain or moisture. Dangerously high voltages are present inside the unit. Do not open the cabinet. Refer servicing to qualified personnel only.
Table of Contents Precautions. . . . . . . . . . . . . . . . . . . . . . . . . . . . . . . . . . . . . . . . . . . . 4 Identifying parts and controls . . . . . . . . . . . . . . . . . . . . . . . . . . . . . . 5 Setup. . . . . . . . . . . . . . . . . . . . . . . . . . . . . . . . . . . . . . . . . .7 Setup 1: Connect a computer equipped with a DVI output connector (digital RGB) . . . . . . . . . . . . . . . . . . . . . . . . . . .
Note on the LCD (Liquid Crystal Display) Precautions Warning on power connections • Use the supplied power cord. If you use a different power cord, be sure that it is compatible with your local power supply. For the customers in the U.S.A. If you do not use the appropriate cord, this monitor will not conform to mandatory FCC standards. For the customers in the UK If you use the monitor in the UK, be sure to use the appropriate UK power cord.
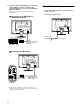
Identifying parts and controls Rear of the display stand See the pages in parentheses for further details. Front of the LCD display 9 A 1 (Power) switch and 1 (power) indicator (pages 9, 18, 22) This switch turns the monitor on when the 1 (power) indicator lights up in red. To turn the monitor off, press this switch again. If the 1 (power) indicator does not light up, press the MAIN POWER switch (8). B MENU button (page 12) This button turns the menu screen on and off.
J AC IN connector (page 8) This connector connects the power cord (supplied). Rear of the LCD display K Security Lock Hole The security lock hole should be used with the Kensington Micro Saver Security System. Micro Saver Security System is a trademark of Kensington. L DVI-D input connector (digital RGB) for INPUT1 (page 7) This connector inputs digital RGB video signals that comply with DVI Rev. 1.0.
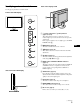
2 Setup Before using your monitor, check that the following items are included in your carton: • LCD display • Power cord • HD15-HD15 video signal cable (analog RGB) • DVI-D video signal cable (digital RGB) • Utility/Instruction Manual CD-ROM (utility software for Windows/Macintosh, Operating Instructions) • Warranty card • Quick Setup Guide to the DVI-D input connector (digital RGB) for INPUT1 or INPUT2 Setup 1: Connect a computer equipped with a DVI output connector (digital RGB) • Turn off the monitor
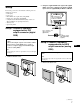
2 Using the supplied HD15-HD15 video signal cable (analog RGB), connect the computer to the monitor’s HD15 input connector (analog RGB) for INPUT1 or INPUT2. Connect the computer according to the following illustrations. Setup 3: Connect the power cord 1 Connect the supplied power cord to the monitor’s AC IN connector. 2 Connect it to a power outlet.
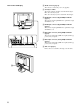
Setup 4: Bundle the cords and cables Setup 5: Turn on the monitor and computer 1 Remove the arm cover. 1 2 Bundle the cords and cables inside of the stand. 3 Replace the arm cover and back cover. arm cover Press the MAIN POWER switch on the right side of the monitor in the direction of the [. The 1 (power) indicator lights up in red. MAIN POWER lights in red 1 2 back cover 3 2 Press the 1 (power) switch on the front right of the monitor. The 1 (power) indicator lights up in green.
If no picture appears on your screen • Check that the power cord and the video signal cable are properly connected. • If “No input signal” appears on the screen: – Check that the input priority setting is correct (page 16). – The computer is in the power saving mode. Try pressing any key on the keyboard or moving the mouse. – Check that the input signal setting is correct by pressing the INPUT button (page 11). Setup 6: Adjust the tilt This monitor can be adjusted within the angles shown below. approx.
Selecting the input signal (INPUT button) Press the INPUT button. The input signal and corresponding input indicator change each time you press this button. INPUT1: Select the input signal received at the monitor’s DVI-D input connector (digital RGB) for INPUT1, or at the monitor’s HD15 input connector (analog RGB) for INPUT1. INPUT2: Select the input signal received at the monitor’s DVI-D input connector (digital RGB) for INPUT2, or at the monitor’s HD15 input connector (analog RGB) for INPUT2.
5 Customizing Your Monitor Before making adjustments Close the menu. Press the MENU button once to return to normal viewing. If no buttons are pressed, the menu closes automatically after about 45 seconds. MENU Connect the monitor and the computer, and turn them on. For the best results, wait for at least 30 minutes before making adjustments. You can make numerous adjustments to your monitor using the on-screen menu.
1 Press the MENU button. The main menu appears on the screen. 2 Press the M/m buttons to select (PICTURE ADJUSTMENT) and press the OK button. The PICTURE ADJUSTMENT menu appears on the screen. 3 Press the M/m buttons to select “Brightness” and press the OK button. The “Brightness” adjustment menu appears on the screen. 4 Press the M/m buttons to adjust the brightness. PICTURE ADJUSTMENT menu You can adjust the following items using the PICTURE ADJUSTMENT menu.
Fine tuning the color temperature The setting is stored in memory for each video input connector, respectively. x Selecting the Smoothing If the picture displayed at the “Full2” or “Full1” mode of “Zoom” is not smooth, use the picture smoothing function. PICTURE ADJUSTMENT R: G: B: 1 110 128 140 Backlight : Contrast : Brightness : Color : Gamma : Smoothing : Press the MENU button. The main menu appears on the screen.
4 INPUT SETTING menu You can adjust the following items using the INPUT SETTING menu. • Auto Adjust INPUT SETTING 1: HD15 • Phase Auto Adjust : On • Pitch Phase : 20 Pitch : 0 • H Center H Center : 50 V Center : 50 • V Center Input1 Priority : DVI-D Input2 Priority : DVI-D • Input1 Priority • Input2 Priority 1920 × 1200/60 Hz Select Set OK Exit Press the M/m buttons to select “Off” and press the OK button. To resume the automatic picture quality adjustment function Select “On” in step 4 above.
Adjust the picture’s position manually (H Center /V Center) If the picture is not in the center of the screen, adjust the picture’s centering as follows. 1 Set the resolution to 1920 × 1200 on the computer. 2 Load the Utility Disk. 3 x Selecting the Input Priority When computers are connected to both of the monitor’s video input connectors (DVI-D and HD15) for either INPUT1 or INPUT2, you can choose the connector to which a signal is input preferentially.
x Menu Position OPTION menu You can change the menu position if it is blocking an image on the screen. You can adjust the following items using the OPTION menu. • • • • • Zoom Menu Position Language Menu Lock Reset OPTION 1 Press the M/m buttons to select “Menu Position” and press the OK button. The “Menu Position” adjustment menu appears on the screen. 2 Press the M/m buttons to select the desired position. You can choose one of 9 positions where the menu will appear.
Technical Features signal only) Power saving function This monitor meets the power-saving guidelines set by VESA, ENERGY STAR, and NUTEK. If the monitor is connected to a computer or video graphics board that is DPMS (Display Power Management Signaling) compliant, the monitor will automatically reduce power consumption as shown below. Power mode Power consumption 1 (power) indicator normal operation 80 W (max.) green active off* (deep sleep)** approx. 1 W orange 1 (power) off approx.
If “Cable disconnected” appears on the screen Troubleshooting This indicates that the video signal cable has been disconnected from the currently selected connector. Before contacting technical support, refer to this section. INFORMATION 1: HD15 Cable disconnected Go to power save On-screen messages If there is something wrong with the input signal, one of the following messages appears on the screen. To solve the problem, see “Trouble symptoms and remedies” on page 20.
Trouble symptoms and remedies If a problem occurs as a result of a connected computer or other equipment, refer to the connected computer/equipment’s instruction manual. Use the self-diagnosis function (page 22) if the following recommendations do not resolve the problem. Symptom Check these items No picture If the 1 (power) indicator is not lit, or if the 1 (power) indicator will not light up when the 1 (power) switch is pressed, • Check that the power cord is properly connected.
Symptom Check these items Picture flickers, bounces, oscillates, or is scrambled. • Adjust the pitch and phase (analog RGB signal only) (page 15). • Isolate and eliminate any potential sources of electric or magnetic fields such as other monitors, laser printers, electric fans, fluorescent lighting, or televisions. • Move the monitor away from power lines or place a magnetic shield near the monitor. • Try plugging the monitor into a different AC outlet, preferably on a different circuit.
Displaying this monitor’s information While the monitor is receiving a video signal, press and hold the MENU button for more than 5 seconds until the information box appears. Press the MENU button again to make the box disappear. Example MENU INFORMATION 1: HD15 Model : SONY SDM-P232W Ser. No. : 1234567 Manufactured : 2002-40 Model name Self-diagnosis function This monitor is equipped with a self-diagnosis function.
Specifications LCD panel Panel type: a-Si TFT Active Matrix Picture size: 23.0 inch Input signal format RGB operating frequency* Horizontal: 28–92 kHz (analog RGB) 28–75 kHz (digital RGB) Vertical: 48–85 Hz (analog RGB) 60 Hz (digital RGB) Resolution Horizontal: Max.1920 dots Vertical: Max.1200 lines Input signal levels Analog RGB video signal: 0.7 Vp-p, 75 Ω, positive SYNC signal: TTL level, 2.2 kΩ, positive or negative (Separate horizontal and vertical, or composite sync) 0.