
Operating Instructions


5
GB
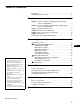
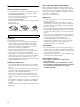
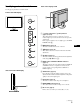
Identifying parts and controls
See the pages in parentheses for further details.
A 1 (Power) switch and 1 (power) indicator
(pages 9, 18, 22)
This switch turns the monitor on when the 1 (power)
indicator lights up in red. To turn the monitor off, press this
switch again.
If the 1 (power) indicator does not light up, press the MAIN
POWER switch (8).
B MENU button (page 12)
This button turns the menu screen on and off.
C M/m buttons (page 12)
These buttons are used to select the menu items and make
adjustments.
D OK button (page 12)
This button activates the selected menu item and adjustments
made using the M/m buttons (3).
E INPUT button and INPUT1/INPUT2 indicators
(page 11)
This button switches the video input signal between INPUT1
and INPUT2 when two computers are connected to the
monitor, and the corresponding indicator (INPUT1 or
INPUT2) lights up.
F AUTO button (page 15)
Press this button when the displayed picture seems poorly
adjusted. It makes further automatic adjustment of the picture
quality for the current input signal.
G ECO button (page 18)
This button is used to reduce the power consumption.
H MAIN POWER switch (page 9)
This switch turns the monitor’s main power on and off.
I Back cover (page 7)
Remove this cover when you connect cables or cords.
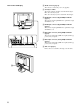
Front of the LCD display
Side view of the LCD display
9
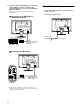
Rear of the display stand
(continued)