4-680-196-13 (2) S-AIT Tape Drive Unit Operating Instructions Page 5 _________________________________ Important Safeguards Page 50 ________________________________ SDZ-S100 SDZ-S130 © 2003 Sony Corporation
Owner’s Record The model and serial numbers are on a label on the bottom of the unit. Record the serial number in the space provided below. These numbers provide specific information about your S-AIT Tape Drive Unit and will be very helpful if you have to contact technical support. Model No. Serial No. Safety Information Your S-AIT Tape Drive Unit is assigned model number SDZ-S100 or SDZ-S130 for regulatory compliance certifications.
A certified power supply cord has to be used with this equipment. The relevant national installation and/or equipment regulations shall be considered. A certified power supply cord not lighter than ordinary polyvinyl chloride flexible cord according to IEC 60227 (designation H05VV-F 3G 0.75 mm2 or H05VVH2-F2 3G 0.75 mm2) shall be used. Alternative a flexible cord be of synthetic rubber according to IEC 60245 (designation H05RR-F 3G 0.75 mm2) shall be used.
This equipment generates, uses, and can radiate radio frequency energy and, if not installed and used in accordance with the instructions, may cause harmful interference to radio communications. However, there is no guarantee that interference will not occur in a particular installation.
Table of Contents Chapter 1 Introduction Overview.......................................................................7 S-AIT Technology ........................................................7 Product Features .........................................................8 Compatible Cartridges ................................................9 Data Cartridges ............................................................... 9 Cleaning Cartridges.........................................................
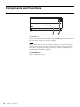
Chapter 4 Using the Media Compatible Cartridges ..............................................35 Data Cartridge............................................................35 Components and Functions........................................... 36 Setting the Write-protect Switch ..............................38 Cleaning Cartridge ....................................................38 Handling Cartridges ..................................................
Introduction Chapter 1 Overview The S-AIT Tape Drive Unit is a tape streamer that makes use of “S-AIT” (Super Advanced Intelligent Tape) technology. The S-AIT drive stores large amounts of image data on a single half-inch tape cartridge, making it the industry's highest capacity tape drive. S-AIT Technology Helical Scan Recording Technology Helical scan technology, based on a very stable rotating drum/head platform, permits accurate and reliable data recording at very high track densities.
Product Features Two models of S-AIT Tape Drive Units are available according to the type of interface of your host computer. SDZ-S100 Uses the Ultra 160 Wide Low Voltage Differential/Single-Ended (LVD/SE) SCSI SDZ-S130 Uses 2 Gbps Fibre Channel interface Common Features • Native storage capacity of 500 GB per cartridge (1.3 TB at 2.6:1 compression) with the S-AIT data cartridge SAIT1-500. • Native sustained data transfer rate of 30 MB per second.
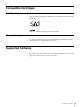
Compatible Cartridges Data Cartridges Tape cartridges used with the S-AIT Tape Drive Unit must be marked with the SAIT-1 logo. SAIT-1 logo Caution Only use cartridges designed specifically for S-AIT. Cleaning Cartridges To clean the read/write heads, use the S-AIT Cleaning Cartridge. For details about cleaning, see “Head Cleaning” on page 41. Supported Software For details about software that can be used with the S-AIT Tape Drive Unit and supported operating systems, contact your dealer.
Components and Functions Front OPEN TAPE MOTION DRIVE ERROR TAPE ERROR CLEANING REQUEST A Front Door Used to protect the front of the unit. Press the DOOR button to unlock and open the door when inserting or removing cartridges. Note Even when the front door is closed and a cartridge is ejected by software, the cartridge does not come in contact with the door. You can therefore keep the door closed except when inserting or removing cartridges to minimize any contamination from airborne particles.
Front door opened 1 2 3 9 8 7 6 5 4 A Power Switch Press this switch to turn the S-AIT Tape Drive Unit on or off. When you restart the unit, be sure to wait at least 10 seconds before turning it on again. B POWER Indicator Lights green when the unit is on. When it flashes, the cooling fan of the unit may be malfunctioning. If this is the case, verify that the cooling fan on the rear is operating normally. If it is not, contact your dealer. C Cartridge Slot Used to insert and remove cartridges.
Drive Status The indicators of the S-AIT Tape Drive Unit show the status of the unit. This status is indicated by a combination of colors (green, orange, or yellow), and whether the indicators are lit or flashing. Refer to the table below for explanations about the meaning of indicator activity.
Rear SDZ-S100 A SCSI ID Switch Used to set the SCSI ID of the S-AIT Tape Drive Unit. Upon shipment, the SCSI ID is 0. For details, see “Setting the SCSI ID (SDZ-S100 only)” on page 22. B RS-232C Connector For service use only. You do not normally need to use this connector. C Cooling Fan and Ventilation Holes Be careful not to block the ventilation holes. If you do, the unit may overheat, resulting in damage. D AC IN Connector Connect the power cable appropriate for your country to this connector.
SDZ-S130 7 6 5 1 2 4 3 A RS-232C Connector For service use only. You do not normally need to use this connector. B Cooling Fan and Ventilation Holes Be careful not to block the ventilation holes. If you do, the unit may overheat, resulting in damage. C AC IN Connector Connect the power cable appropriate for your country to this connector. D Ventilation Holes Be careful not to block the ventilation holes. If you do, the drive in the unit may overheat, resulting in damage.
Bottom 1 2 3 A Access Cover for Service Use Do not open this cover. For service use only. B Dip Switch Access Cover If you need to change the data compression settings, remove this cover to change the DIP switch settings. For details about setting the DIP switches, see “Setting the DIP Switches” on page 19. C Air Filter Unit Be careful not to block the ventilation holes of the air filter unit. If you do, the S-AIT Tape Drive Unit may overheat, resulting in damage.
About the label 1 2 3 A Model number The model number is located on the bottom of the unit, together with the serial number. Refer to the model and serial numbers on the label when seeking technical support. B Serial number The serial number is located on the bottom of the unit, together with the model number. Refer to the serial and model numbers on the label when seeking technical support.
Installation Chapter 2 Overview This chapter describes the general procedures for positioning the S-AIT Tape Drive Unit, connecting it to the host computer, and turning it on. This chapter also describes initial setup. Installation and setup procedures may vary slightly depending on your system. Unpacking Note You will need the box and packing materials if you wish to move or transport the unit. Retain them for future use. 1 Remove the unit from the box as indicated below.
Package Contents After opening the package, make sure that all the following items are present. Contact your dealer if anything is missing. • S-AIT Tape Drive Unit (1) • Operating Instructions (1) Note In addition to the above, other items may be included in the package. Preparing the Host Computer Prepare the host computer before installing the S-AIT Tape Drive Unit. 1 Make sure that a SCSI host adapter card or Fibre Channel host bus adapter (FC HBA) is installed in the host computer.
Setting the DIP Switches By setting the DIP switches at the bottom of the S-AIT Tape Drive Unit, you can: • Choose whether to compress the data when recording. • Choose whether the host can control data compression. The default settings of the DIP switches is as follows. • DC Control-1: ON Compression is enabled. • DC Control-2: OFF The host can control compression.
3 Change the settings with a pointed object. Each DIP switch is defined in the tables below.
Block Size OFF Default is 512 byte block size fix mode. ON Default is variable mode. Immediate WFM Definition OFF Enable Immed bit field in WRITE FILEMARKS command. ON Ignore Immed bit field, and always return good status immediately. UA Control 4 Definition Definition OFF Enable to report UnitAttention (UA) sense. ON Disable to report UnitAttention (UA) sense under AIX/IRIX environment. After changing the DIP switch settings, replace the access cover.
Setting the SCSI ID (SDZ-S100 only) The SCSI ID is a unique address that identifies the SDZ-S100 to the host. The default SCSI ID of the SDZ-S100 is 0. The unit can be configured to SCSI ID addresses ranging from 0 to 15 (or 0 to F) using the SCSI ID switch on the rear of the unit. Press the switch buttons to select the necessary SCSI ID number. Caution • The range of SCSI IDs is 0 to 15 (or 0 to F). SCSI ID priority is 7 (highest) to 0, and then 15 (or F) to 8 (lowest).
Setting the Loop ID (SDZ-S130 only) You can set the Loop ID with the loop ID jumpers, if necessary. These jumpers are functional when the topology is arbitrated loop. When the jumpers are enabled, they acquire AL_PA through LIHA (Loop Initialization Hard Assigned). AL_PA is acquired from the loop ID. See table “Arbitrated Loop Physical Addresses (AL_PA) and Loop IDs” on page 24 for conversion details.
Arbitrated Loop Physical Addresses (AL_PA) and Loop IDs 24 8-bit AL_PA (Hex) (Decimal) (Hex) 00 0 01 1 02 03 7-bit Loop ID 8-bit AL_PA 7-bit Loop ID 8-bit AL_PA (Hex) (Decimal) (Hex) (Hex) (Decimal) (Hex) EF 2B 43 A3 56 86 4D E8 2C 44 9F 57 87 4C 2 E4 2D 45 9E 58 88 4B 3 E2 2E 46 9D 59 89 4A 04 4 E1 2F 47 9B 5A 90 49 05 5 E0 30 48 98 5B 91 47 06 6 DC 31 49 97 5C 92 46 07 7 DA 32 50 90 5D 93 45 08 8 D9 33 51 8F 5E 9
Installing the S-AIT Tape Drive Unit The S-AIT Tape Drive Unit weights about 7 kg (15.4 lb.) and has the following dimensions. Make sure that the surface where you will install the S-AIT Tape Drive Unit is appropriate before installing the unit. Note Install the S-AIT Tape Drive Unit on a horizontal surface near an AC power outlet. Make sure that you leave gap of about 150 mm (5.9 in.) behind the rear of the unit to allow air to circulate. 86 mm (3.4 in.) 372 mm (14.6 in.) 210 mm (8.3 in.) 50 mm (2.
Connecting the Power Cable 1 Verify the power cable plug to make sure that it matches the AC IN connector receptacle. 2 Make sure that the electrical outlet you use to connect the unit is properly grounded. 3 Connect one end of the power cable to the AC IN connector and the other end to the power outlet. Note If the S-AIT drive does not come with a power cable, make sure that you connect a power cable appropriate for your country to this connector.
Connecting the SCSI Bus Cable (SDZ-S100 only) Connect the SDZ-S100 (SCSI model) and the host computer with a SCSI cable. This section describes how to do so. Use an Ultra 160/m SCSI LVD cable commonly sold in stores to connect the unit to the SCSI bus. The SDZ-S100 uses a 68-pin half pitch connector. Caution • Do not connect the SDZ-S100 to a HVD (High Voltage Differential) SCSI bus. If you do, the unit or other devices on the SCSI bus may be damaged.
When the SDZ-S100 is one of several devices on the SCSI bus 1 Turn off all SCSI devices on the SCSI bus, including the SDZ-S100. Caution When connecting or disconnecting a SCSI cable to SCSI devices (including the SDZ-S100), turn off all the SCSI devices. Failing to do so may result in damage. 2 Connect the SCSI cable to the next device on the SCSI bus, connect the terminator to the last device on the bus, then issue the host command to resume operation.
Connecting the Optical Fiber Cable for Fibre Channel (SDZ-S130 only) The SDZ-S130 is equipped with an interface that complies with the Fibre Channel standards with the following specifications. • Short-wave laser • 200 MB/sec • Duplex LC Fibre Channel connectors The equipment (HBA, hub, switch, etc.) to be connected to the SDZ-S130 must be of the same type. Use an optical fiber cable with the following specifications.
Configuring the S-AIT Tape Drive Unit to the Host Configure the S-AIT Tape Drive Unit as follows. 1 Turn on the S-AIT Tape Drive Unit. For details, see “Turning the Unit On or Off” on page 31. 2 30 Chapter 2 Installation To configure the unit for use, refer to the documentation of the host computer and software.
Operation Chapter 3 Overview This chapter describes how to turn the unit on and off, as well as how to insert and eject cartridges. Turning the Unit On or Off Turning On the Unit 1 Press the DOOR button to unlock and open the front door.
2 Press the power switch on the front panel. The POWER indicator lights green and the unit starts. Then four status indicators change as follows as the unit is starting. • All the indicators light green for about half a second. • They then repeatedly flash yellow form left to right for about 3 seconds, indicating that the unit is performing a self-diagnostic. • Finally, all the indicators go out. (If there is a cartridge in the unit, the TAPE MOTION indicator lights green or yellow.
Turning Off the Unit 1 Press the DOOR button to unlock and open the front door. 2 Press the power switch on the front panel. Caution Do not turn off the S-AIT Tape Drive Unit when it is in use or there is a cartridge in the unit, as this could damage data. Note After turning off the S-AIT Tape Drive Unit, wait at least 10 seconds before turning it on again. Preparing Cartridges Make sure that cartridges are not write-protected and prepare them for use.
4 Apply gentle pressure to the back of the cartridge until the unit takes the cartridge and loads it. Caution Do not apply force to the cartridge after the unit starts loading it. Otherwise, the cartridge may rush out of the unit when it is ejected. 5 Close the front door to minimize any contamination from airborne particles. When the cartridge is loaded, the TAPE MOTION indicator lights green or yellow. Notes • The host software controls the reading and writing of tapes.
Using the Media Chapter 4 Compatible Cartridges S-AIT Tape Drive Unit uses: • S-AIT data cartridges • S-AIT cleaning cartridges Only use the cartridges above with your S-AIT Tape Drive Unit. Do not use other types of cartridges, such as LTO Ultrium, SDLT, or DLT. Data Cartridge S-AIT data cartridges contain a half inch AME (Advanced Metal Evaporated) tape.
Components and Functions TOP 1 2 4 3 A Insertion Guide The insertion guide is a large notch preventing you from inserting the cartridge incorrectly or inserting cartridges of other types into the unit. B Insertion Indicator This arrow shows the direction in which the cartridge must be inserted into the drive. C Label Area Area where you can affix labels to identify your S-AIT data cartridges.
Bottom 5a 5 qa 6 q; 9 7 8 E Recognition Holes Used by the unit to determine the type of cartridge. S-AIT data cartridge recognition holes are all closed. S-AIT cleaning cartridge holes are closed except hole . Caution Do not open the recognition holes as this may prevent the unit from recognizing the type of cartridge correctly. F Reel Lock Used to prevent the tape from moving when it is outside the unit. When you insert a cartridge into the unit, its reel locks are released automatically.
J Reel Lock Used to prevent the tape from moving when it is outside the unit. When you insert a cartridge into the unit, its reel locks are released automatically. Caution Do not close the reel lock as this may cause loading problems. K Positioning Hole Used by the unit to determine the position of the cartridge in the unit. Caution Do not close the positioning hole as this may cause loading problems.
Handling Cartridges Handling or storing S-AIT cartridges incorrectly can damage them or their tapes. Follow the guidelines below to avoid damaging your cartridges. Handling precautions • Before using cartridges, let them acclimate themselves to the normal operating environment for at least 24 hours. • Verify whether cartridges are damaged before using them. • Verify whether foreign objects such as labels are affixed to the cartridges as they may cause loading problems.
Usage, Storage, and Transport Environmental Specifications Before using cartridges, let them acclimate themselves to the operating environment for at least 24 hours.
Appendix Head Cleaning The S-AIT Tape Drive Unit is equipped with an automatic head cleaning system and was developed to require only a minimum of cleaning. Yet, to maintain the unit in peak condition, the unit determines when head cleaning using a cleaning cartridge is necessary. When cleaning is necessary, the CLEANING REQUEST indicator flashes yellow. OPEN TAPE MOTION 1 DRIVE ERROR TAPE ERROR CLEANING REQUEST Insert an S-AIT cleaning cartridge into the unit.
Changing the Air Filter Unit We recommend that you replace the air filter unit at least once a year. Consult your dealer to purchase air filter units. Note We recommend that you clean the air filter unit once a month with a vacuum cleaner. 1 Prepare a new air filter unit. 2 Turn off the unit. 3 Disconnect all cables from the unit. 4 Turn the unit upside-down. There are three latches on the air filter unit.
Hardware Reset In case of an emergency, you can reset the unit by inserting a pointed object such as a paper clip into the hardware reset hole. Caution Resetting the unit with the hardware reset hole may cause you to lose data. Under normal circumstances, the hardware reset is only for manufacturing or repair purposes. Hardware reset hole Updating the Firmware You can update the S-AIT Tape Drive Unit firmware by downloading the new version of the firmware to your unit through the SCSI bus.
Avoiding Damage Avoid Shock and Vibrations Intense shock, such as from dropping the unit, may damage it. Environmental Considerations Do not store or use the unit in locations subject to: • high humidity • excessive dust • high temperature • intense vibrations • direct sunlight • sudden changes in temperature Proper Ventilation To avoid overheating, install the unit where air can circulate freely around the case, and do not cover it during operation.
Troubleshooting Before contacting your dealer, vatify the following. If the problem persists, contact your dealer. The unit does not start (the POWER indicator does not light) • Verify that the power cable is connected correctly and that it is not damaged. Replace it if necessary. • Try another power outlet. The POWER indicator flashes green Verify that the cooling fan on the rear is operating normally.
The SDZ-S130 (Fibre Channel interface model) and the host computer cannot communicate with each other • Verify that the host computer is on. • Verify the FC status indicator at the rear of the unit. If it is lit orange, there is a connection error. In this case, reconnect the cable or change it if necessary. • Verify that an optical fiber cable is correctly connected from the unit to the host computer, hub, or switch. • Verify that the optical fiber cable is of the appropriate type.
Specifications Performance Storage capacity 500 GB (uncompressed with 600 m S-AIT Data Cartridge) 1.3 TB (2.
Vibrations Operating Non-operating Shock Operating Non-operating swept sine 5 to 500 Hz 0.25G peak 1 Octave/min. swept sine 5 to 500 Hz 0.5G peak 1 Octave/min. half sine 5G peak 3 ms (no data loss) half sine 90G peak 2 ms (no unit damage) Power Specifications/Miscellaneous Power 100 V - 240 V AC ± 10% (50 to 60 Hz) 0.7 A (100 V AC) 0.4 A (240 V AC) Noise level Streaming read/write 50 dB (A) External dimensions 210 × 86 × 372 mm (W × H × D) (excluding protrusions) (8.3 × 3.4 × 14.6 in.
M Index Model number .............................. 16 O A Air filter unit ................................. 42 Appendix ...................................... 41 Arbitrated Loop Physical Addresses (AL_PA) and Loop IDs ............ 24 Avoiding damage ......................... 44 C Cartridges ..................... 9, 33, 35, 39 Changing air filter unit ................. 42 Cleaning ....................................... 41 Cleaning cartridge ........................ 38 Components ......................
IMPORTANT SAFEGUARDS For your protection, please read these safety instructions completely before operating the appliance, and keep this manual for future reference. Carefully observe all warnings, precautions and instructions on the appliance, or the one described in the operating instructions and adhere to them. SECURITES IMPORTANTES Pour votre protection, lisez attentivement ces instructions de sécurité avant d'utiliser l'appareil. Conservez toujours ce manuel sous la main.
English USE SERVICE Power Sources — This unit should be operated only from the type of power source indicated on the marking label. If you are not sure of the type of electrical power, consult your dealer or local power company.
Français UTILISATION ENTRETIEN ET REPARATION Alimentations — Cet appareil ne peut fonctionner qu'avec l'alimentation indiquée sur l'étiquette. Si vous n'êtes pas certain de la puissance électrique, consultez votre distributeur ou votre société régionale d'électricité.
Deutsch BEDIENUNG Stromzufuhr — Dieses Gerät sollte ausschließlich mit dem auf dem Markierungsschild angegebenen Strom versorgt werden. Wenn Sie die Stromstärke anzweifeln, beraten Sie sich bitte bei Ihrem Elektriker oder bei Ihrer örtlichen Stromversorgungsgesellschaft. Für die Verwendung eines drei-kabligen Erdungssteckers des Types ac: Wenn es Ihnen nicht gelingt den Stecker in die Anschlußdose zu stecken nehmen Sie bitte mit Ihrem Elektriker Kontakt auf und lassen Sie einen geeigneten Stecker montieren.
Español USO SERVICIO Fuentes de alimentación — Este aparato debe funcionar solamente con el tipo de fuente de alimentación que se indica en la etiqueta de características. Si no está seguro del tipo de alimentación eléctrica que tiene, consulte a su distribuidor o a la compañía de suministro eléctrico de su zona.
Nederlands GEBRUIK NAZICHT EN REPARATIE Voedingsbronnen — Dit toestel mag alleen worden gevoed door het type voeding dat aangegeven is op het typeplaatje. Als u niet zeker bent van het type van uw elektrische voeding, neem dan contact op met uw dealer of plaatselijke elektriciteitsmaatschappij.
Svenska ANVÄNDNING SERVICE Nätspänning — Apparaten får endast anslutas till den spänning och strömart, som framgår av märkplåten. Tala med återförsäljaren eller med den lokala kraftleverantören, om du inte är säker på strömarten.
Italiano USO Fonti di alimentazione elettrica — Il dispositivo deve essere messo in funzione utilizzando esclusivamente il tipo di alimentazione indicata sull'etichetta dei dati di funzionamento. Qualora non siate sicuri sul voltro tipo di alimentazione elettrica, consultate il vostro rivenditore o la società di erogazione dell'energia elettrica.
Portuguese UTILIZAÇÃO SERVIÇO FONTES DE ALIMENTAÇÃO — Este conjunto deverá ser ligado apenas ao tipo de fonte de alimentação indicado na etiqueta. Se não tiver a certeza quanto ao tipo de corrente eléctrica, consulte o seu revendedor ou a EDP.
Suomenkielinen KÄYTTÖ HUOLTO Liittäminen sähköverkkoon — Liitä vastaanotin vain sähköverkkoon, jonka jännite on sama kuin arvokilpeen merkitty. Jos olet epävarma, ota yhteys vastaanottimen myyjään tai paikalliseen sähköyhtiöön. Korjausta edellyttävät vauriot — Irrota verkkojohto pistorasiasta ja käänny huollon puoleen, jos: Laitteet, joissa on suojamaadoitettu pistotulppa: Jos et saa kytkettyä pistotulppaa pistorasiaan, käänny sähköasentajan puoleen.
Dansk ANVENDELSE SERVICE Strømkilder — Dette apparat må kun drives med den type strømkilde, der er angivet på typeskiltet. Er man ikke sikker på, hvilken strømtype, man har, må man spørge sig for hos sin forhandler eller det lokale el-selskab.
Norsk BRUK SERVICE Spenningsforsyning — Apparatet må bare brukes med den spenningsforsyning som er angitt på merkeskiltet. Hvis du er usikker på hvilken spenningstype du har, må du kontakte forhandleren eller det lokale elektrisitetsverket.
For information about the S-AIT Tape Drive Unit, contact your reseller.