3-073-154-E1 (3) GB Video Cassette Recorder Operating Instructions YUS PAL SECAM SLV-SE820B SLV-SE720B SLV-SE620B SLV-SE220B © 2002 Sony Corporation ShowView' ShowView’ ShowView’
WARNING To prevent fire or shock hazard, do not expose the unit to rain or moisture. To avoid electrical shock, do not open the cabinet. Refer servicing to qualified personnel only. Mains lead must only be changed at a qualified service shop. Precautions Safety • This unit operates on 220 - 240 V AC, 50 Hz. Check that the unit’s operating voltage is identical with your local power supply.
Table of contents Getting Started 4 Index to parts and controls 11 Step 1 : Unpacking 12 Step 2 : Setting up the remote commander 16 19 Step 3 : Connecting the VCR Step 4 : Setting up the VCR with the Auto Set Up function 21 Setting the clock 23 Downloading the TV tuner’s preset data (not available on SLV-SE620B and SE220B) 24 Selecting a language 25 Presetting channels 28 Changing/disabling programme positions 33 Setting the Canal Plus decoder Basic Operations 36 Playing a tape 38 Recording TV program
Getting Started Index to parts and controls Refer to the pages indieated in parentheses ( ) for details.
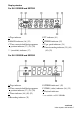
For SLV-SE720B and SE620B A 1/1 (on/standby) switch B Remote sensor (12) C Tape compartment D A (eject) button (36) E H (play) button* (36) (54) F ■ (stop) button* (20) (36) (70) (71) G ENR Z (record) button (39) (56) (70) H X (pause) button (36) (70) (71) I (fast-forward) button (36) (54) J (rewind) button (36) (54) K CHAINE +/- buttons* (55) (64) * The (play), ■ (stop) and CHAINE + buttons have a tactile dot.
For SLV-SE220B A 1/1 (on/standby) switch B A (eject) button (36) C Remote sensor (12) D Tape compartment E (play) button* (36) (54) F ■ (stop) button* (20) (36) (70) (71) G ENR Z (record) button (39) (56) (70) H X (pause) button (36) (70) (71) I (fast-forward) button (36) (54) J (rewind) button (36) (54) K CHAINE +/- buttons* (55) (64) * The (play), ■ (stop) and CHAINE + buttons have a tactile dot.
Display window For SLV-SE820B and SE720B A Tape indicator E TV indicator (41) B MAGN indicator (16) (39) F STEREO indicator (59) C Time counter/clock/line/programme position indicator (37) (38) (70) G Tape speed indicators (38) ^ ^ (smartlink) indicator (17) H Timer/recording indicator (39) (44) (49) (52) For SLV-SE620B and SE220B A Tape indicator E STEREO indicator* (59) B Time counter/clock/line/programme position indicator (37) (38) (70) F VIDEO (video) indicator (16) (39) C Timer indicato
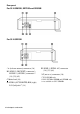
Rear panel For SLV-SE820B, SE720B and SE620B For SLV-SE220B ^ ir (in from antenna) connector (16) B LIGNE-3 (DEC/EXT) connector*1 LIGNE-2 (dEC/EXt) connector*^ (18) (33) (69) C Mains lead (16) D AUDIO (OUT/SORTIE) R/D (right) L/G (left)jacks*3 (18) 8 Indextoparts andcontrols E LIGNE-1 (EURO AV) connector (16) (33) (68) ^ èÌ (out to tv) connector (16) *1 SLV-SE820B only *2 SLV-SE720B, SE620B and SE220B only *3 not available on SLV-SE620B
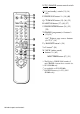
Remote commander A Z (eject) button (36) ^ ^ (wide) button (for TV) (14) (15) C±) AFFICH button (14) (37) (39) [ •!/* m—-0 m O © •© •© •© ■0 ■© J) E Programme number buttons*1 (13) (40) F — (ten’s digit) button (13) (40) -Œ>aŒ) O D COMPT/DUREE REST button (39) 0 G / (Teletext) button (for TV)*^ (14) H 2 (volume) +/- buttons {for TV) (13) I O TV power on/TV mode select button (for TV)*^ (13) J 9 ENR (record) button (39) (56) K SP (Standard Play)/LP (Long Play) button*3 (38) L MENU button (21) (57)
N |TV| / IMAGNI remote eontrol switeh (12) O 1/1 (on/standby) switeh (13) (14) (49) P CHOIX SON button*1*3 (14) (60) Q t TV/MAGN button (13) (16) (39) R ANNUL/0 button (37) (48) (57) S CHOIX ENTREE button (38) (52) (70) T CHAINE (programme) +/-buttons*1 (13)(38) @/C Teletext page aeeess buttons (for TV)*2 (14) U y RALENTI button*4 (54) V x2 button*4 (54) W ^M/^W (index seareh) buttons*3*4 (62) MINUTERIE button (47) (51) *1 The H (play), CHOIX SON, number 5 and CHAINE + buttons have a taetile dot.
step 1 : Unpacking Check that you have received the following items with the VCR: • Remote commander R6 (size AA) batteries • Aerial cable PERITEL cable Check your model name The instructions in this manual are for the 4 models: SLV-SE820B, SE720B, SE620B and SE220B. Check your model name by looking at the rear panel of your VCR. SLV-SE820B is the model used for illustration purposes. Any difference in operation is clearly indicated in the text, for example, “SLV-SE820B only.
step 2 : Setting up the remote commander Inserting the batteries Insert two R6 (size AA) batteries by matehing the + and - on the batteries to the diagram inside the battery eompartment. Insert the negative (-) end first, then push in and down until the positive (+) end elieks into position. Using the remote commander Remote sensor You ean use this remote eommander to operate this VCR and a Sony TV. Buttons on the remote eommander marked with a dot (*) ean be used to operate your Sony TV.
TV control buttons To Press Set the TV to standby mode 1/1 Select an input source: aerial in or line in t TV/MAGN Select the TV’s programme position Programme number buttons, —, CHAINE +/- Adjust the volume of the TV 2+/- Switch to TV (Teletext off)*' a (TV) continued- Setting up the remote commander 13
To Press Switch to Teletext*' / (Teletext) Select the sound*^ CHOIX SON Use FASTEXT*' FASTEXT buttons Call up the on-screen display (E) AFFICH Change the Teletext page*' c /'C Switch to/from wide mode of a Sony wide TV (For other manufactures’ wide TVs, see “Controlling other TVs with the remote commander (SLVSE820B only)” below.) (wide) Notes • With normal use, the batteries should last about three to six months.
Code numbers of controllable TVs If more than one eode number is listed, try entering them one at a time until you find the one that works with your TV. To switeh to wide mode, see the footnotes below this table for the applieable eode numbers.
step 3 : Connecting the VCR Disconnect the aerial cable from your TV and connect it to ir on the rear panel of the VCR. 1 Connect® of the VCR and the aerial input of your TV using the supplied aerial cable. Connect LIGNE-1 (EURO AV) on the VCR and the PERITEL connector on the TV with the supplied PERITEL cable. Whenever you want to watch the VCR picture, press t TV/MAGN to display the MAGN*1 or VIDEO*^ indicator in the display window. Connect the mains lead to the mains.
About the SMARTLINK features (not available on SLV-SE620B and SE220B) If the connected TV complies with SMARTLINK, MEGALOGIC*!, EASYLINK*2, Q-Link*3, EURO VIEW LINK**, or T-V LINK*5, this VCR automatically runs the SMARTLINK function alter you complete the steps on the previous page (theç? indicator appears in the VCR’s display window when you turn on the TV). You can enjoy the following SMARTLINK features. • TV Direct Rec You can easily record what you are watching on the TV when the VCR is turned on.
Additional connections To a stereo system (not available on SLVSE620B and SE220B) You can improve sound quality by connecting a stereo system to the AUDIO R/D L/Gjacks as shown on the right. : Signal flow To a satellite or digital tuner with Line Through Using the Line Through function, you can watch programmes from a satellite or digital tuner connected to this VCR on the TV even when the VCR is turned off.
step 4 : Setting up the VCR with the Auto Set Up function Before using the VCR for the first time, set up the VCR using the Auto Set Up funetion. With this funetion, you ean set the TV ehannels, guide ehannels for the ShowView system*, and VCR eloek* automatieally. 1 Turn on your TV and set it to the video ehannel. Conneet the mains lead to the mains. The VCR automatieally turns on, and the message for the Auto Set Up funetion appears. Press OK. The SÉLECTION DU PAYS menu* appears.
To cancel the Auto Set Up function Press MENU. Notes • Whenever you operate the Auto Set Up function, some of the settings (ShowView*, timer, etc.) will he reset. If this happens, you have to set them again. • Auto preset starts automatically only when you plug in the mains lead for the first time after you purchase the VCR. • If you want to use the Auto Set Up function again, press MENU, then press M/m/
Setting the clock You must set the time and date on the VCR to use the timer features properly. The Auto Cloek Set funetion* works only if a station in your area is broadeasting a time signal. Before you starts • Turn on the VCR and the TV. • Set the TV to the video ehannel. • Refer to “Index to parts and eontrols” for button loeations. 1 o Press MENU, then press , to highlight RÉGLAGE HORLOGE and press OK. Press M/m to set the hour. 1 /JAN /2 0 0 2 MAR HORLOGE AUTO : O UI SELECT.
Set the day, month, and year in sequenee by pressing , to seleet the item to be set, and press Mm to seleet the digits, then press The day of the week is set automatieally. Press Mm to seleet OUI for the setting of the Auto Cloek Set funetion* *. The VCR automatieally sets the eloek aeeording to the time signal broadeast between the ehannels ST 1 to ST 5. SÉLECT. RÉGLER : FIN : OK SORTIE : MENU If you do not need the Auto Cloek Set funetion, seleetNON. Press MENU to exit the menu.
Downloading the TV tuner’s preset data (not available on SLV-SE620B and SE220B) You can download your TV tuner’s preset data to the VCR and tune the VCR according to that data using the SMARTLINK connection. Before you starts • Turn on the VCR and the TV. • Set the TV to the video channel. • Refer to “Index to parts and controls” for button locations. 1 o Press MENU, then press , to highlight INSTALLATION and press OK. INSTALLATION AUTO INSTALLATION MANUELLE SMARTLINK SELECT.
Selecting a language If you prefer an on-sereen language other than Freneh, use the on-sereen display to seleet another language. Before you starts • Turnon theVCRandtheTV. • Set the TV to the video ehannel. • Refer to “Index to parts and eontrols” for button loeations. 1 o Press MENU, then press , to highlight SÉLECTION LANGUE and press OK. Press to highlight the abbreviation of the desired language from the table below, then press OK.
Presetting channels If some channels could not be preset using the Auto Set Up function, you can preset them manually. Before you starts • Turn on the VCR and the TV. • Set the TV to the video channel. • Refer to “Index to parts and controls” for button locations. 1 o Press MENU, then press , to highlight INSTALLATION and press OK. INSTALLATION AUTO INSTALLATION MANUELLE SMARTLINK SÉLECT. ^ ^ RÉGLER :► FIN : OK SORTIE : MENU Press Mm to highlight INSTALLATION MANUELLE, then press ST I1 2 3 4 5 CAN.
Press K*I SYS. L / L' ST 5 0 3 3 1 CANAL RÉGL.FIN DECODEUR : NON — NOM SÉLECT. : AT FIN :OK Press M/m to highlight NOM, then press ,. ** RÉGLER : SORTIE : MENU RECHERCHE MANUELLE »K* SYS.
10 Press MENU to exit the menu. o Ifthe picture is not ciear If the pieture is not elear, you may use the Manual Fine Tuning (REGL.FIN) funetion. After step 6, press M/m to seleet REGL.FIN. Press
Changing/disabling programme positions After setting the ehannels, you ean ehange the programme positions as you like. If any programme positions are unused or eontain unwanted ehannels, you ean disable them. You ean also ehange the station names. If the station names are not displayed, you ean enter them manually. Changing programme positions Before you starts • Turnon theVCRandtheTV. • Set the TV to the video channel. • Refer to “Index to parts and eontrols” for button loeations.
Press OK, then press M/^ to move to the desired programme position. LISTE STATIONS TV ST 1 2 3 CAN. NOM 0 2 7 AAB - ** 5 0 2 9 L MN- 0 3 0 CDE - AT DEC NON SYS. L / L' NON L / L' Mi iNO^MiL / U k ^ NON L / L' ► MODIF. ST : OK SORTIE : MENU Press OK to confirm the setting. To change the programme position of another station, repeat steps 3 through 5. 6 7 Press MENU to exit the menu. o Disabling unwanted programme positions After presetting channels, you can disable unused programme positions.
Press Mm to highlight INSTALLATION MANUELLE, then press ** LISTE STATIONS TV ** ST CAN. NOM DEC SYS. 1 0 2 7 AAB - NON L / L’ 2 0 2 9 LMNNON L / L’ 3 0 3 0 CDE - NON L / L’ 4 0 3 2 I JKNON L / L’ 5 AT ► MODIF. ST : OK EFFACE : ANNUL SORTIE : MENU Press Mm to highlight the row which you want to disable. To display other pages for programme positions 6 to 80, press Mm repeatedly. ST 1 2 3 4 5 CAN. 027 029 030 032 AT ► EFFACE ANNUL/0 DEC NON NON NON NON SYS. L / L’ L / L’ L / L’ L / L’ MODIF.
Changing the station names (not avaiiabie on SLV-SE620B) You can change or enter the station names (up to 4 characters). The VCR must receive channel information for station names to appear automatically. Before you starts Turn on the VCR and the TV. Set the TV to the video channel. Refer to “Index to parts and controls^ for button locations. 1 o Press MENU, then press , to highlight INSTALLATION and press OK. [3i INSTALLATION AUTO INSTALLATION MANUELLE SMARTLINK SÉLECT.
Enter the station name. 1 Press Mm to seleet a eharaeter. Eaeh time you press M, the eharaeter ehanges as shown below. _t9tA ** RECHERCHE MANUELLE »K * SYS. ST CANAL R ÉGL.FIN DECODEUR NOM L / L' 5 0 3 3 SÉLECT. RÉGLER : FIN : OK SORTIE : MENU 2 Press , to set the next eharaeter. The next spaee flashes. To eorreet a eharaeter, press
Setting the Canal Plus decoder You can watch or record Canal Plus programmes if you connect a decoder (not supplied) to the VCR. Connecting a decoder PERITEL cable Canal Plus decoder : Signal flow Setting Canal Plus channels To watch or record Canal Plus programmes, set your VCR to receive the channels using the on-screen display. In order to set the channels correctly, be sure to follow all of the steps below. Before you starts • Turn on the VCR, the TV, and the decoder.
1 O Press MENU, then press , to highlight INSTALLATION and press OK. INSTALLATION AUTO INSTALLATION MANUELLE SMARTLINK SELECT. ^ ^ REGLER : ► FIN : OK SORTIE : MENU Press Mm to highlight INSTALLATION MANUELLE, then press ST I1 2 3 4 5 CAN. 0 2 7 0 2 9 030 032 033 AT ► EFFACE Press M/m to highlight the row whieh you want to set for the deeoder, then press NOM AAB L MNCDE I J K --------- T/T 1 NON NON NON NON L L L L / / / / L' L' L' L' MODIF.
Press M/m to highlight CANAL, then press
Basic Operations Playing a tape Before you start... • Refer to “Index to parts and controls” for button locations. Turn on your TV and set it to the video ehannel. 1 Insert a tape. The VCR turns on and starts playing automatically if you insert a tape with its safety tab removed. Press (play). When the tape reaches the end, it will rewind automatically.
To use the time counter Press ANNUL/0 at the point on the tape that you want to find later. The eounter in the display window resets to “0:00:00” or “00:00.” Seareh for the point afterwards by referring to the eounter. Hour Minute Second Hour Minute To display the eounter on the TV sereen, pressE) AFFICH. I 00 Notes a> VI • The eounter resets to “0:00:00” or “00:00” whenever a tape is reinserted. • The eounter stops eounting when it eomes to a portion with no reeording.
Recording TV programmes Before you start... • Refer to “Index to parts and controls” for button locations. Turn on your TV and set it to the video channel. To record from a decoder, turn it on. 1 Insert a tape with its safety tab in place. cHAiNE • To record a normal channel, press CHAINE +/- until the programme position number you want appears in the display window.
*ENR Press Z ENR to start recording. The recording indicator lights up red in the display window. IP^GN I I in - I ^ - nrinRecording indicator----- j j .j j j j . j j j I I I • I I I ^ n rm n p. VIDEO LI /_/•/_/ LI ¥ Recording indicator DD a> VI To stop recording Press ■ (stop). O (D T3 To check the remaining time o PressE) AFFICH twice. With the display on, press COMPT/DUREE REST to check the remaining time.
To save a recording To prevent aeeidental erasure, break off the safety tab as illustrated. To reeord on the same tape again, eover the tab hole with adhesive tape. Tips • To seleet a programme position, you ean use the programme number buttons on the remote eommander. For two-digit numbers, for example, press 2 and 3 to seleet “ST 23.” • If you eonneet additional equipment to a LIGNE eonneetor orjaek, you ean seleet the input signal using the CHOIX ENTREE or CHAINE +/- buttons.
Recording what you are watching on the TV (TV Direct Rec) (not avaiiabie on SLV-SE620B and SE220B) If you use the SMARTLINK eonneetion, you ean easily reeord what you are watehing on the TV (other than tapes being played on the VCR). ^ Press 1/1 to turn on the VCR. 2 Insert a tape with its safety tab in plaee. 2 Press ENR while you are watehing a TV programme or external souree. The TV indieator lights up and the VCR starts reeording what you are watehing on the TV.
Recording TV programmes using the Dial Timer (SLV-SE820B only) The Dial Timer funetion allows you to make timer reeordings of programmes without turning on your TV. Set the reeording timer to reeord up to eight programmes, ineluding settings made with other timer methods, that will be broadeast within the next month. The reeording start time and reeording stop time ean be set at one minute intervals.
Press© PROG. “START” and the current time appear alternately in the display window. CTD 1 MAGN / S P _/ l i l i l í 1 1 m 1 ♦ CTO MAGN SP ~i~inn L _/■/_//_/ 00 a> VI Turn© PROG to set the recording start time. You can set the recording start time inl5 minute intervals or adjust the time in one minute intervals by pressing the CHAINE +/buttons. O (D T3 o 3 VI cro MAGN O0 SP inn L iJIJ Press© PROG. “STOP” and the recording stop time alternately appear in the display window.
0PROG Press0 PROG. The programme position or LIGNE input appears in the display window. AAA '^MAGN / / ^/ //► ▼y▼ Turn © PROG to set the programme position. 8 *^MAGN /__ / S P _/ 1 ~l 1 cHoix ENTREE To reoord from a deeoder or other souree eonneeted to one or more Q of the LIGNE inputs, turn© PROG or press CHOIX ENTREE to display the eonneeted line in the display window. 0PROG Press© PROG to eomplete the setting. “OK” appears in the display window for about five seeonds.
To set the clock ^ Hold down0 PROG so that “DAY” appears in the display window. However, if the eloek has already been set, the eurrent setting appears. 2 Turn© PROG to set the day. 2 Press© PROG. “MONTH” appears in the display window. ^ Turn and press© PROG to set the month, and then the year. After you set the year, “CLOCK” appears in the display window again. ^ Turn and press© PROG to set the hour and minute. 0 When you have finished setting the time, press© PROG to start the eloek.
About the Demonstration Mode The Dial Timer funetion has a Demonstration Mode that allows the user, sueh as a salesperson, to enter more than eight examples of timer settings when demonstrating the use of the Dial Timer. It eaneels the “FULL” notiee whieh appears if eight programmes have already been set. Do not use the Demonstration Mode for making timer reeordings. Doing so may eause the settings to be inaeeurate. To activate the Demonstration Mode Press X (pause) on the VCR while turning the © PROG.
Recording TV programmes using the ShowView® system (not available on SLVSE620B) The ShowView system is the feature that simplifies programming the VCR to make timer reeordings. Just enter the ShowView number listed in the TV programme guide. The date, times, and programme position of that programme are set automatieally. You ean preset a total of eight programmes, ineluding settings made with other timer methods. 00 a> Before you starts VI • Cheek that the VCR eloek is set to the eorreet time and date.
'O '© '© '© '© © ©©© © Press the programme number buttons to enter the ShowView number. If you make a mistake, press ANNUL/0 and re-enter the eorreet ANNUL/0 number. Q Press OK. The date, start and stop times, programme position, tape speed and VPS/PDC setting appear on the TV sereen. • If“—” appears in the “ST” CHOIX ENTREE (programme) eolumn (this may happen for loeal broadeasts), you ANNUL/0 have to set the appropriate Q programme position manually. Press M/m to seleet the desired programme position.
Press 1/1 to turn off the VCR. The© indieator appears in the display window and the VCR stands by for reeording. To reeord fTom a deeoder or other souree, leave the eonneeted equipment switehed on. To stop recording To stop the VCR while reeording, press ■ (stop). Daily/weekly recording In step 4 above, press m to seleet the reeording pattern. Eaeh time you press m, the indieation ehanges as shown below. Press M to ehange the indieation in reverse order.
To use the Auto Tape Speed function* In step 4 above, press m to seleet AUTO. When you are reeording a programme in the SP mode and the remaining tape length beeomes shorter than the reeording time, the reeording tape speed is automatieally ehanged to the LP mode. Note that some noise will appear on the pieture when the tape speed is ehanged. To operate this funetion eorreetly, the “SÉLECT.CASSETTE” setting in the RÉGLAGES UTILISATEUR menu must be aeeurate (see page 66).
Recording TV programmes using the timer You can preset a total of eight programmes, including settings made with other timer methods. Before you starts • Check that the VCR clock is set to the correct time and date. • Insert a tape with its safety tab in place. Make sure the tape is longer than the total recording time. • To record from a decoder, turn it on. • Turn on your TV and set it to the video channel. • Set OPTIONS PROG.*' to NORMALE or MIXTE in the FONCTIONS AVANCÉES menu (see page 67).
Set the date, start and stop times, programme position, tape speed*^ and VPS/PDC funetion*^: 1 Press , to seleet eaeh item in turn. 2 Press M/m to set eaeh item. CHOIX ENTREE To eorreet a setting, press < to O return to that setting and reset. • To reeord the same programme every day or the same day every week, see “Daily/weekly reeording” on page 52. • To usetheVPS/PDCfunetion*^,set V/Pto P. For details about the VPS/PDC funetion, see “Timer reeording with VPS/PDC signals” on page 49.
To use the VCR after setting the timer To use the VCR before a reeording begins, just press i/1. The© indieator turns off and the VCR switehes on. Remember to press i/1 to reset the VCR to reeording standby after using the VCR. You ean also do the following tasks while the VCR is reeording: • Reset the eounter (page 37). • Display tape information on the TV sereen (page 39). • Cheek the timer settings (page 57). • Wateh another TV programme (page 39).
Additional Operations Playing/searching at various speeds Before you starts • Refer to “Index to parts and controls” for button locations. Playback options Operation View the picture during fast-forward or rewind During fast-forward, hold down (fast-forward). During rewind, hold down (rewind). Play at high speed • During playback, press (fast-forward) or (rewind) on the remote commander. • During playback, hold down ^M (fast-forward) or (rewind). When you release the button, normal playback resumes.
To use the shuttle ring in normal mode During playback or pause, turn the shuttle ring clockwise or anticlockwise. Each change in the shuttle ring position changes the playback mode in the following way. Pause. Slow motion in reverse / Normal speed in reverse / Double speed in reverse I High speed in reverse Slow motion \ Normal speed ""'“a's'Pe‘d’ Double speed i High speed > a a 5' 3 SL O (D T3 To use the shuttle ring in jog mode Use this mode for frame-by-frame playback.
Setting the recording duration time After you have started recording in the normal way, you can have the VCR stop recording automatically after a specified duration. Before you starts • Refer to “Index to parts and controls” for button locations. ^ While recording, press Z ENR. T h e © indicator appears in the display window. OD ©I MAGN n •“//“/ 's P IJ -J IJ CTO VIDEO _ n- J n ® I IJ -J IJ "" 2 Press ENR repeatedly to set the duration time.
Checking/changing/cancelling timer settings Before you starts • Turn on your TV and set it to the video channel. • Refer to “Index to parts and controls” for button locations. ^ Press 1/1 to turn on the VCR. 2 Press MENU, then press M/^ to highlight MINUTERIE and press OK. • If you want to change or cancel a setting, go on to the next step.
When the timer settings overiap The programme that starts first has priority and the seeond programme starts reeording only after the first programme has finished. If the programmes start at the same time, the programme listed first in the menu has priority.
Recording stereo and bilingual programmes (not available on SLV-SE220B) In the ZWEITON (German stereo) system This VCR automatically receives and records stereo and bilingual programmes based on the ZWEITON system. When a stereo or bilingual programme is received, the STEREO indicator appears in the display window. To select bilingual sound while recording Press CHOIX SON to select the sound you want.
To select the sound while recording Press CHOIX SON to select the sound you want.
How sound is recorded on a video tape The VCR records sound onto two separate tracks. Hi-fi audio is recorded onto the main track along with the picture. Monaural sound is recorded onto the normal audio track along the edge of the tape.
Searching using the index function (not available on SLV-SE220B) The VCR automatically marks the tape with an index signal at the point where each recording begins. Use these signals as references to find a specific recording. To find a specific recording by scanning (Index scan) ^ Insert an indexed tape into the VCR. 2 Press ^M/^W (index search). The VCR starts scanning each recording for five seconds in the corresponding direction. 2 Press (play) to start playback when you find the desired point.
Notes • No index signal will be added when recording starts from recording pause. However, an index signal will be marked if you change the programme position during recording pause. • When you press (index search), if there is nothing recorded before the selected index signal, playback may not start exactly at the index signal.
Adjusting the picture Adjusting the tracking Although the VCR automatically adjusts the tracking when playing a tape, distortion may occur if the recording is in poor condition. In this case, manually adjust the tracking. During playback, press CHAINE +/- on the VCR to display the tracking meter. The distortion should disappear as you press one of the two buttons. To resume automatic tracking adjustments, eject the tape and re insert it.
Reducing the VCR’s power consumption You can turn off the indicators in the display window when the VCR is off (standby mode) to reduce the VCR’s power consumption. ^ Press MENU, then press to highlight RÉGLAGES UTILISATEUR and press OK. 2 Press Mim to highlight VEILLEECO. 2 Press ^ to set to OUI, then press OK. The power consumption is reduced to a minimum. AFFICHAGE ÉCRAN SÉLECT.CASSETTE SYST. COULEUR FORMAT 16:9 NICAM IV EILLE ECO SMART TRILOGIC SÉLECT.
Changing menu options ^ Press MENU, then seleet RÉGLAGES UTILISATEUR or FONCTIONS AVANCÉESandpressOK. M AFFICHAGE ÉCRAN SÉLECT.CASSETTE SYST. COULEUR FORMAT 16:9 NICAM VEILLE ECO SMART TRILOGIC SÉLECT. ^ ^ RE FIN :OK SORT OUI E18 0 AUTO AUTO OUI NON OUI GLER :► IE : MENU VPS / PDC PAR DEFAUT NON É TENDRE SHOWVIEW NON VEILLE AUTO NON OPTIONS PROG. : MIXTE SÉLECT. ^ ^ RÉGLER : ► FIN : OK SORTIE : MENU 2 Press Mm to select the option. 2 Press , to change the setting, then press OK.
Menu option Set this option to NICAM*! • OUi to record NICAM broadcasts on the hi-fi audio track. • NON to record standard sound on the hi-fi audio track. For details, see page 59. VEILLE ECO • OUI to turn off the indicators in the display window to conserve the VCR’s power. • NON to turn on the indicators in the display window while the VCR is standing by. SMART TRILOGIC • OUi to automatically adjust the sharpness of the picture. • NON to manually adjust the sharpness of the picture.
Editing Connecting to a VCR or stereo system How to connect to record on this VCR Connect the line outputs of the other VCR to the input connector of this VCR. Refer to the examples A through C and choose the connection that best suits your VCR.
Example C TV Your VCR (Recorder) m a 3 (fi ^: Signal flow How to connect to a stereo system (SLV-SE820B only) Connect the t LIGNE-2 Go D jacks on this VCR to the audio outputjacks on the stereo system, using the RK-C510HG audio cable (not supplied). Notes • Make sure you connect the plugs to jacks of the same colour. • If the other VCR is a monaural type, leave the red plugs unconnected.
Basic editing When recording on this VCR Before you start editing • Turn on your TV and set it to the video channel. • Press CHOIX ENTREE to display the connected line in the display window. • Press SP/LP to select the tape speed, SP or LP.* ENR • ^O1I6o O X ^ Insert a source tape with its safety tab removed into the other (playback) VCR. Search for the point to start playback and set it to playback pause. 2 Insert a tape with its safety tab in place into this (recording) VCR.
Audio dubbing (slv-se820B only) This feature lets you reeord over the normal audio traek. The monaural sound previously reeorded is replaeed while the original hi-fi sound remains unehanged. Use this feature to add eommentary to a tape that you have reeorded with a eameorder. Before you start... DOUBLAGE SON GD № t LIGNE-2 G O D X • Open the t LIGNE-2 G O Djacks cover on the front panel and eonneet a playbaek souree. • Turn on the TV and set it to the video ehannel.
Additional Information Troubleshooting If you have any questions or problems not eovered below, please eonsult your nearest Sony serviee faeility. Symptom Remedy The 1/1 (on/standby) • Connect the mains lead to the mains securely. switeh does not funetion. The power is turned on but the VCR does not operate. • Moisture condensation has occurred. Turn the power off, unplug the mains lead and leave the VCR to dry for over three hours. The VCR is plugged in but the display window remains dark.
Symptom Remedy The picture rolls vertically during picture search. • Adjust the vertical hold control on the TV or monitor. The picture has no u sound. C3 0. • The tape is defective. • If you made A^ connections, check the audio cable connection. • Adjust the tracking. The sound from a tape recorded with the VCR is • The video heads are dirty. Clean the video heads using the not in stereo or the Sony T-25CLD, E-25CLDR, or T-25CLW video head STEREO indicator in the cleaning cassette as explained above.
Symptom Remedy The SHOWVIEW menu or the MINUTERIE menu does not appear. • Check that OPTIONS PROG, in the FONCTIONS AVANCÉES menu is set correctly (see page 67), The VPS/PDC function does not operate properly. • Check that the clock and the date are set correctly. • Check that the VPS/PDC time you set is the correct one (there might he a mistake in the TV programme guide). If the hroadcast you wanted to record did not send the good VPS/PDC information, the VCR will not start recording.
Symptom 2 The Line Through 0) function does not £ Remedy • Set VEILLE ECO in the RÉGLAGES UTILISATEUR menu to NON (see page 65). o operate.
Specifications System Inputs and outputs Channel coverage SECAM (L): VHF F2toF10 UHF F21 to F69 CATV BtoQ HYPER S21 to S41 PAL (B/G): VHFE2toE12 VHF Italian channel A to H UHFE21 to E69 CATVS01to S05,S1toS20 HYPER S21 to S41 Aerial out 75-ohm asymmetrical aerial socket Tape speed SP: PAL 23.39 mm/s (recording/ playback) NTSC 33.35 mm/s (playback only) SECAM 23.39 mm/s (recording/ playback) MESECAM 23.39 mm/s (playback only) LP: PAL 11.70 mm/s (recording/ playback)* NTSC 16.
Dimensions including projecting parts and controls (w/h/d) Approx. 360 X 95 x 243 mm (SLV-SE220B) Approx. 430 X 96 x 242 mm (SLV-SE720B and SE620B) Approx. 430 X 96 x 251 mm (SLV-SE820B) Mass Approx. 2.8 kg (SLV-SE220B) Approx. 3.1 kg (SLV-SE820B, SE720B and SE620B) Supplied accessories Remote commander (1) R6 (size AA) batteries (2) Aerial cable (1) PERITEL cable (1) Design and specifications are subject to change without notice.
Index Adjusting picture 64 tracking 64 Aerial hookup 16 Audio dubbing 71 Audio track 61 Auto Clock Set 19 Auto Set Up 19 Language selection 19, 24 LP mode 38 Canal Plus 33 Changing the programme position 28 Changing the station name 31 Cleaning the video heads 72 Clock setting 21 Colour system compatible colour systems N M Manual fine tuning 27 Monaural 60 Monitoring during playback 60 during recording 60 NICAM broadcasts 59 Normal audio track 61 o Optional setting 66 2 setting 36 Connecting the VCR
Quick Start Guide I Connecting the VCR When all of the receivable channels are preset, the menu disappears from the TV screen. You can rearrange the programme position in any order (see “Changing/ disabling programme positions”). 3 Setting the clock 1.. 2.. 3.. 4.. . Press MENU, then press M/m/