Table of contents Operation Search Settings Search Index Handbook Digital HD Video Camera Recorder HDR-AS15/AS10 © 2012 Sony Corporation 4-432-600-13(1) US
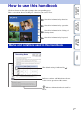
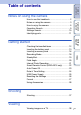
Table of contents How to use this handbook Click on a button on the right to jump to the corresponding page. This is convenient when searching for a function you want to view. Operation Search Search for information by operation. Settings Search Search for information in a listing of Settings items. Marks and notations used in this handbook Settings Search Index Search for information by keyword. Operation Search Table of contents Search for information by function.
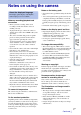
Notes on the battery pack About the displayed language The display panel displays only English. Other languages are not available. The camera may get warm due to continuous use, but it is not a malfunction. On the overheat protection Depending on the camera and battery temperature, you may be unable to record movies or the power may turn off automatically to protect the camera. A message will be displayed on the display panel before the power turns off or you can no longer record movies.
On wireless network function Settings Search Index • Only the HDR-AS15 is equipped with the Wi-Fi function. • The wireless network function built into this camera has been confirmed to conform with WiFi specifications set forth by the Wi-Fi Alliance (WFA). • Depending on the region, access to a wireless LAN may not be available, may require a separate service charge, or communications may be blocked or suffer from intermittent outages.
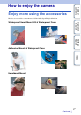
Enjoy more using the accessories Table of contents How to enjoy the camera Movies are recorded at a maximum of 1920×1080 30p full high definition.
You can directly upload images and share them by using the wireless network function of this camera (page 39). Operation Search Upload captured moments Table of contents Share your life Settings Search Connect to TV Index Connect the camera to a TV with a micro HDMI cable (sold separately), and enjoy images on the big screen (page 38).
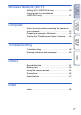
Notes on using the camera Index Checking the bundled items································ 12 Inserting the battery pack···································· 13 Inserting a memory card ····································· 16 Recording Mode·················································· 18 SteadyShot·························································· 19 Field Angle ·························································· 20 Interval Photo Recording····································· 21 Smart
Setting Wi-Fi (HDR-AS15 only)··························· 39 Copying data to a smartphone (HDR-AS15 only) ················································ 41 Useful functions when connecting the camera to your computer ····················································· 42 Preparing a computer (Windows)························ 43 Starting the “PlayMemories Home” software ······ 45 Settings Search Troubleshooting Operation Search Computer Table of contents Wireless Network (Wi-Fi) Troubleshooting ··
Shooting movies and photos Shooting ································································· 37 Changing the date, time and region Date & Time Setting············································ 24 Initializing settings Resetting the Settings ········································ 26 Viewing on TVs Viewing images on a TV···································· 38 Operating using a smartphone or tablet Smart Remote Control (HDR-AS15 only) ····· 22 Index Format ······························
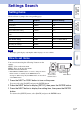
Table of contents Settings Search Setting items Click each item to jump to the corresponding page. Items Display Default setting VIDEO HQ (1920×1080/30P) SteadyShot STEDY ON Field Angle ANGLE 120° Interval Photo Recording LAPSE 5sec Smart Remote Control (HDR-AS15 only) RMOTE OFF Auto Power Off A.
A REC/access lamp B REC START/STOP button ENTER (Menu execute) button Table of contents Identifying parts C b HOLD switch*1 D Display panel F PREV button G NEXT button H Microphones Operation Search E Speaker I Lens J Connector cover K m (Mic) jack*2 M CHG (Charge) lamp N HDMI OUT jack O Settings Search L Expansion connector*3 (USB) jack P Battery pack/memory card cover Q Memory card insertion slot S Battery tray *1 Used to prevent accidental operation. Slide in the direction of b to lock.
Make sure that you have following bundled items. The number in parentheses indicates the quantity of that item bundled. • Camera (1) • Micro USB cable (1) Operation Search • Rechargeable battery pack (NP-BX1) (1) Table of contents Checking the bundled items • Battery tray, type X (only for NP-BX1) (1) Attached to the camera.
Table of contents Inserting the battery pack 1 Slide the Battery pack/memory card cover in the direction of the arrow, then open the cover. Operation Search 2 Pull out the battery tray from the camera, set the battery pack on the tray, then return it into the camera. Match the direction of v. Settings Search Pinch the tab and pull out. Index 3 Close the cover. z To set Auto Power Off function Select [A.OFF] from the [SETUP] screen, then set the Auto Power Off function.
Table of contents Charging the battery pack 1 Turn off the power of the camera. Charging is not possible when the camera is turned on. 2 Connect the camera to the computer that is turned on with the micro USB cable (supplied). CHG (Charge) lamp Operation Search The CHG (Charge) lamp lights up. Micro USB cable (supplied) Insert until fully seated Charging is complete when the CHG (Charge) lamp turns off (full charge) (page 53).
A remaining charge indicator appears on the upper right of the display panel. High Low Operation Search • The displayed remaining charge indicator may not be correct under certain circumstances. • It takes about one minute until the correct remaining charge indicator appears.
Table of contents Inserting a memory card 1 Slide the Battery pack/memory card cover in the direction of the arrow, then open the cover. Operation Search 2 Insert the memory card until it clicks. microSD card: Insert in the direction of A. “Memory Stick Micro (M2)” media: Insert in the direction of B. • When [WAIT] appears on the display panel, wait until the message disappears. • Insert a memory card directly in the correct orientation; otherwise, the camera will not recognize it.
Notes Table of contents Operation Search • In order to stabilize memory card operation, it is recommended that you format the memory card when you use it with the camera for the first time (page 27). All data recorded on the memory card will be erased by formatting, and cannot be recovered. • Save important data on the memory card on other media such as a computer, before formatting the memory card.
Setting display t Table of contents Recording Mode You can set the image resolution and frame rate for shooting movies. To make the setting, select [SETUP] first. 1 Press the NEXT button to display [SETUP], then press the ENTER button. If the camera turns off by the Auto Power Off function while setting, perform the procedure again from step 1. 3 Press the NEXT button to select the Recording Mode, then press the ENTER button.
Setting display t You can activate the camera-shake reduction when shooting. To make the setting, select [SETUP] first. Table of contents SteadyShot 1 Press the NEXT button to display [SETUP], then press the ENTER button. 3 Press the NEXT button to select the setting, then press the ENTER button. Operation Search 2 Press the NEXT button to display [STEDY] (SteadyShot), then press the ENTER button. Uses SteadyShot. Settings Search Does not use SteadyShot. Returns to the [STEDY] menu.
Setting display t You can change the field angle for recording. To make the setting, select [SETUP] first. Table of contents Field Angle 1 Press the NEXT button to display [SETUP], then press the ENTER button. 3 Press the NEXT button to select the setting, then press the ENTER button. Operation Search 2 Press the NEXT button to display [ANGLE] (Angle), then press the ENTER button. Records with a field angle of 170°. Settings Search Records with a field angle of 120°. Returns to the [ANGLE] menu.
Setting display t Table of contents Interval Photo Recording Once recording is started, the camera records photos continuously at regular intervals until recording is stopped. To make the setting, select [SETUP] first. 2 Press the NEXT button to display [LAPSE] (Interval), then press the ENTER button. Operation Search 1 Press the NEXT button to display [SETUP], then press the ENTER button. 3 Press the NEXT button to select the setting, then press the ENTER button.
Setting display t 1 Press the NEXT button to display [SETUP], then press the ENTER button. 2 Press the NEXT button to display [RMOTE] (Remote), then press the ENTER button. Operates by the smartphone. Settings Search 3 Press the NEXT button to select the setting, then press the ENTER button. Operation Search By connecting the camera and a smartphone through Wi-Fi, you can operate the camera by the smartphone. To make the setting, select [SETUP] first.
Setting display t You can change the setting of the Auto Power Off function. To make the setting, select [SETUP] first. Table of contents Auto Power Off 1 Press the NEXT button to display [SETUP], then press the ENTER button. 3 Press the NEXT button to select the setting, then press the ENTER button. Operation Search 2 Press the NEXT button to display [A.OFF] (Auto Power Off), then press the ENTER button. Turns the power off after about 10 seconds.
Setting display t You can set the year/month/day and region. To make the setting, select [SETUP] first. Table of contents Date & Time Setting 1 Press the NEXT button to display [SETUP], then press the ENTER button. 3 Press the NEXT button to select the desired date, time and region, then press the ENTER button to confirm. Select 00:00 for midnight, 12:00 for noon. Display Operation Search 2 Press the NEXT button to display [DATE] (Date Time), then press the ENTER button.
Setting display t When connecting the camera to a computer or USB device with the micro USB cable (supplied), the camera can be set so the connected device supplies power to it. To make the setting, select [SETUP] first. Table of contents USB Power Supply 1 Press the NEXT button to display [SETUP], then press the ENTER button. 3 Press the NEXT button to select the setting, then press the ENTER button.
Setting display t You can reset the settings to their defaults. If you activate [RESET], movies are not deleted. Table of contents Resetting the Settings 1 Press the NEXT button to display [SETUP], then press the ENTER button. 3 Press the ENTER button to display [SURE?] while [OK] is displayed, then press the ENTER button again. The camera automatically restarts when resetting is complete.
Setting display t Formatting is the process of deleting all movies in the memory card, and restoring the memory card to its initial state. To make the setting, select [SETUP] first. Table of contents Format 1 Press the NEXT button to display [SETUP], then press the ENTER button. 3 Press the ENTER button to display [SURE?] while [OK] is displayed, then press the ENTER button again. Operation Search 2 Press the NEXT button to display [FORMT] (Format), then press the ENTER button.
Table of contents Using Accessories The following explains how to use accessories that can be attached to this camera. Waterproof Case (SPK-AS1) By inserting the camera in the Waterproof Case, you can shoot movies in the rain or at a beach.
Table of contents 4 Insert the tab of the case cover into the slot of the case body. Operation Search 5 Hook the buckle over the tab on the lower part of the case cover 1, then close the buckle in the direction of 2, until it clicks into place. Notes Settings Search • You cannot operate the START/STOP button when the HOLD lever is set to the lock position. Release the lock before operation.
Notes on use Table of contents Operation Search • Do not throw the Waterproof Case into the water. • Avoid using the Waterproof Case under the following situations: – in a very hot or humid place. – in water hotter than 40°C (104°F). – at temperatures lower than 0°C (32°F). In these situations moisture condensation or water leakage may occur and damage the camera. • Do not leave the Waterproof Case under direct sunlight in a very hot and humid place for a long period of time.
Maintenance • To prevent deterioration of the O-ring, store the Waterproof Case in a cool, well-ventilated location. Do not fasten the buckle. • Prevent dust from collecting on the O-ring. • Avoid storing the Waterproof Case in a cold, very hot or humid place, or together with naphthalene or camphor, as these conditions might damage the Waterproof Case.
The Adhesive Mount is used for fixing the Waterproof Case to an item you intend to use. The Adhesive Mount is a general term for the Attachment Buckle, Flat Adhesive Mount, and Curved Adhesive Mount. Insert the camera in the Waterproof Case before attaching.
Notes Table of contents Operation Search • The Flat Adhesive Mount and Curved Adhesive Mount cannot be used again once they are detached from the location surface. • When detaching, peel off slowly. If peeled off forcibly, the surface on which the mount is fixed might be damaged. • Before attaching, check the surface of the item to be used. If it is dirty, or dust, moisture or oily substances are attached, adhesive strength may be impaired and the item could detach with slight impact.
The Handlebar Mount is used for fixing the Waterproof Case on the handlebar of a bicycle. Insert the camera in the Waterproof Case before attaching. For details, refer to the instruction manual of the Handlebar Mount (VCT-HM1) (sold separately). Table of contents Handlebar Mount (VCT-HM1) (sold separately) How to attach Operation Search Align the tripod screw hole of the Waterproof Case with the camera mounting screw of the cradle, then secure the Waterproof Case by turning the camera mounting knob.
The Waterproof Head Mount Kit is used for fixing the Waterproof Case to an item you intend to use. The Kit comprises of a Goggle Mount and a Headband. Insert the camera in the Waterproof Case beforehand. Table of contents Waterproof Head Mount Kit (VCT-GM1) (sold separately) Headband Goggle Mount Operation Search Buckle Cushion Settings Search Buckle lock Tripod screw Attachment method 1 Rotate the buckle lock in the direction of 1, then, open the buckle in the direction of 2.
You can fasten the camera to your head using the Headband Mount. Table of contents Headband Mount (BLT-HB1) (sold separately) Head strap Holder B Buckle lock Operation Search M5 coin screw Holder A Attachment method Index 2 Attach the camera to the Holder A 1, then close Holder B 2. Settings Search 1 Release the buckle lock 1 and open Holder B in the direction of 2. 3 Close the buckle lock. • The tilt of the holder can be adjusted by loosening the M5 coin screw.
Display About the b HOLD switch The b HOLD switch can prevent accidental operation. Slide the b HOLD switch in the direction of b to lock. To release the lock, slide it in the opposite direction of b. Before recording, release the lock. If you lock the camera while recording, the recording state will be kept*. If you lock the camera after you stop recording, the stopped state will be kept*. Release the lock to change the setting.
Display Connect the camera to a TV which has an HDMI terminal using a micro HDMI cable (sold separately). Refer also to the instruction manuals of the TV. Table of contents Viewing images on a TV 1 Turn off both the camera and the TV. Operation Search 2 Open the connector cover and connect the camera to the TV with the micro HDMI cable (sold separately). HDMI jack Settings Search 1 To HDMI jack Micro HDMI cable (sold separately) 2 To HDMI OUT jack 3 Set the input of the TV to [HDMI input].
Setting display Items to be prepared before setting • Sticker attached to the Operating Guide of the camera (ID/password described) • Your smartphone Operation Search You can operate the camera by a smartphone, or transfer and display images onto a smartphone. To operate the camera by a smartphone, see page 22 for details. To transfer and display images onto a smartphone, download the application “PlayMemories Mobile” (designed for smartphones) from the application store.
1 2 3 Connect the camera to a computer with the micro USB cable (supplied). Turn on the power. Display [Computer] t [PMHOME] t [INFO] t [WIFI_INF.TXT] on your computer, then check the user ID and password.
You can copy movies and photos shot by the camera to a smartphone. Table of contents Copying data to a smartphone (HDR-AS15 only) 1 Press the NEXT button to turn on the camera. 3 Press the ENTER button to display [PREP], then Wi-Fi is activated. Wi-Fi connection status (automatic display) [PREP] (prepare for connecting) t [AWAIT] (await connecting) When [READY] appears, data can be copied from the camera to the smartphone by operating the smartphone.
The “PlayMemories Home” software allows you to import images in the camera to your computer and play them on the computer easily. Visit the following URL to install the software. http://www.sony.net/pm Importing images Operation Search For Windows Table of contents Useful functions when connecting the camera to your computer Playback Settings Search Index • Use the micro USB cable (supplied) when connecting the camera to your computer.
Step 1 Checking the computer system Microsoft Windows XP SP3/Windows Vista SP2/Windows 7 SP1 CPU*2 Intel Core Duo 1.66 GHz or faster, or Intel Core 2 Duo 1.66 GHz or faster Memory Windows XP: 512 MB or more (1 GB or more is recommended) Windows Vista/Windows 7: 1 GB or more Hard disk Disk space required for installation: Approximately 500 MB Display Minimum 1,024×768 dots Others USB port (this must be provided as standard, Hi-Speed USB (USB 2.
To delete the USB connection Table of contents Windows7 1 Click on the task tray. 2 Click the disconnect icon in Customize. 3 Click the device to remove. Disconnect icon Operation Search Windows Vista/Windows XP Perform the procedures from step 1 to 3 below before: • Disconnecting the micro USB cable (supplied). • Turning off the camera. 1 Double-click the disconnect icon on the task tray. (USB Mass Storage Device) t [Stop].
1 Double-click the “PlayMemories Home” icon on the computer screen. Table of contents Starting the “PlayMemories Home” software The “PlayMemories Home” software starts up. Operation Search 2 Double-click the ““PlayMemories Home” Help Guide” short-cut icon on the computer screen to see how to use “PlayMemories Home.” • If the icon is not displayed on the computer screen, click [Start] t [All Programs] t [PlayMemories Home] t the desired item.
If you experience trouble with the camera, try the following solutions. 1 Check the items on pages 47 to 50. Table of contents Troubleshooting 2 Turn the power off and then on again. Operation Search 3 Consult your Sony dealer or local authorized Sony service facility.
Cannot turn on the camera. • Attach a charged battery pack. • Make sure that the battery pack is inserted correctly (page 13). Table of contents Battery pack and power The power turns off suddenly. Operation Search • Depending on the camera and battery temperature, the power may turn off automatically to protect the camera. In this case, a message is displayed on the display panel before the power turns off.
Cannot insert dates on images. Viewing images Table of contents • The camera does not have a feature for superimposing dates on images. Cannot play back images. The image does not appear on the TV. • Check whether the connection is correct (page 38). Operation Search • The folder/file name has been changed on your computer. • Connect a micro HDMI cable (sold separately). Computers • When the battery level is low, charge the camera. • Turn on the camera and connect to a computer.
The lens gets fogged. • Moisture condensation has occurred. Turn off the camera and wait about an hour for the moisture to evaporate. Table of contents Others The camera becomes warm when you use it for a long time. • This is not a malfunction. • Set the date and time again (page 24). Operation Search The date or time is incorrect.
If the following messages appear, follow the instructions. ERROR • Turn the power off and then on again. Operation Search • The battery level is low. Charge the battery pack immediately. Table of contents Warning indicators and messages HEAT NoIMG Settings Search • The camera temperature has risen. The power may turn off automatically, or you may be unable to record images. Leave the camera in a cool location until the temperature goes down.
Estimated duration of recording and playback for each battery pack Table of contents Recordable time Recording time (Units: minutes) Battery pack Continuous recording time Typical recording time Image quality NP-BX1 (supplied) HQ 140 VGA 185 HQ 80 VGA 110 NP-BG1/FG1 105 145 60 85 Playing time Settings Search • Times measured when using the camera at 25°C (77°F). It is recommended that you use the camera from 10°C to 30°C (50°F to 86°F).
(unit: image) 8GB 2M (16:9) 10500 16GB 21000 32GB 40000 Note • The unique pixel array of the Sony ClearVid CMOS Sensor, and the image processing system BIONZ, allow the still image resolution equivalent to the sizes described. Operation Search • When using a Sony memory card. • The number of recordable photos for the memory card shown is for the maximum image size for your camera. The actual number of recordable photos is displayed on the LCD screen during shooting.
On charging the battery pack Operation Search • Charge the battery pack before using the camera for the first time. • We recommend charging the battery pack in an ambient temperature of between 10°C to 30°C (50°F to 86°F) until the CHG (Charge) lamp turns off. The battery pack may not be effectively charged in temperatures outside this range. • The CHG (Charge) lamp may lights up in the following situation: – Battery pack is not attached correctly. – Battery pack is damaged.
On TV color systems To view images shot by the camera on a TV, you need a TV (or monitor) with an HDMI jack and a micro HDMI cable (sold separately).
Do not use/store the camera in the following places Operation Search • In an extremely hot, cold or humid place In places such as in a car parked in the sun, the camera body may become deformed and this may cause a malfunction. • Under direct sunlight or near a heater The camera body may become discolored or deformed, and this may cause a malfunction. • In a location subject to strong vibration • Near strong magnetic fields • In sandy or dusty places Be careful not to let sand or dust get into the camera.
How to avoid moisture condensation Notes on optional accessories Table of contents When you bring the camera from a cold place into a warm place, put the camera in a plastic bag and seal it tightly. Remove the bag when the air temperature inside the plastic bag has reached the ambient temperature (after about 1 hour). • Genuine Sony accessories may not be available in some countries/regions.
Camera [System] Index Corresponding standard: IEEE 802.11/b/g/n/ HDMI OUT jack: HDMI micro connector USB jack: micro-B/USB2.0 Hi-Speed (massstorage) [Accessories] Power requirements: Rechargeable battery pack 3.6 V (NP-BX1 (supplied)), Rechargeable battery pack 3.6 V (NP-BG1/ FG1) USB 5.0 V USB charging: DC 5.0 V, 500 mA/600 mA Charging time: Via a computer NP-BX1 (supplied): Approx. 245 min NP-BG1/NP-FG1: Approx. 185 min Via a AC-UD20 (sold separately) NP-BX1 (supplied): Approx.
Table of contents Operation Search Settings Search Index Mass: Approx. 14 g (0.5 oz) Curved Adhesive Mount Dimensions: Approx. 50.0 mm × 16.0 mm × 58.5 mm (2 in. × 21/32 in. × 2 3/8 in.) (W/H/D, excluding protrusions) Mass: Approx. 16 g (0.6 oz) Waterproof Head Mount Kit (VCT-GM1) (sold separately) Goggle Mount Dimensions: Approx. 53.0 mm × 81.5 mm × 63.5 mm (2 1/8 in. × 3 1/4 in. × 2 1/2 in.) (W/H/ D, not including a Headband) Mass: Approx. 69 g (2.4 oz) (not including a Headband) Headband Length: Approx.
Trademarks Settings Search Index The software that is eligible for the following GNU General Public License (hereinafter referred to as “GPL”) or GNU Lesser General Public License (hereinafter referred to as “LGPL”) are included in the camera. This informs you that you have a right to have access to, modify, and redistribute source code for these software programs under the conditions of the supplied GPL/LGPL. Source code is provided on the web. Use the following URL to download it.
A RMOTE ................................................................................22 A.OFF ....................................................................................23 S ANGLE .................................................................................20 Table of contents Index SEND .....................................................................................39 Settings ..................................................................................10 Battery pack .....