3-862-854-11 (1) Cordless Telephone with Answering System Operating Instructions EN Manual de instrucciones ES SPP-A945 ©1998 by Sony Corporation
Owner’s Record The model and the serial numbers are located at the bottom of the unit. Record the serial number in the space provided below. Refer to these numbers whenever you call upon your Sony dealer regarding this product. Model No. SPP-A945 Serial No. ________________ IMPORTANT SAFETY INSTRUCTIONS 2EN When using your telephone equipment, basic safety precautions should always be followed to reduce the risk of fire, electric shock and injury to persons, including the following: 1.
may result in damage and will often require extensive work by a qualified technician to restore the product to normal operation. E. If the product has been dropped or the cabinet has been damaged. F. If the product exhibits a distinct change in performance. 13. Avoid using a telephone (other than a cordless type) during an electrical storm. There may be a remote risk of electric shock from lightning. 14. Do not use the telephone to report a gas leak in the vicinity of the leak.
If your telephone is equipped with automatic dialers When programming emergency numbers and (or) making test calls to emergency numbers: 1. Remain on the line and briefly explain to the dispatcher the reason for the call. 2. Perform such activities in the off-peak hours, such as early morning or late evenings. Note This equipment has been tested and found to comply with the limits for a Class B digital device, pursuant to Part 15 of the FCC Rules.
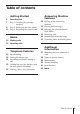
Table of contents Getting Started 6 7 Read this first Step 1: Checking the package contents 8 Step 2: Setting up the base phone 11 Step 3: Preparing the battery pack Basics 13 Making calls 15 Receiving calls Telephone Features 16 Speed dialing 19 Setting the ringer type 21 Switching the phones during a call 23 Talking between the handset and the base phone (Intercom) 24 Having a three-way conference Answering Machine Features 25 Setting up the answering machine 31 Playing back messages 33 Selecting the
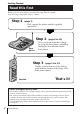
Getting Started Read this first Before you use your phone, you must set it up. Here is a quick way to set up your phone: Step 1, 2 and 3. Step 1 (page 7) First, unpack the phone and the supplied accessories. Step 2 (page 8 to 10) Next, you need to do three things to set up the base phone, including finding the best location for the base phone. Base phone Step 3 (page 11 to 12) Finally, you need to insert the battery pack into the handset and charge it for more than 8 hours.
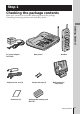
Step 1 Checking the package contents Make sure you have received the following items in the package. If anything is missing, contact your local Sony dealer.
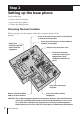
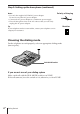
Step 2 Setting up the base phone Do the following: • Choose the best location • Connect the base phone • Choose the dialing mode Choosing the best location Where you place the base phone affects the reception quality of the handset.
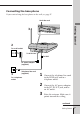
Connecting the base phone If you want to hang the base phone on the wall, see page 37. Hook the cord. Getting Started 3 2 To an AC outlet To DC IN 10 V To LINE AC power adaptor (supplied) 1 Telephone line cord (supplied) 1 To a telephone outlet 2 3 Connect the telephone line cord to the LINE jack, and to a telephone outlet. Connect the AC power adaptor to the DC IN 10 V jack, and to an AC outlet. Raise the antenna. Make sure it points toward the ceiling.
Step 2: Setting up the base phone (continued) Notes • Use only the supplied AC-T105 AC power adaptor. Do not use any other AC power adaptor. • Connect the AC power adaptor to a continuous power supply. • Place the base phone close to the AC outlet so that you can easily unplug the AC power adaptor. Polarity of the plug – Tip If your telephone outlet is not modular, contact your telephone service company for assistance.
Step 3 Preparing the battery pack Insert the battery pack into the handset, then place the handset on the base phone. 2 3 4 Slide open the battery compartment lid of the handset. Getting Started 1 Insert the battery pack (with contacts facing down) into the battery compartment. Close the battery compartment lid. Place the handset on the base phone. The CHARGE lamp lights up when the handset is properly seated on the charge terminals of the base phone.
Step 3: Preparing the battery pack for the handset (continued) Battery duration A fully charged battery pack lasts for about: • 7 hours when you use the handset continuously. • 7 days when the handset is in standby mode. Battery life may vary depending on usage condition and ambient temperature. Notes • The CHARGE lamp of the base phone is always lighted when the handset is placed on the base phone, even if the battery pack has been fully charged. • The battery works best when charged after several calls.
Basics Making calls 1 Press (TALK/FLASH). The TALK lamp lights up, then you will hear a dial tone. If you hear beeps, move closer to the base phone. TALK lamp VOL switch (HOLD) (REDIAL) (CHANNEL) (OFF) or replace the handset on the base phone. The TALK lamp goes off. Basics (*TONE) 2 Dial the phone number. 3 When you are done talking, press Additional tasks To Do this Put a call on hold Press (HOLD). The TALK lamp flashes slowly. Press (TALK/FLASH) to resume the conversation.
Making calls (continued) Making calls through the speakerphone (REDIAL/PAUSE) Press (SPEAKERPHONE) on the base phone. The SPEAKERPHONE lamp lights up. ”- -” lights up on the display. Dial the phone number. To adjust the speaker volume, press (VOLUME +/–). When you are done talking, press (SPEAKERPHONE) again. (VOLUME +/–) (SPEAKERPHONE) To obtain the best speakerphone performance • You may not be able to hear the other party's voice in a noisy place. Use the speakerphone in a quiet room.
Receiving calls 1 When the phone rings: • Press (TALK/FLASH) (or any button except (OFF)). or • Pick up the handset from the base phone when the handset is placed on the base phone. TALK lamp The TALK lamp and the IN USE lamp on the base phone light up at the same time. (TALK/FLASH) (HOLD) (OFF) or replace the handset on the base phone. Basics 2 When you are done talking, press The TALK and IN USE lamps go off. Additional tasks To Do this Put a call on hold Press (HOLD).
Telephone Features Speed dialing You can dial with a touch of a few keys by storing a phone number on a dialing key. You can store up to 10 phone numbers separately on the handset and on the base phone. Storing phone numbers 1 Press (PGM). The TALK lamp flashes quickly. 2 Press a dialing key ((0) to (9)) to select the destination for the phone number. You will hear a confirmation beep. TALK lamp 3 Enter the phone number you want to store.
Storing phone numbers on the base phone 1 Press (PGM). The SPEAKERPHONE lamp flashes quickly. 2 Press a dialing key ((0) to (9)) to select the destination for the phone number. You will hear a confirmation beep. 3 Enter the phone number you want to store. You can enter up to 16 digits, including a tone and a pause, each of which is counted as one digit. (REDIAL/PAUSE) You will hear another confirmation beep, and the number is stored.
Speed dialing (continued) To store a number to be dialed via Private Branch Exchange (PBX) Before entering a phone number in step 3 on the previous page, do as follows: 1 2 Enter the outside line access digit (e.g. 9). Press (REDIAL/PAUSE). To change a stored number Store a new number by following the instructions on the previous page. To clear a number from memory 1 Press (PGM). 2 3 Press the speed dialing key you want to clear. Press (SPEED DIAL).
Setting the ringer type You can select a ringer from four types. 1 Press (PGM). 2 Press (#). 3 Press a number button, (1) to (4), to select a ringer type. You will hear the corresponding ringer tone. (1)–(5) 4 Press (OFF). (0) Telephone Features Turning off the ringer of the handset 1 2 3 4 Press (PGM). Press (#). Press (5). Press (OFF). The ringer on the handset is turned off. To turn the ringer on again Follow the instructions described in “Setting the ringer type.
Setting the ringer type (continued) Checking the ringer type 1 2 3 Press (PGM). Press (#). Press (0). The currently selected ringer sounds. 4 Press (OFF). Note If you hear no sound (only key beep), the ringer on the handset has been turned off. Adjusting the ringer volume level of the base phone Set the RINGER LEVEL switch on the base phone to HIGH or LOW. To turn the ringer off, set it to OFF.
Switching the phones during a call When you put a call on hold, you can return to the call on the other phone without disconnecting the call. To switch from the base phone to the handset 1 Press (HOLD) on the base phone. The SPEAKERPHONE lamp and the TALK lamp on the handset will flash slowly. 2 Press (TALK/FLASH) or pick up the handset. 3 When you are done talking, press (OFF) or replace the handset to the base phone. Telephone Features The TALK lamp will light up.
Switching the phones during a call (continued) To switch from the handset to the base phone 1 Press (HOLD) on the handset. The TALK lamp will flash slowly. 2 Press (SPEAKERPHONE). The SPEAKERPHONE lamp will light up. ”- -” lights up on the display. The TALK lamp will repeat sets of two flashes. 3 When you are done talking, press (SPEAKERPHONE) again.
Talking between the handset and the base phone (Intercom) You can talk between the base phone and the handset. You can start the intercom from either phone. To talk from the handset to the base phone (TALK/FLASH) (OFF) (INTERCOM) Press (INTERCOM) on the handset. After the base phone rings once, you will be connected automatically. When a person at the base phone answers, you can talk. The INTERCOM lamp on the handset and the base phone will light up. When you are done talking Press (OFF).
Having a three-way conference The handset and the base phone operate like two extensions on the same line. Both phones can operate at the same time, so that you, the outside caller, and the person at the other phone can engage in a threeway conversation. To join the phone conversation Press (TALK/FLASH). (OFF) If you are at the base phone, press (SPEAKERPHONE). (SPEAKERPHONE) When you are done talking Press (OFF) on the handset/(SPEAKERPHONE) on the base phone, respectively.
Answering Machine Features Setting up the answering machine Setting the time and day of the week 1 Press (MENU) repeatedly until (PLAY/STOP) you hear “Set day and time.” ”- -” blinks on the display. 2 Press (SELECT) repeatedly to select the day of the week. 3 Press (TIME/SET). The day is set and the hour is announced. select the hour. 5 Press (TIME/SET). The hour is set and the minute is announced. 6 Press (SELECT) repeatedly to select the minute.
Setting up the answering machine (continued) Tip All the mailbox buttons ((MAILBOX 1), (MAILBOX 2), and (MAILBOX 3)) work as the (PLAY/STOP) button; press any of the three in this case. To hear the current time Press (TIME/SET). The current time setting is announced. Recording the greeting You can record your own greeting for the “normal” and “announcement only” modes (page 33). (ERASE) 1 Press (MENU) repeatedly until “Set out-going message” is announced. “- -“ blinks on the display.
To check the greeting Press (MENU) repeatedly until “Set out-going message” is announced. Then press (PLAY/STOP) to play back the greeting. To change the greeting Record a new greeting by following the instructions on the previous page. The new greeting replaces the old one. To erase the greeting 1 Press (MENU) repeatedly until “Set out-going message” is announced. 2 Press (ERASE). Answering Machine Featues Notes • You can also erase the greeting during playback.
Setting up the answering machine (continued) Setting the number of rings You can select the number of times the phone rings before it answers to take a message. There are four modes: 2, 4, 6, and Toll Saver. 1 Press (MENU) repeatedly until you hear “Set number of rings.” “- -“ blinks on the display. 2 Press (SELECT) repeatedly to select a ring duration (2, 4, 6, or Toll Saver). To answer after 2 rings, select “2.” To answer after 4 rings, select “4.” To answer after 6 rings, select “6.
Setting the audible message alert You have the option of having a beep tell you if you have received any new incoming messages. ∗ 1 Press (MENU) until you hear “Set audible message alert.” “- -“ blinks on the display. 2 Press (SELECT) to set the audible message alert on or off. 3 Press (TIME/SET). The setting is announced. 4 Press (PLAY/STOP) to exit the menu setup mode.
Setting up the answering machine (continued) Turning on the answering function Message counter Press (ANSWER ON/OFF) on the base phone. The (ANSWER ON/OFF) button lights up. (ANSWER ON/OFF) When a caller calls The caller can choose one of two ways to leave a message: • Wait until the greeting finishes, then start recording a message. (By default, the message goes into box 1).
Playing back messages If there are new messages, the display flashes the number of new messages. You will hear beeps if the audible message alert setting is on (see page 29). (SKIP/QUICK) (REPEAT) (ERASE) Press a mailbox button ((MAILBOX 1), (MAILBOX 2), or (MAILBOX 3)) to play back new messages in the selected mailbox. Note If a call comes in, the playback will stop. Additional tasks when playing back messages To Do this Stop playback Press a mailbox button ((MAILBOX 1), (MAILBOX 2), or (MAILBOX 3)).
Playing back messages (continued) Adjusting the speaker volume To adjust the speaker volume, press (VOLUME +/–). (VOLUME +/–) Notes • When you have reached the minimum or maximum volume level, you will hear three short beeps. • You cannot adjust the speaker volume while the phone is ringing. Tip There are 8 steps for the volume level (1 to 8). The volume level is preset to 4. Erasing messages 1 Press and hold (ERASE) for more than 2 seconds.
Selecting the Announcement Only Mode You can set the answering machine to play the greeting without recording incoming messages (Announcement only mode). You might want to select this mode when, for example, you expect to be away for a while and you cannot pick up messages. 1 Press (MENU) repeatedly until you hear “Set announce only.” 2 Press (SELECT) to set the announcement only mode on or off. 3 Press (TIME/SET). The setting is announced.
Recording a memo message You can leave messages for other users of the unit. 1 Press (REC/MEMO). 2 Press a mailbox button ((MAILBOX 1), (MAILBOX 2), or (MAILBOX 3)) to which you want to leave the message. “Now recording” is announced and counting starts. 3 Speak into the base phone microphone (MIC) to record your message. A memo can be up to four minutes in length. 4 Press (PLAY/STOP) to stop recording. The message number on the display increases by one.
Operating from an outside phone Setting your security code To operate the answering machine from a touch-tone phone while you are away from home, you need to set your security code. 1 Press (MENU) repeatedly until you hear “Set security code.” 2 Press (SELECT) to change the security code setting. 3 Press (TIME/SET) to confirm your choice. The new security code is announced. menu setup mode. Note Press and hold (SELECT) to increase the security code by 10.
Operating from an outside phone (continued) Picking up new messages 1 2 3 4 Call your telephone number from a touch-tone phone. When you hear the greeting, press (#) and enter your security code. A confirmation beep sounds. The number of new messages will be announced. Press the keys in the “Table of control codes” below for the desired operation command. When you are finished, disconnect the line. Notes • Do not let two seconds elapse between each digit of the security code and the control code.
Additional Information Mounting the base phone on a wall 1 Remove the hang-up tab and Hang-up tab replace it upside down. Telephone line cord 2 Attach the AC power adaptor cord and the telephone line cord to the wall bracket. Wall bracket AC power adaptor cord 3 Hook the wall bracket to the wall plate, and plug the telephone line cord into the telephone outlet.
Notes on power sources On battery pack • Store the battery pack at a temperature between 41°F (5°C) and 95°F (35°C) for best performance. • If you do not use the handset for a long period of time, remove the battery pack after charging for more than 8 hours. On power failure During a power interruption, you cannot make or receive calls, and you cannot use the answering machine. Maintenance • Clean the cabinets with a soft cloth slightly moistened with water or a mild detergent solution.
Troubleshooting If you experience any of the following difficulties while using your phone, use this troubleshooting list to help you remedy the problem. Should any problem persist, consult your nearest Sony dealer. Symptom Remedy During conversation You hear no dial tone. • Make sure the telephone line cord is securely connected to the telephone outlet. • Make sure the battery is fully charged (page 11). The telephone does not connect • Make sure the dialing mode is set correctly (page 10).
Answering machine Intercom Speed dialing Troubleshooting (continued) Symptom Remedy You cannot store a speed dialing number. • Make sure you follow the procedure in storing the number correctly (page 16, 17). • When the handset is in use, you cannnot store a speed dialing number on the base phone. When the base phone is in use, you cannot store a speed dialing number on the handset.
Power source Symptom Remedy The CHARGE lamp does not light up when you place the handset on the base phone. • Wipe the charge terminals of the base phone and the handset with a soft cloth or paper for better contact of the charge terminals. • Make sure the handset is placed on the base phone properly. The CHARGE lamp flashes continuously. • Place the base phone away from noise sources (page 8). • Clean the terminal on the base phone and the handset with a dry, soft cloth.
Specifications General Answering machine Operating frequency 900 MHz ISM bands/10 channels Dial signal Tone, 10 PPS (pulse) selectable Supplied accessories See page 7. Maximum recording time About 18 minutes, using incorporated IC Greeting message Up to 90 seconds per each Incoming and Memo message Up to 4 minutes per message Handset Power source Rechargeable battery pack BP-T23 Battery life Talk time: Approx. 7 hours Standby: Approx. 7 days Dimensions Approx.
Index A Adjusting volume handset volume 13 ringer volume 20 speaker volume 14, 15, 32 Announcement only mode 33 Answering machine playing back messages 31 setting up 25 turning on 30 Audible message alert 29 B Battery pack charging 11 duration 12 I, J, K S Intercom 23 Screening calls 33 Security code (to operate from an outside phone) 35 Setting up answering machine 25 base phone 8 handset 11 Speakerphone 14, 15 Speed dialing 16 Stamping day and time to messages 25, 31 Switching phones during a call 21
Registro del propietario Los números de modelo y de serie se encuentran en la parte inferior del teléfono. Anote el número de serie en el espacio que se proporciona a continuación. Refiérase a estos números cada vez que se comunique con su distribuidor Sony con respecto al producto.
12. Desconecte este producto de la línea telefónica y refiera el servicio a personal de servicio calificado bajo las siguientes condiciones: A. Cuando el cable eléctrico o el enchufe se encuentra dañado o deshilachado. B. Si se ha derramado líquido dentro del producto. C. Si el producto ha estado expuesto a lluvia o agua. D. Si el producto no opera normalmente al seguir las instrucciones de operación.
6. La compañía telefónica puede realizar cambios en sus instalaciones, equipos, operaciones, o procedimientos que pueden afectar la operación del equipo. Cuando suceda esto, la compañía telefónica le avisará con antelación para que usted realice las modificaciones necesarias para mantener ininterrumpido el servicio. Nota 8. Todas las reparaciones deberá realizarlas un centro de reparaciones Sony.
Índice Preparativos 6 7 En primer lugar, lea esto Paso 1: Comprobación del contenido del paquete 8 Paso 2: Instalación del teléfono base 11 Paso 3: Preparación de la batería Operaciones básicas 13 Realización de llamadas 15 Recepción de llamadas Caracteristicas del teléfono 16 Marcación abreviada 19 Ajuste del tipo de generador de llamada 21 Cambio de teléfono durante una llamada 23 Conversación entre el microteléfono y el teléfono base (Intercomunicación) 24 Conferencia tripartita Funciones del contest
Preparativos En primer lugar, lea esto Antes de utilizar su teléfono, tendrá que instalarlo. A continuación se indica una forma de instalar rápidamente su teléfono: Pasos 1, 2, y 3. Paso 1 (página 7) En primer lugar, desembale el teléfono y los accesorios suministrados. Paso 2 Teléfono base (página 8 a 10) A continuación, tendrá que realizar tres cosas para instalar el teléfono base, incluyendo la elección del lugar adecuado para el mismo.
Paso 1 Comprobación del contenido del paquete Compruebe si el paquete contiene los componentes siguientes. Si falta alguno, póngase en contacto con su proveedor Sony.
Paso 2 Instalación del teléfono base Realice lo siguiente: • Elija el lugar más adecuado • Conecte el teléfono base • Seleccione el modo de marcación Elección del lugar más adecuado El emplazamiento del teléfono base influirá en la calidad de recepción del microteléfono.
Conexión del teléfono base Si desea colgar el teléfono base en una pared, consulte la página 37. Enganche el cable Preparativos 3 2 a un tomacorriente de CA a DC IN 10 V a LINE Adaptador de alimentación de CA (suministrado) 1 Cable de línea telefónica (suministrado) 1 a la toma modular para teléfono 2 3 Conecte el cable de línea telefónica a la toma LINE, y a una toma modular para teléfono. Conecte el adaptador de alimentación de CA a la toma DC IN 10 V, y a un tomacorriente de CA.
Paso 2: Instalación del teléfono base (continuación) Notas Polaridad de la clavija • Utilice solamente el adaptador de alimentación de CA AC-T105 suministrado. – + No use ningún otro adaptador de alimentación de CA. • Conecte el adaptador de alimentación de CA a un tomacorriente que suministre constantemente alimentación. Toma • Coloque el teléfono base cerca de un tomacorriente de CA a fin de poder modular desenchufar fácilmente el adaptador de alimentación de CA.
Paso 3 Preparación de la batería Inserte la batería en el microteléfono, y después coloque éste en el teléfono base. 2 3 4 Deslice la tapa del compartimiento de la batería del microteléfono. Preparativos 1 Inserte la batería (con los contactos encarados hacia abajo) en el compartimiento para la misma. Cierre la tapa del compartimiento de la batería. Coloque el microteléfono en el teléfono base.
Paso 3: Preparación de la batería para el microteléfono (continuación) Duración de la batería Una batería completamente cargada durará: • 7 horas utilizando continuamente le microteléfono. • 7 días con el microteléfono en el modo de espera. La duración de la batería variará de acuerdo con las condiciones de utilización y la temperatura ambiental.
Operaciones básicas Realización de llamadas 1 Presione (TALK/FLASH). Lámpara TALK Control VOL (HOLD) La lámpara TALK se encenderá, y usted oirá el tono de invitación a marcar. Si oye pitidos, acérquese al teléfono base. (REDIAL) (*TONE) presione (OFF) o coloque el microteléfono en el teléfono base. La lámpara TALK se apagará. Tareas adicionales Para Realice lo siguiente poner una llamada en espera Presione (HOLD). La lámpara TALK parpadeará lentamente.
Realización de llamadas (continuación) Realización de llamadas con la función de interfono Presione (SPEAKERPHONE) del teléfono base. (REDIAL/PAUSE) La lámpara SPEAKERPHONE se encenderá. En el visualizador aparecerá “- -”. Marque el número de teléfono. Para ajustar el volumen del altavoz, presione (VOLUME +/–). Cuando haya terminado de hablar, vuelva a presionar (SPEAKERPHONE).
Recepción de llamadas 1 Cuando oiga sonar el teléfono: • Presione (TALK/FLASH) (o cualquier botón excepto (OFF)). o • Descuelgue el microteléfono del teléfono base cuando esté colocado en él. Lámpara TALK La lámpara TALK parpadeará y se encenderá al mismo tiempo la lámpara IN USE del teléfono base. (TALK/FLASH) (HOLD) presione (OFF) o coloque el microteléfono en el teléfono base. Las lámparas TALK e IN USE se apagarán.
Caracteristicas del teléfono Marcación abreviada Usted podrá marcar presionando unas pocas teclas después de haber almacenado números de teléfono en el teclado. Usted podrá almacenar hasta 10 números de teléfono separadamente en el microteléfono y en el teléfono base. Almacenamiento de números de teléfono 1 Presione (PGM). La lámpara TALK parpadeará rápidamente. 2 Presione la tecla de marcación ((0) a Lámpara TALK (9)) en la que desee almacenar el número de teléfono de destino.
Almacenamiento de números en el teléfono base 1 Presione (PGM). La lámpara SPEAKERPHONE parpadeará rápidamente. 2 Presione la tecla de marcación ((0) a (9)), en la que desee almacenar el número de teléfono. Oirá un pitido de confirmación. 3 Introduzca el número de teléfono que desee almacenar. (REDIAL/PAUSE) Usted podrá introducir hasta 16 dígitos, incluyendo un tono y una pausa, que se contarán cada uno como un dígito más. Usted oirá otro pitido de confirmación, y el número se almacenará.
Marcación abreviada (continuación) Para almacenar un número de teléfono que desee marcar a través de una centralita privada (PBX) Antes de introducir el número de teléfono en el paso 3 de la página anterior, realice lo siguiente: 1 2 Introduzca el número de acceso a la línea interurbana (p. ej., 9). Presione (REDIAL/PAUSE). Para cambiar un número almacenado Para almacenar un nuevo número, siga las instrucciones ofrecidas en la página anterior. Para borrar un número de la memoria 1 Presione (PGM).
Ajuste del tipo de generador de llamada Usted podrá seleccionar uno de cuatro tipos de generador de llamada. 1 Presione (PGM). 2 Presione(#). 3 Presione una tecla numérica (1)–(5) (1) a (4), para seleccionar el tipo de generador de llamada. Usted oirá el tono del generador de llamada correspondiente. 4 Presione (OFF). (0) Caracteristicas del teléfono Desactivación del generador de llamada del microteléfono 1 2 3 4 Presione (PGM). Presione (#). Presione (5). Presione (OFF).
Ajuste del tipo de generador de llamada (continuación) Comprobación del tipo de generador de llamada 1 2 3 Presione (PGM). 4 Presione (OFF). Presione (#). Presione (0). Sonará el generador de llamada seleccionado. Nota Si no oye sonido (solamente el pitido de teclas), el generador de llamada del teléfono base estará desactivado. Ajuste del nivel del volumen del generador de llamada del teléfono base Ponga el selector RINGER LEVEL del teléfono base en HIGH o LOW.
Cambio de teléfono durante una llamada Cuando ponga una llamada en espera, podrá volver a ella a través del otro teléfono sin desconectarla. Para cambiar del teléfono base al microteléfono 1 Presione (HOLD) del teléfono base. Las lámparas SPEAKERPHONE y TALK del microteléfono parpadearán lentamente. descuelgue el microteléfono. La lámpara TALK se encenderá. La lámpara SPEAKERPHONE se apagará y se encenderá la lámpara IN USE.
Cambio de teléfono durante una llamada (continuación) Para cambiar del microteléfono al teléfono base 1 Presione (HOLD) del microteléfono. La lámpara TALK parpadeará lentamente. 2 Presione (SPEAKERPHONE). La lámpara SPEAKERPHONE se encenderá. En el visualizador aparecerá “- -”. La lámpara TALK repetirá juegos de dos parpadeos. 3 Cuando haya terminado de hablar, vuelva a presionar (SPEAKERPHONE).
Conversación entre el microteléfono y el teléfono base (Intercomunicación) Usted podrá conversar entre el teléfono base y el microteléfono. Usted podrá iniciar la intercomunicación desde cualquiera de los teléfonos. Para conversar desde el microteléfono al teléfono base (TALK/FLASH) (OFF) (INTERCOM) Presione (INTERCOM) del microteléfono. Después de que el teléfono base haya sonado una vez, usted se conectará automáticamente. Cuando responda alguien en el teléfono base, podrá conversar.
Conferencia tripartita El microteléfono y el teléfono base funcionan como dos extensiones de la misma línea. Ambos teléfonos podrán trabajar al mismo tiempo, motivo por el que usted, el que llama, y la persona del otro teléfono podrán entablar una conversación tripartita. Para unirse a una conversación telefónica Presione (TALK/FLASH). (OFF) Si usted se encuentra en el teléfono base, presione (SPEAKERPHONE).
Funciones del contestador de llamadas Configuración del contestador de llamadas Ajuste de la hora y el día de la semana 1 Presione (MENU) hasta que (PLAY/STOP) oiga “Set day and time.” En el visualizador parpadeará ”- -” . 2 Presione repetidamente 3 Presione (TIME/SET). El día se introducirá y se anunciará la hora. 4 Presione repetidamente (SELECT) para seleccionar la hora. 5 Presione (TIME/SET). Se introducirá la hora y se anunciarán los minutos.
Configuración del contestador de llamadas (continuación) Notas • Usted no podrá configurar el contestador de llamadas mientras esté utilizando el interfono en el teléfono base. La lámpara TALK repetirá juegos de dos destellos para indicar esta condición. • Mantenga presionada (SELECT) para aumentar el ajuste de los minutos en 10. • La hora y el día están preajustados a lunes, 12:00 AM.
Notas • Si no graba su propio mensaje de mensaje de bienvenida, se asignará automáticamente uno pregrabado (consulte más abajo). • Si su mensaje de mensaje de bienvenida dura menos de dos segundos, no se grabará. En este caso se asignará automáticamente un mensaje previamente grabado. • Si llega una llamada durante la grabación, ésta se parará automáticamente. • Si han transcurrido 90 segundos o si la memoria se llena en el paso 3, la grabación se parará automáticamente.
Configuración del contestador de llamadas (continuación) Ajuste del número de llamadasz Usted podrá seleccionar el número de veces que desee que suene el teléfono antes recibir un mensaje. Existen cuatro modos: 2, 4, 6, y Toll Saver (ahorro de línea). 1 Presione repetidamente (MENU) hasta que oiga “Set number of rings”. En el visualizador parpadeará “- -“. 2 Presione repetidamente (SELECT) para seleccionar el número de llamadas (2, 4, 6, o Toll Saver).
Ajuste del aviso audible de mensajes Usted puede elegir la opción de que suene un pitido para indicarle que ha recibido cualquier nuevo mensaje entrante. 1 Presione (MENU) hasta que oiga “Set audible message alert”. ∗ En el visualizador parpadeará “- -”. o desactivar el aviso audible de mensajes. 3 Presione (TIME/SET). Se anunciará el ajuste. 4 Presione (PLAY/STOP) para salir del modo de menú de configuración.
Configuración del contestador de llamadas (continuación) Cuando llame alguien Quien llame podrá elegir entre dos formas de dejar un mensaje: • Esperar hasta que finalice el mensaje de mensaje de bienvenida, y después comenzar a grabar su mensaje. (Inicialmente, el mensaje irá al buzón 1.) • Seleccionar un buzón presionando(*)(1) (Buzón 1), (*)(2) (Buzón 2), o (*)(3)(Buzón 3), mientras esté reproduciéndose el mensaje de mensaje de bienvenida.
Reproducción de mensajes Cuando haya nuevos mensajes, en el visualizador parpadeará el número de los mismos. Si ha activado el aviso audible de mensajes, oirá pitidos (consulte la página 29). (SKIP/QUICK) (ERASE) Nota Cuando entre una llamada, la reproducción se parará. (PLAY/STOP) Sugerencia Si no hay nuevos mensajes, se reproducirán los mensajes previamente escuchados.
Reproducción de mensajes (continuación) Ajuste del volumen del altavoz Para ajustar el volumen del altavoz, presione (VOLUME +/–). (VOLUME +/–) Notas • Cuando haya alcanzado el nivel mínimo o máximo de volumen, oirá tres pitidos cortos. • Usted no podrá ajustar el volumen del altavoz mientras el teléfono esté sonando. Sugerencia Para el nivel de volumen existen 8 pasos (1 a 8). El nivel del volumen está ajustado a 4. Borrado de mensajes 1 Mantenga presionada (ERASE) durante más de 2 segundos.
Selección del modo de anuncio solamente Usted podrá ajustar el contestador de llamadas para que reproduzca el mensaje de mensaje de bienvenida sin grabar mensajes de quienes llamen (modo de anuncio solamente). Usted podrá utilizar este modo cuando, por ejemplo, vaya a estar ausente durante cierto tiempo y no pueda escuchar los mensajes. 1 Presione repetidamente (MENU) hasta que oiga “Set announce only”. o desactivar el modo de anuncio solamente. MIC 3 Presione (TIME/SET). Se anunciará el ajuste.
Grabación de un mensaje de memorando Usted podrá dejar mensajes para otros usuarios de la unidad. 1 Presione (REC/MEMO). 2 Presione la tecla del buzón ((MAILBOX 1), (MAILBOX 2), o (MAILBOX 3)) en el que desee dejar el mensaje. Se anunciará “Now recording” y se iniciará un cómputo. 3 Hable ante el micrófono (MIC) del teléfono base para grabar su mensaje. El memorando podrá ser de hasta cuatro minutos de duración. 4 Para parar la grabación, presione (PLAY/STOP).
Operación desde un teléfono exterior Introducción de su código de seguridad Para utilizar el contestador de llamadas desde un teléfono de marcación por tonos mientras se encuentre ausente de su hogar, tendrá que introducir su código de seguridad. 1 Presione repetidamente (MENU) 2 Presione (SELECT) para cambiar el código de seguridad. 3 Presione(TIME/SET) para confirmar su elección. Se anunciará el nuevo código de seguridad. 4 Presione (PLAY/STOP)para salir del modo de menú de configuración.
Operación desde un teléfono exterior (continuación) Notas • No deje que transcurran dos segundos entre cada dígito del código de seguridad y el código de control. • Si no había activado el contestador de llamadas, su teléfono contestará automáticamente después de haber sonado 10 veces. • Si la memoria de grabación de mensajes se llena, el contestador de llamadas se desactivará automáticamente. En este caso se anunciará “Memory full. Please enter your security code”.
Información adicional Montaje del teléfono base en una pared 1 Quite la lengüeta de colgado y Lengüeta de colgado colóquela al revés. Cable de línea telefónica Soporte mural Cable del adaptador de alimentación de CA 2 Fije el cable del adaptador de alimentación de CA y el cable de línea telefónica al soporte mural. 3 Enganche el soporte mural en la placa mural, y enchufe el cable de línea telefónica en la toma modular para teléfono.
Notas sobre las fuentes de alimentación Batería • Para un óptimo rendimiento, almacene la batería a una temperatura de entre 5°C y 35°C. • Si no va a utilizar el auricular durante un periodo de tiempo prolongado, extraiga la batería después de cargarla durante más de 8 horas. Interrupción del suministro eléctrico Durante la interrupción del suministro eléctrico no es posible realizar ni recibir llamadas, ni es posible utilizar el contestador de llamadas.
Solución de problemas Si experimenta cualquiera de las dificultades siguientes cuando utilice su teléfono, use esta lista de solución de problemas para tratar de resolver el problema. Si el problema persiste, consulte a su proveedor Sony. Realización de llamadas Síntoma Solución Se oyen cuatro pitidos cortos de • Compruebe si el teléfono base está correctamente instalado (página 8). error al presionar • Acerque el microteléfono al teléfono base. (TALK/FLASH).
Operación desde un teléfono exterior Contestador de llamadas Intercomunicación Marcación abreviada Solución de problemas (continuación) 40ES Síntoma Solución No es posible almacenar un número de marcación abreviada. • Realice correctamente el procedimiento de almacenamiento de números (páginas 16 y 17). • Cuando esté utilizando el microteléfono, no podrá almacenar números de marcación abreviada en el teléfono base.
Fuente de alimentación Síntoma Solución La lámpara CHARGE no se enciende al colocar el microteléfono en el teléfono base. • Frote los terminales de carga del teléfono base y del microteléfono con un paño o un papel suave para mejorar el contacto de los mismos. • Compruebe si el microteléfono está correctamente colocado en el teléfono base. la lámpara CHARGE parpadea continuamente. • Coloque el teléfono base alejado de fuentes de ruido (página 8).
Especificaciones Generales Contestador de llamadas Frecuencia de operación Bandas ISM de 900 MHz/10 canales Señal de marcación Tonos, 10 PPS (pulsos por segundo) seleccionable Accesorios suministrados Consulte la página 7. Tiempo máximo de grabación Aprox. 18 minutos, utilizando un circuito integrado incorporado Mensaje de bienvenida Hasta 90 segundos Mensaje de entrada y memorando Hasta 4 minutos cada uno Microteléfono El diseño y las especificaciones están sujetos a cambio din previo aviso.
Índice alfabético A D, E, F N Ajuste del volumen volumen del altavoz 14, 15, 32 volumen del generador de llamada 20 volumen del microteléfono 13 Aviso audible de mensajes 29 Día y hora 25, 31 Número de llamadas 28 G, H O, P, Q Generador de llamada activación/desactivación 19 ajuste del tipo de generador de llamada 19 comprobación del tipo de generador de llamada 20 Grabación de mensaje de memorando 34 de mensajes de bienvenida 26 Operación desde un teléfono exterior 35, 36 B Batería carga 11 durac
Sony Corporation Printed in Hong Kong