3-864-117-12 (1) FM Data Receiver Operating instructions see 2-GB GB Mode d’emploi voir 2-FR FR Bedienungsanleitung seite 2-DE DE Gebruiksaanwijzing zie 2-NL NL Istruzioni per l’uso vedere 2-IT IT SRF-DR2000 1998 by Sony Corporation
General Information FOR YOUR RECORDS For your assistance in reporting this unit in case of loss or theft, please record below the model number and serial number which are located on the back of the unit. Please retain this information. Model number Serial number Your ID number Date of purchase Place of purchase Digital DJ System E2 is a registered trademark of Digital DJ Inc.
Table of Contents Before You Begin ........................................................................... 4 Features .......................................................................................... 4 Getting Started Installing the Batteries ................................................................. 5 Selecting a Language .................................................................... 7 Operating the Radio Manual Tuning ............................................................
Before You Begin Thank you for choosing the Sony FM data receiver! The FM data receiver will give you many hours of listening pleasure and will display up-to-date information. Before operating the FM data receiver, please read these instructions thoroughly and retain them for future reference. Features • FM stereo radio • High-speed data receiver which can receive text and graphics. • Five Function buttons for user-friendly operations and intuitive information-receiving operations.
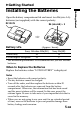
”Getting Started Open the battery compartment lid and insert two R6 (size AA) batteries (not supplied) with the correct polarity. DC IN 3V R6 (size AA) × 2 ÷ Battery Life (Approx. hours) Sony Alkaline LR6(SG) Sony R6(SR) Audio only 35 14 FM multiplex reception 23 9 * For maximum performance we recommend that you use alkaline batteries. When to Replace the Batteries Replace the batteries when “LOW BATTERY” is displayed. Notes • Insert the batteries with correct polarity.
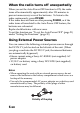
When the radio turns off unexpectedly When you set the Auto Power OFF function to ON, the radio turns off automatically approximately after 120 minutes to prevent unnecessary wear of the batteries. To listen to the radio continuously, press POWER. If the radio does not turn on after pressing POWER, or if the radio turns off unrelated to the Auto Power OFF feature, the batteries are exhausted. Replace both batteries with new ones.
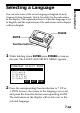
Selecting a Language POWER ENTER Function buttons 2 1 While holding down ENTER press POWER to turn on the unit. The LANGUAGE SELECT MENU appears. LANGUAGE SELECT MENU 1:English 2:French 3:German 4:Italian 5:Spanish ENT VUP vDWN 2 Press the corresponding Function button to ↑ UP or ↓ DWN to move the cursor to the language you want, and press the Function button corresponding to ENT. The indications in the display will switch over to the selected language.
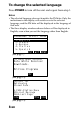
To change the selected language Press POWER to turn off the unit and repeat from step 1. Notes • The selected language does not translate the FM data. Only the indications in the display will switch over to the selected language, and the FM data will be displayed in the language of that area. • The three display windows shown below will be displayed in English, even when you set the language other than English.
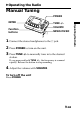
”Operating the Radio Manual Tuning POWER ENTER VOLUME Function buttons 2 NEWS•MUSIC 1 Connect the stereo headphones to the 2 jack. 2 Press POWER to turn on the unit. 3 Press TUNE +/– to manually tune in to the desired station. If you press and hold TUNE +/–, the frequency is scanned rapidly. Release the button to stop scanning. 4 Adjust the volume with VOLUME. To turn off the unit Press POWER.
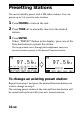
Presetting Stations The unit is initially preset with 5 FM radio stations. You can preset up to 5 of your favorite stations. 1 Press POWER to turn on the unit. 2 Press TUNE +/– to manually tune in to the desired station. 3 Press ENTER. When “PRESET” flashes in the display, press one of the Function buttons to preset the station. The beep sounds twice through the headphones and your favorite station is preset to the desired Function button. FM 97.5 0 MHz PRESET 87.5 92.0 98.0 104.3 108.0 FM 97.
Listening to a Preset Station Once your favorite FM radio stations are preset, simply press the corresponding Function button to recall and tune in to the desired station. Press POWER to turn on the unit. 2 Press the desired Function button which corresponds to the preset station you wish to recall. Improving FM radio reception Fully extend the headphones cord which functions as an FM antenna.
”Seeing FM Data Seeing the Information on Your Receiver You can receive up-to-date information that you can read on the display while receiving the FM radio broadcast through FM multiplex reception which is transmitted by a specific FM broadcasting station only. Also, you can choose from 7 languages (English, French, German, Italian, Spanish, Dutch, Swedish) for the indications in the display.
4 Press FM DATA to receive FM multiplex broadcasts. The DATA indication appears when an FM multiplex broadcast is receivable in the area. (For details on the DATA indication see page 14) Then, the window below (Total Index display) appears with the menus which correspond to the Function buttons.* To Retrieve Stored Data While Receiver Downloads. M2 * The menus may differ depending on the participating radio stations in your area. 5 Press the corresponding Function button to M2.
To See the FM data Broadcast 1 Press the corresponding Function button to H-PAGE. 2 Select the desired menu by pressing the corresponding Function button to receive further information where applicable. DATA indicator Appearance of the DATA indicator(1) shows you the availability of FM multiplex reception. DATA Indicator is on The station you tune in to is transmitting FM multiplex information and the reception is strong.
When receiving urgent Information When an urgent information is broadcasted while receiving FM Data Broadcast, you will hear a beeping sound through the headphones and the FM Data Broadcast display will automatically switch over to the urgent information. When you receive the urgent information the DATA and MSG indications appear at the left side of the display. Press any button to stop the beep. DATA To move to the next page, follow the instructions to the contents of the receiving broadcast.
Notes • When you press H-PAGE program, MSG or PAGE to receive the data, “RECEIVING DATA!” will be displayed. If there is no data to be received, approximately after 20 seconds the display will return to the previous screen. (( )) RECEIVING DATA! • When the reception is poor, the DATA indicator disappears, but “RECEIVING DATA!” will be displayed for approximately 10 seconds. Then “SIGNAL TOO WEAK.” will be displayed for approximately 10 seconds and return to the previous display.
Saving Information That You Can See You can save up to 8 pages of important information that you can recall for later use. SAVE/MENU Seeing FM Data Function buttons 2 1 2 Display the information you wish to save. Press SAVE/MENU. WRITE READ 3 CONFIG Press the Function button corresponding to WRITE on the display.
To recall information that has been saved Press SAVE/MENU. Then, press the Function button corresponding to READ on the display window. To scroll to the next page press the Function button corresponding to READ again.
Deleting the Information that Has Been Saved 1 Press the Function button corresponding to READ to display the information you want to delete. DEL READ 8 2 CONFIG Press the Function button corresponding to DEL. YES NO To delete, press the Function button corresponding to YES . To cancel, press the Function button corresponding to NO .
Setting the Functions You can set the functions such as Auto Power OFF and Reception Area. SAVE/MENU POWER Function buttons 2 1 2 3 Press POWER to turn on the unit. Press SAVE/MENU. Press the Function button corresponding to CONFIG. The Mode 1 Main Menu will be displayed. 4 Press the Function button corresponding to SETUP on the display. 5 Press the Function button corresponding to ↑ UP or ↓ DWN to move the cursor to the Function Setup, and press the Function button corresponding to ENT.
Note If you enter the “Maintenance Mode” at the “Set Up Menu”, press BACK to return to previous display. The Maintenance Mode is not needed for radio operations. To set the Auto Power OFF When you turn this to ON and there is no key operation for 120 minutes while the power is turned on, the power automatically turns off. 1 Press the Function button corresponding to + or – to set to either ON or OFF.
To set the Reception Area To set the format of the receiving signal to the area, select from one of these modes : EURO or USA. 1 2 Press the Function button corresponding to ↑ UP or ↓ DWN to move the cursor to Reception Area. Set Up Function Auto Power OFF Reception Area OFF EURO Press the Function button + – VUP vDWN corresponding to + or – to set to either EURO or USA. When using the unit in the United States of America, set it to USA.
”Additional Information ID Numbers ID refers to the following three ID numbers. Your ID: for personal messaging (Radio Paging Message) services. DDJ Group ID: for group information services. Password ID: for free additional information services. These ID Numbers are factory set. You do not need to register or confirm these ID Numbers for radio operation. If the service company contacts you, follow the steps below. Press POWER to turn on the unit. 2 Press SAVE/MENU.
To confirm the DDJ Group ID Press the Function button corresponding to ↑ UP or ↓ DWN to move the cursor to the “DDJ Group ID”, press the Function button corresponding to ENT to select the DDJ Group ID. DDJ Group ID ## ########## Jan. 9,99 ########## TFN DG-ID 3 DG-ID 4 DG-ID 5 VUP vDWN When the DDJ Group ID is registered, the ID Number and Expiration dates appear in the display. You can register up to 12 subscription services of DDJ-ID.
To confirm the Password ID Press the Function button corresponding to ↑ UP or ↓ DWN to move the cursor to the Password ID, and press the Function button corresponding to ENT to select the Password ID. Password ID ## Pwd-ID Pwd-ID Pwd-ID Pwd-ID Pwd-ID 1 2 3 4 5 2281701### DEL ENT VUP vDWN 25-GB Additional Information When the Password ID is registered, the ID Number appears in the display. You can register up to 8 passwords.
To register and correct the Password ID Press the Function button corresponding to ↑ UP or ↓ DWN to move the cursor to an empty Password ID or a Password ID to correct at the display above, and press the Function button corresponding to ENT to switch over the display to a Password ID editing display. Password ID ## Pwd-ID # 2281701### END + – Press the Function button corresponding to + or – to enter the value of the Password ID. The range of the value is 2281701376 to 2281701631.
Using the Stand Lift and use the stand on the base of the unit to see the display at an optimum angle. Frequency range FM multiplex 87.5 – 108 MHz DARC type 64 x 132 FSTN LCD display Output 2 jack (stereo minijack) Power output 8 mW + 8 mW (at 10 % harmonic distortion) Power requirements DC 3 V, two R6 (size AA)/LR6 batteries Auto power off function Approx. 120 minutes Dimensions 116 x 70.5 x 28 mm (w/h/d) (Approx. 45⁄8 x 27⁄8 x 11⁄8 inches) not incl. projecting parts and controls Mass Approx. 150 g (5.
Precautions • Operate the unit only on 1.5 V DC with two R6 (size AA) batteries. • Avoid exposure to temperature extremes, direct sunlight, moisture, sand, dust or mechanical shock. Never leave the unit in a car parked in the sun. • Should anything fall into the unit, remove the batteries and have the unit checked by qualified personnel before operating it any further. • To clean the casing, use a soft cloth dampened with a mild detergent solution.
Warning If there is lightning when you are using the unit, take off the headphones immediately. If you have any questions or problems concerning your unit, please consult your nearest Sony dealer. Troubleshooting Should any problem occur with the unit, make the following checks to determine whether or not servicing is required. If the problem persists, consult your nearest Sony dealer. The reception is unstable and contains noise.
Index to Parts and Controls Refer to the pages indicated in parentheses for details.
Display 1 DATA 2 3 MSG PAGE FM 87.5 0MHz 4 PRESET 87.5 92.0 98.0 104.3 108.
Index A Auto Power OFF .................... 21 B, C Batteries ..................................... 5 D DATA indicator ...................... 14 DDJ Group ID ........................ 24 E External Power sources ........... 6 Expiration Dates .................... 26 F, G, H FM multiplex broadcast .... 4, 14 I, J, K, L, M, N, O Improving FM radio reception ................................. 11 P, Q Paging Message ..................... 15 Password ID ..................... 25, 26 R, S, T Reception Area ..
Additional Information
Information d’ordre général Référence de l’utilisateur Pour toute référence en cas de perte ou de vol, veuillez inscrire ci-dessous le numéro de votre modèle et le numéro de série qui sont indiqués à l’arrière de l’appareil. Conservez ces informations en lieu sûr. Numéro de modèle Numéro de série Numéro ID de l’utilisateur Date d’achat Lieu d’achat Digital DJ System E2 est une marque déposée de Digital DJ Inc.
Table des matières Informations préliminaires ......................................................... 4 Caractéristiques ............................................................................ 4 Préparatifs Mise en place des piles ................................................................. 5 Sélection de la langue ................................................................... 7 Fonctionnement de la radio Accord manuel ......................................................................
Informations préliminaires Félicitations pour l’achat de ce récepteur de données FM Sony ! Ce récepteur vous offrira de nombreuses heures d’écoute agréables et des informations de dernière heure que vous pourrez lire sur l’afficheur. Avant de mettre le récepteur de données FM en service, veuillez lire attentivement ce mode d’emploi que vous conserverez pour toute référence future.
”Préparatifs Ouvrez le couvercle du logement des piles et insérez deux piles R6 (format AA) (non fournies) en tenant compte de la polarité. DC IN 3V 2 piles R6 (format AA) ÷ Autonomie des piles (Approx. en heures) Alcalines Sony LR6 (SG) Sony R6 (SR) Son seulement 35 14 Réception FM multiplex 23 9 * Pour une performance optimale, il est conseillé d’utiliser des piles alcalines. Remplacement des piles Remplacez les piles lorsque “PILE FAIBLE” apparaît sur l’afficheur.
Si la radio s’arrête tout à coup Si vous avez validé la fonction d’arrêt automatique, la radio s’arrêtera automatiquement dans les 120 minutes pour éviter une usure inutile des piles. Pour continuer à écouter la radio, appuyez sur POWER. Si la radio ne se met pas en marche après une pression sur POWER, ou Si elle s’arrête avant l’arrêt automatique, c’est que les piles sont usées. Remplacez-les par des neuves.
Sélection de la langue POWER ENTER Touches de fonction 1 2 Tout en tenant la touche ENTER enfoncée, appuyez sur POWER pour mettre l’appareil sous tension. Le message LANGUAGE SELECT MENU apparaît. LANGUAGE SELECT MENU 1:English 2:French 3:German 4:Italian 5:Spanish ENT VUP vDWN 2 Appuyez sur la touche de fonction correspondant à ↑ UP ou ↓ DWN pour amener le curseur sur la langue souhaitée et appuyez sur la touche de fonction correspondant à ENT.
Pour changer de langue Appuyez sur POWER pour éteindre l’appareil et répétez l’étape 1. Remarques • La langue sélectionnée ne s’applique qu’aux indications affichées et non pas aux données FM transmises. Les données FM seront donc dans la langue de la zone de diffusion. • Les trois fenêtres d’affichage indiquées ci-dessous seront en anglais, même si vous sélectionnez une autre langue.
”Fonctionnement de la radio Accord manuel POWER ENTER VOLUME Touches de fonction 2 NEWS•MUSIC 1 Branchez un casque stéréo sur la prise 2 . 2 Appuyez sur POWER pour mettre l’appareil sous tension. 3 Appuyez sur TUNE +/– pour accorder manuellement la station souhaitée. Si vous maintenez la pression sur TUNE +/–, les fréquences seront parcourues plus rapidement. Relâchez la touche pour vous arrêter sur une station. 4 Ajustez le volume avec VOLUME. Pour éteindre l’appareil Appuyez sur POWER.
Préréglage des stations Cet appareil a été préréglé initialement sur 5 stations radio FM. Vous pouvez cependant changer ces 5 stations et choisir vos stations préférées. 1 Appuyez sur POWER pour mettre l’appareil sous tension. 2 Appuyez sur TUNE +/– pour accorder manuellement la station souhaitée. 3 Appuyez sur ENTER. Lorsque “PRÉRÉGLAGE” clignote sur l’afficheur, appuyez sur une des touches de fonction pour prérégler la station.
Ecoute d’une station préréglée Une fois que vos stations préférées ont été préréglées, appuyez simplement sur la touche de fonction correspondante pour rappeler et accorder la station souhaitée. Appuyez sur POWER pour mettre l’appareil sous tension. 2 Appuyez sur la touche de fonction souhaitée correspondant à la station préréglée que vous voulez accorder. Amélioration de la réception radio FM Déployez complètement le cordon de casque qui sert d’antenne FM.
”Visualisation de données FM Visualisation d’informations sur le récepteur Vous pouvez recevoir des informations de dernière heure et les lire pendant la réception d’une émission radio FM par grâce à la réception FM multiplex qui est transmise par une station de radiodiffusion FM spéciale. Vous pouvez aussi choisir une des 7 langues (anglais, français, allemand, italien, espagnol, hollandais, suédois) pour l’affichage des indications. (Voir page 7 “Sélection de la langue”.
4 Appuyez sur FM DATA pour recevoir les émissions FM multiplex. L’indicateur de données (DATA) apparaît lorsqu’une émission FM multiplex peut être reçue dans la région. (Pour les détails sur l’indicateur de données, voir page 14.) Ensuite, le menu suivant (Affichage complet d’index) apparaît avec les menus correspondant aux touches de fonction.* To Retrieve Stored Data While Receiver Downloads. M2 * Les menu varient selon les stations radio de la région diffusant des émissions FM multiplex.
Pour voir les données FM transmises 1 Appuyez sur la touche de fonction correspondant à H-PAGE. 2 Sélectionnez le menu souhaité en appuyant sur la touche de fonction correspondante pour recevoir d’autres informations, le cas échéant. Indicateur de données L’apparition de l’indicateur de données (DATA) (1) signale que des informations FM multiplex sont disponibles. DATA Indicateur allumé La station accordée transmet des informations FM multiplex et le signal de réception est suffisamment puissant.
Réception d’informations urgentes Si une information urgente est diffusée pendant la réception de données FM, vous entendrez un bip par le casque et l’information urgente sera automatiquement affichée à la place des données FM. Lorsque vous recevez des informations urgentes, l’indicateur de données (DATA) et l’indicateur de message urgent (MSG) apparaissent sur la gauche de l’afficheur. Appuyez sur une touche quelconque pour arrêter le bip.
Remarques • Lorsque vous appuyez sur l’option H-PAGE, MSG ou PAGE pour recevoir des données, “Réception données!” apparaît. Si aucune donnée n’est reçue dans les 20 secondes qui suivent, l’affichage précédent réapparaîtra. (( )) Réception données! • Si la réception est de mauvaise qualité, l’indicateur de données (DATA) disparaît, mais “Réception données!” reste affiché pendant 10 secondes environ.
Pour revenir à la première page Appuyez sur la touche de fonction correspondant à H-PAGE sur l’afficheur.
Sauvegarde des informations affichées Vous pouvez sauvegarder jusqu’à 8 pages d’informations importantes que vous pourrez rappeler par la suite. SAVE/MENU Touches de fonction 1 2 Affichez l’information que vous voulez sauvegarder. Appuyez sur SAVE/MENU. INSCR LIRE 3 2 CONFIG Appuyez sur la touche de fonction correspondant à INSCR sur l’afficheur.
Pour rappeler des informations sauvegardées Appuyez sur SAVE/MENU. Appuyez ensuite sur la touche de fonction correspondant à LIRE sur l’afficheur. Pour afficher la page suivante, appuyez une seconde fois sur la touche de fonction correspondant à LIRE. SUPP LIRE 8 CONFIG 1 Appuyez sur la touche de fonction correspondant à LIRE pour afficher l’information que vous voulez supprimer. SUPP LIRE 8 2 CONFIG Appuyez sur la touche de fonction correspondant à SUPP.
Réglage des fonctions Vous pouvez régler certaines fonctions, comme l’arrêt automatique de l’appareil et la zone de réception. SAVE/MENU POWER Touches de fonction 2 1 Appuyez sur POWER pour mettre l’appareil sous tension. 2 3 Appuyez sur SAVE/MENU. 4 5 Appuyez sur la touche de fonction correspondant à CONFIG. L’affichage Menu principal Mode 1 apparaît. Menu de réglage Confg Fonctions Mode d'entretien ENT VHAUT vBAS DÉBUT Appuyez sur la touche de fonction correspondant à CONFG sur l’afficheur.
Remarque Si vous entrez dans “Mode d’entretien” de “Menu de réglage”, appuyez sur BACK pour revenir à l’affichage précédent, Le Mode d’entretien ne sert pas pour le fonctionnement de la radio. Pour valider l’arrêt automatique Lorsque que vous validez l’arrêt automatique (ON) et ne touchez aucune touche en l’espace de 120 minutes, lorsque l’appareil est sous tension, l’alimentation de l’appareil est automatiquement coupée.
Pour sélectionner la zone de réception Pour sélectionner le format du signal de réception, sélectionnez un des deux modes de réception: EURO ou USA. 1 2 Appuyez sur la touche de fonction correspondant à ↑ HAUT ou ↓ BAS pour amener le curseur sur “Zone réception”. Fonction de réglage Arrêt Auto Zone réception + – OUI EURO VHAUT vBAS Appuyez sur la touche de fonction correspondant à + ou – pour régler le mode de réception sur EURO ou USA.
”Informations diverses Numéros d’identification (ID) Il y a trois types de numéros d’identification, comme suit: Votre ID: pour la messagerie personnelle (radiomessagerie) ID de groupe DDJ: pour les services d’informations groupés. ID de code: pour d’autres services libres. Ces trois numéros d’identification ont été préréglés en usine. Vous n’avez pas besoin d’enregistrer vos numéros ni de confirmer ces numéros auprès des opérateurs pour la réception radio.
Pour vérifier un ID de groupe DDJ Appuyez sur la touche de fonction correspondant à ↑ HAUT ou ↓ BAS pour amener le curseur sur “ID de groupe DDJ”, puis appuyez sur la touche de fonction correspondant à ENT pour sélectionner “ID de groupe DDJ. ID Groupe DDJ ## ########## ########## DG-ID 3 DG-ID 4 DG-ID 5 Jan. 9,99 DENF Fév.11,99 Mar.12,00 Avr.13,01 VHAUT vBAS Si le numéro ID de groupe DDJ est enregistré, le numéro ID et les dates d’expiration apparaîtront sur l’afficheur.
ID de code ## Code-ID1 Code-ID2 Code-ID3 Code-ID4 Code-ID5 2281701### SUPP ENT VHAUT vBAS Lorsque le code est enregistré, le numéro ID apparaît sur l’afficheur. Vous pouvez enregistrer en tout 8 codes. Appuyez sur la touche de fonction correspondant à ↑ HAUT ou ↓ BAS pour faire défiler l’affichage. Pour enregistrer et corriger un code ID de code ## Code-ID # 2281701### FIN + – Appuyez sur la touche de fonction correspondant à + ou – pour entrer la valeur du code.
Pour vérifier les dates d’expiration Appuyez sur la touche de fonction correspondant à ↑ HAUT ou ↓ BAS pour amener le curseur sur les dates d’expiration. Appuyez sur la touche de fonction correspondant à ENT pour sélectionner les dates d’expiration. Dates expiration Catégor. Catégor. Catégor. Catégor. Catégor. 1 2 3 4 5 DENF Sep.10,99 Jun. 2,99 Jul. 3,00 Aoû. 4,01 VHAUT vBAS Lorsque les dates d’expiration sont enregistrées, elles apparaissent sur l’afficheur.
Utilisation du pied Levez le pied derrière l’appareil pour incliner l’appareil de manière à mieux voir l’afficheur. Spécifications 87,5 – 108 MHz Type DARC Afficheur LCD FSTN 64 x 132 Sortie Prise 2 (minijack stéréo) Puissance de sortie 8 mW + 8 mW (à 10% de distorsion harmonique) Alimentation CC 3 V, deux piles R6 (format AA)/ Piles LR6 Fonction d’arrêt automatique Approx. 120 minutes Dimensions 116 x 70,5 x 28 mm (l/h/p) (Env. 45⁄8 x 27⁄8 x 11⁄8 pouces) projections et saillies non comprises Poids Approx.
Précautions • Faites fonctionner l’appareil sur le courant continu de 1,5 V seulement avec deux piles R6 (format AA). • Evitez d’exposer l’appareil à des températures extrêmes, à la lumière directe du soleil, à l’humidité, au sable, à la poussière et à des chocs mécaniques. Ne laissez jamais l’appareil dans une voiture garée en plein soleil. • Si un solide ou un liquide tombe dans l’appareil, enlevez les piles et faites-le vérifier par un technicien avant de le remettre sous tension.
Civisme Ecoutez à un volume modéré. Vous pourrez entendre les sons extérieurs et ne gênerez pas les gens autour de vous. Avertissement En cas d’éclairs, cessez d’écouter et enlevez immédiatement le casque. Pour toute question ou difficulté concernant cet appareil, veuillez consulter votre revendeur Sony. En cas de panne La réception est instable et parasitée. • Les piles sont faibles. Remplacez-les par des neuves. • La réception est de mauvaise qualité, lorsque des obstacles, bâtiments, etc.
Description des éléments et commandes Reportez-vous aux pages entre parenthèses pour les détails.
Afficheur 1 DATA 2 3 MSG PAGE FM 87.5 0MHz PRÉRÉGLAGE 87.5 92.0 98.0 104.3 108.
Index A, B, C U, V, W, X, Y Amélioration de la réception radio FM ............. 11 Arrêt automatique .............. 21 Utilisation du pied .............. 27 Z Zone de réception ............... 21 D Dates d’expiration .............. 26 E, F, G, H Emission FM multiplex .. 4, 14 I, J, K, L ID de code ...................... 24, 25 ID de groupe DDJ ............... 24 Indicateur de données (DATA) ................................. 14 Informations urgentes ........ 15 M, N, O Message personnel (PAGE) ......
Vor dem Betrieb Bitte Eintragen Füllen Sie bitte die folgende Liste aus, um die Informationen zur Hand zu haben, wenn Sie das Gerät als gestohlen melden müssen. Serien- und Modellnummer stehen auf der Rückseite des Geräts. Wichtige Informationen zum Gerät: Modellnummer Seriennummer ID-Nummer Kaufdatum Kaufort Digital DJ System E2 ist ein eingetragenes Warenzeichen der Digital DJ Inc.
Inhaltsverzeichnis Vorbereitungen .............................................................................. 4 Merkmale ....................................................................................... 4 Die ersten Schritte Einlegen der Batterien .................................................................. 5 Wahl der Sprache .......................................................................... 7 Radiobetrieb Manuelle Abstimmung .........................................................
Vorbereitungen Wir beglückwünschen Sie zu diesem Sony UKW-DatenReceivers und sind überzeugt davon, daß Sie lange Freude an diesem modernen Gerät haben werden. Bevor Sie das Gerät in Betrieb nehmen, lesen Sie bitte diese Anleitung sorgfältig durch, und bewahren Sie sie zum Nachschlagen gut auf. Merkmale • UKW-Stereoempfang • Empfang von Text- und Grafikdaten mit hoher Geschwindigkeit. • Fünf praktische Funktionstasten zur bequemen Steuerung des Datenempfangs.
”Die ersten Schritte Öffnen Sie den Batteriefachdeckel und legen zwei R6/AA-Batterien (nicht mitgeliefert) mit richtiger Polarität ein. zwei Mignonzellen DC IN 3V (R6/Größe AA) ÷ Batterie-Lebensdauer (ungefähre Angaben in Stunden) Sony Alkalibatterie LR6(SG) Sony Batterie R6(SR) Nur Tonwiedergabe 35 14 UKW-Multiplexempfang 23 9 • Für optimale Leistung wird die Verwendung von Alkalibatterien empfohlen.
Automatische Ausschaltung Wenn die Funktion „Automatische Ausschaltung” aktiviert ist, schaltet sich das Radio automatisch nach etwa 120 Minuten aus, um unnötigen Stromverbrauch zu vermeiden. Wenn Sie weiter Radio hören wollen, drücken Sie in einem solchen Fall POWER. Wenn sich das Radio vor Ablauf der Zeitspanne ausschaltet und mit POWER nicht mehr eingeschaltet werden kann, sind die Batterien erschöpft. Wechseln Sie die Batterien dann aus.
Wahl der Sprache Die ersten Schritte Für die Anzeigen im Display kann unter den Sprachen Englisch, Französisch, Deutsch, Italienisch, Spanisch, Holländisch und Schwedisch gewählt werden. POWER ENTER Funktionstasten 2 1 Halten Sie ENTER gedrückt, und drücken Sie gleichzeitig POWER, um das Gerät einzuschalten. Das LANGUAGE SELECT MENU erscheint.
Erneutes Ändern der Sprache Schalten Sie das Gerät durch Drücken von POWER aus, und beginnen Sie dann erneut ab Schritt 1. Hinweise • Die Sprache der empfangenen UKW-Daten hängt vom Sender ab und kann nicht umgeschaltet werden. Die Umschaltung der Sprache betrifft nur die Menüanzeigen im Display. • Die folgenden drei Menüs sind stets in English, auch wenn Sie einen andere Sprache gewählt haben.
”Radiobetrieb Manuelle Abstimmung POWER TUNE +/– VOLUME Funktionstasten 2 NEWS•MUSIC 1 Schließen Sie den Stereo-Kopfhörer an die 2 -Buchse an. 2 Drücken Sie POWER, um das Gerät einzuschalten. 3 Drücken Sie TUNE +/–, um auf den gewünschten Sender abzustimmen. Wenn Sie TUNE +/– gedrückt halten, ändern sich die Frequenzziffern in schneller Folge. Beim Loslassen der Taste stoppen die Frequenzziffern. 4 Stellen Sie mit VOLUME die Lautstärke ein. Zum Abschalten des Geräts Drücken Sie POWER.
Stationsvorwahl Werksseitig sind bereits fünf UKW-Sender gespeichert. Wenn Sie fünf eigene Sender speichern wollen, verfahren Sie wie folgt: 1 Drücken Sie POWER, um das Gerät einzuschalten. 2 Drücken Sie TUNE +/–, um manuell auf den Sender abzustimmen. 3 Drücken Sie ENTER. Wenn „VORWAHL” im Display blinkt, drücken Sie die Funktionstaste, auf der der Sender gespeichert werden soll. Mit zwei Pieptönen meldet das Gerät über den Kopfhörer, daß der Sender gespeichert ist. FM 97.5 0 MHz VORWAHL 87.5 92.
Abrufen eines gespeicherten Senders Die gespeicherten UKW-Sender können wie folgt durch einfaches Drücken der betreffenden Funktionstasten abgerufen werden. Drücken Sie POWER, um das Gerät einzuschalten. 2 Drücken Sie die Funktionstaste des gewünschten Senders. Radiobetrieb 1 Für optimalen Empfang Breiten Sie das Kopfhörerkabel auf volle Länge aus. Das Kabel dient gleichzeitig als UKW-Antenne. Für optimale Verständlichkeit bzw.
”Anzeigen der UKW-Daten Anzeigen der Informationen im Display des Receivers Die Multiplexdaten, die von einigen UKW-Sendern ausgestrahlt werden, können im Display dieses Geräts angezeigt werden. Für die Menüanzeige im Display können Sie unter sieben Sprachen (Englisch, Französisch, Deutsch, Italienisch, Spanisch, Holländisch, Schwedisch) wählen (siehe „Wahl der Sprache” auf Seite 7). DATA-Anzeige( ) POWER FM DATA Funktionstasten 2 1 Schließen Sie den Stereo-Kopfhörer an die 2-Buchse an.
4 Drücken Sie FM DATA, um ein UKWMultiplexprogramm zu empfangen. Wenn ein solches Programm in Ihrem Gebiet empfangen werden kann, erscheint die DATA-Anzeige. (Einzelheiten zur DATA-Anzeige finden Sie auf Seite 14.) Im Display erscheint eine Übersichtsanzeige (siehe folgendes Beispiel) mit den über die Funktionstasten wählbaren Menüs*. To Retrieve Stored Data While Receiver Downloads. M2 * Die Menüs hängen von den Sendern Ihres Gebietes ab. 5 Drücken Sie die Funktionstaste M2.
Anzeigen der UKW-Multiplexdaten 1 Drücken Sie die Funktionstaste H-PAGE. 2 Wenn mehrere Optionen zur Auswahl angeboten werden, wählen Sie mit den Funktionstasten die Informationen, die Sie sehen möchten. Die DATA-Anzeige Die DATA-Anzeige (1) signalisiert, daß der Sender UKWMultiplexdaten ausstrahlt. DATA DATA-Anzeige erscheint Der Sender wird mit ausreichender Stärke empfangen und überträgt UKW-Multiplexdaten.
Empfang von Alarmmeldungen Wenn der empfangene UKW-Multiplexsender eine Alarmmeldung ausstrahlt, ertönt über den Kopfhörer ein Piepton und im Display erscheint statt der Datenanzeige automatisch die Alarmmeldung. Dabei erscheint links im Display die DATA- und MSG-Anzeige. Durch Drücken einer beliebigen Taste können Sie den Piepton abschalten. DATA Wenn Sie die nächste Seite sehen wollen, folgen Sie den Anweisungen im Display.
Hinweise • Nach Drücken von H-PAGE, MSG oder PAGE erscheint „EMPFANGSDATEN” im Display. Wenn keine Daten empfangen werden, schaltet das Gerät nach etwa 20 Sekunden auf die vorausgegangene Anzeige zurück. (( )) EMPFANGSDATEN • Bei schwachem Empfang verschwindet die DATA-Anzeige, „EMPFANGSDATEN” bleibt jedoch noch etwa zehn Sekunden lang angezeigt. Danach erscheint „SIGNAL ZU SCHWACH” etwa zehn Sekunden lang und schließlich wieder die ursprüngliche Anzeige.
Sichern der angezeigten Informationen Bis zu acht Informationsseiten können für gespeichert werden. SAVE/MENU 2 1 2 Bilden Sie die gewünschte Information im Display ab. Drücken Sie SAVE/MENU. SCHRB LESE 3 KQNF Drücken Sie die Funktionstaste SCHRB. Hinweis Wenn versucht wird, noch weitere Speicher voll! Seiten zu speichern, obwohl Nicht mehr benötigte Daten bitte löschen! bereits acht Seiten gespeichert sind, erscheint die rechts stehende Meldung.
Zum Abrufen von gespeicherten Informationen Drücken Sie SAVE/MENU und dann die Funktionstaste LESE. Durch nochmaliges Drücken der Funktionstaste LESE können Sie zur nächsten Seite blättern.
Löschen von gesicherten Informationen 1 Drücken Sie die Funktionstaste LESE, um die zu löschende Information anzuzeigen. LöSCH LESE 8 2 KONF Drücken Sie die Funktionstaste LÖSCH. JA NEIN Drücken Sie die Funktionstaste JA , um den Löschvorgang zu bestätigen. Oder drücken Sie die Funktionstaste NIEN , um den Löschvorgang abzubrechen.
Funktionseinstellungen Zum Einstellen der Optionen „Automatische Ausschaltung” und „Empfangsbereich” verfahren Sie wie folgt: SAVE/MENU POWER Funktionstasten 2 1 2 3 Drücken Sie POWER, um das Gerät einzuschalten. 4 5 Drücken Sie die Funktionstaste SETUP. Drücken Sie SAVE/MENU. Drücken Sie die Funktionstaste KONF. Das Model 1 Hauptmenü erscheint.
Einstellen der automatischen Ausschaltfunktion Bei Einstellung auf „Auto Aussch EIN” schaltet sich das Gerät automatisch aus, wenn 120 Minuten lang keine Taste gedrückt wird. 1 Schalten Sie mit der Funktionstaste + oder – die Funktion ein oder aus.
Hinweis Wenn Sie die Funktionstaste für die IDs drücken, können Sie Ihr ID und Ihr Paßwort sehen. Diese Informationen werden für Radiobetrieb jedoch nicht benötigt. Durch Drücken der Funktionstaste HAUPT können Sie auf die vorausgegangene Anzeige zurückschalten. (Einzelheiten finden Sie unter „Die IDNummern” auf Seite 23.
”Zusatzinformationen Die ID-Nummern Zwischen den folgenden drei ID-Nummern wird unterschieden. Ihr ID: für persönlichen Rufmeldungsservice. DDJ Gruppen-ID: für Gruppeninformationsservice. Paßwort-ID: für freie Zusatzinformationen. Diese ID-Nummern sind werksseitig voreingestellt. Für Radioempfang ist es nicht erforderlich, die ID-Nummern abzuspeichern oder zu bestätigen. Wenn Sie von dem Anbieter kontaktiert werden, führen Sie die folgenden Schritte aus: Drücken Sie POWER, um das Gerät einzuschalten.
Überprüfen des DDJ Gruppen-ID Wählen Sie mit der Funktionstaste ↑ OBN oder ↓ UNT die Option „DDJ Gruppen-ID”, und bestätigen Sie die Wahl dann durch Drücken der Funktionstaste EING. DDJ Gruppen-ID ## ########## Jan. 9,99 ########## KLD DG-ID 3 DG-ID 4 DG-ID 5 VOBN vUNT Wenn ein DDJ Gruppen-ID registriert ist, erscheinen die IDNummer und das Lösch-Datum im Display. Bis zu 12 DDJ-IDAnbieter können registriert werden.
Überprüfen des Paßwort-IDs Wählen Sie mit den Funktionstasten ↑ OBN oder ↓ UNT die Option „Paßwort-ID”, und bestätigen Sie die Wahl dann durch Drücken von EING. Paßwort-ID ## Paßw-ID Paßw-ID Paßw-ID Paßw-ID Paßw-ID 1 2281701### 2 3 4 5 LÖSCH EING VOBN vUNT 25-DE Zusatzinformationen Wenn ein Paßwort-ID registriert ist, erscheint die ID-Nummer im Display. Bis zu acht Paßwörter können registriert werden. Mit den Funktionstasten ↑ OBN und ↓ UNT können Sie die Anzeige nach oben oder unten verschieben.
Registrieren und Korrigieren eines Paßwort-IDs Wählen Sie mit der Funktionstaste ↑ OBN oder ↓ UNT ein freies Paßwort-ID-Feld bzw. den Paßwort-ID, den Sie korrigieren wollen, und drücken Sie dann die Funktionstaste EING, um das Paßwort-ID-Editiermenü aufzurufen. Paßwort-ID ## Paßw-ID # 2281701### ENDE + – Geben Sie das Paßwort mit der Funktionstaste + oder - ein. Werte zwischen 2281701376 und 2281701631 können eingegeben werden. Beenden Sie die Eingaben durch Drücken der Funktionstaste ENDE.
Verwendung des Ständers Mit dem Ständer können Sie das Gerät so aufstellen, daß das Display optimal zu sehen ist. Empfangsbereich 87,5 – 108 MHz UKW-Multiplexverfahren DARC, 64 x 132 FSTN LCD-Anzeige Ausgang 2-Buchse (Stereo-Minibuchse) Ausgangsleistung 8 mW + 8 mW (bei 10% Klirrgrad) Stromversorgung 3V Gleichspannung, zwei Mignonzellen (R6/LR6, Größe AA) Automatische Ausschaltung nach ca. 120 Minuten Abmessungen 116 x 70,5 x 28 mm (B/H/T), ausschl. vorspringender Teile und Bedienungselemente Gewicht ca.
Zur besonderen Beachtung • Betreiben Sie das Gerät nur mit 1,5 V Gleichspannung (zwei R6/ AA-Batterien). • Halten Sie das Gerät vor extremen Temperaturen, direktem Sonnenlicht, Feuchtigkeit, Sand, Staub und mechanischen Stößen fern. Lassen Sie es niemals in einem in der Sonne geparkten Auto zurück. • Wenn ein Fremdkörper in das Gerät gelangt, nehmen Sie die Batterien heraus, und lassen Sie das Gerät von Fachpersonal überprüfen, bevor Sie es weiterverwenden.
Vorsicht Nehmen Sie bei einem Gewitter umgehend den Kopfhörer ab. Bei weiterführenden Fragen wenden Sie sich bitte an den nächsten Sony Händler. Störungsüberprüfungen Gehen Sie bei Problemen die folgende Liste durch, um zu entscheiden, ob eine Reparatur erforderlich ist oder nicht. Wenn Sie das Problem nicht selbst beheben können, wenden Sie sich an Ihren Sony Händler. Der Empfang ist unstabil und verrauscht. Der gespeicherte Sender kann nicht mit der Funktionstaste abgerufen werden.
Bezeichnung der Bedienungselemente Einzelheiten finden Sie auf den in Klammern angegebenen Seiten.
Display 1 DATA 2 3 MSG PAGE FM 87.5 0MHz VORWAHL 87.5 92.0 98.0 104.3 108.
Stichwortverzeichnis A U Alarmmeldungen ............... 15 Automatische Ausschaltung ....................... 21 UKW -Multiplexempfang ......... 4, 14 V, W, X, Y, Z B, C Batterien ................................. 5 D DATA-Anzeige .................... 14 DDJ Gruppen-ID ................. 25 E, F, G, H, I, J, K Empfangsbereich ................ 21 Externe Stromversorgung ... 6 L, M, N Lösch-Datum ....................... 27 O Optimaler UKWEmpfang ...............................
33-DE
Algemene informatie Memorandum eigenaar Aan de achterzijde van het apparaat vindt u het model- en serienummer. Noteer deze nummers hieronder, zodat u ze vlot bij de hand heeft in geval van diefstal of verlies van het apparaat. Bewaar deze informatie op een veilige plaats. Modelnummer Serienummer Uw identificatiecode Datum van aankoop Plaats van aankoop Digital DJ System E2 is een gedeponeerd handelsmerk van Digital DJ Inc.
Inhoudsopgave Woord vooraf ................................................................................ 4 Kenmerken .................................................................................... 4 Voorbereidingen Inleggen van de batterijen ........................................................... 5 Kiezen van de taal ........................................................................ 7 Bediening van de radio Handmatige afstemming ...........................................................
Woord vooraf Hartelijk dank voor de aanschaf van deze Sony FM datareceiver. Dit apparaat zal u vele uren luisterplezier verschaffen en kan tevens ontvangen informatie in het uitleesvenster tonen. Lees de gebruiksaanwijzing aandachtig door voordat u het apparaat in gebruik neemt. Bewaar de gebruiksaanwijzing voor eventuele naslag in de toekomst. Kenmerken • FM-stereo radio • Data-receiver; ontvangst van tekst en grafische gegevens met hoge snelheid.
”Voorbereidingen Maak het deksel van het batterijvak open en plaats twee R6 (AA-formaat) batterijen (niet bijgeleverd) met de + en - in de juiste richting in het batterijvak. R6 (AA-formaat) × 2 DC IN 3V ÷ Levensduur van de batterijen (bij benadering, in uren) Sony alkali LR6(SG) Alleen geluid 35 FM-multiplex ontvangst 23 Sony R6(SR) 14 9 * Voor een optimale prestatie van het apparaat verdient het aanbeveling alkalibatterijen te gebruiken.
Indien de radio vanzelf wordt uitgeschakeld Als de automatische uitschakelfunctie “AAN” staat, zal de radio automatisch na ongeveer 120 minuten worden uitgeschakeld, om onnodig verbruik van de batterijen te voorkomen. Wilt u naar de radio blijven luisteren, druk dan op de POWER toets.
Kiezen van de taal POWER ENTER Functietoetsen 2 1 Houd de ENTER toets ingedrukt en druk dan tegelijk op de POWER toets om het apparaat in te schakelen. Het LANGUAGE SELECT MENU verschijnt. LANGUAGE SELECT MENU 1:English 2:French 3:German 4:Italian 5:Spanish ENT VUP vDWN 2 Druk op de functietoets die bij ↑ UP of ↓ DWN hoort om de cursor naar de gewenste taal te brengen en druk dan op de functietoets die bij ENT hoort. De aanduidingen in het uitleesvenster schakelen over naar de gekozen taal.
Wijzigen van de gekozen taal Druk op de POWER toets om het apparaat uit te schakelen en herhaal de voorgaande procedure vanaf stap 1. Opmerkingen • Wanneer u een andere taal kiest, betekent dit niet dat de FM-data in een andere taal in het uitleesvenster wordt getoond. Alleen de toetsnamen e.d. in het uitleesvenster worden in een andere taal getoond; de FM-data is in de taal van het gebied waar u bent. • De drie onderstaande schermen zijn altijd in het Engels, ook als u een andere taal heeft ingesteld.
”Bediening van de radio Handmatige afstemming POWER ENTER VOLUME Functietoetsen 2 NEWS•MUSIC 1 Sluit de stereo hoofdtelefoon op de 2 aansluiting aan. 2 Druk op de POWER toets om het apparaat in te schakelen. 3 Druk op de TUNE +/– toetsen om handmatig op de gewenste zender af te stemmen. Als u de TUNE +/– toets ingedrukt houdt, wordt het afstembereik snel doorlopen. Laat de toets los zodra u de gewenste frequentie nadert. 4 Stel de geluidssterkte in met de VOLUME regelaar.
Vastleggen van zenders Bij het verlaten van de fabriek zijn er 5 FM-zenders in het geheugen vastgelegd. U kunt deze zenders vervangen door andere gewenste zenders. 1 Druk op de POWER toets om het apparaat in te schakelen. 2 Druk op de TUNE +/– toetsen om handmatig op de gewenste zender af te stemmen. 3 Druk op de ENTER toets. Druk, terwijl “Voorinstelling” in het uitleesvenster knippert, op een van de functietoetsen om de zender in het geheugen vast te leggen.
Luisteren naar een vastgelegde zender (voorkeurzender) Nadat u uw favoriete zenders eenmaal in het geheugen heeft vastgelegd, kunt u hierop afstemmen door een druk op de bijbehorende functietoets. Druk op de POWER toets om het apparaat in te schakelen. 2 Druk op de functietoets waarmee de gewenste zender in het geheugen is vastgelegd. Voor een betere FM-ontvangst Het hoofdtelefoonsnoer functioneert als FM-antenne. Strek het snoer volledig uit voor een optimale ontvangst.
”Kijken naar FM-data Kijken naar informatie in het uitleesvenster Bij ontvangst van FM-multiplex uitzendingen van bepaalde FM-zenders kunt u informatie die samen met het zendsignaal wordt uitgezonden, ontvangen en in het uitleesvenster weergeven. Voor de aanduidingen die het apparaat in het uitleesvenster toont, kunt u kiezen uit 7 talen (Engels, Frans, Duits, Italiaans, Spaans, Nederlands en Zweeds). (Zie “Kiezen van de taal” op blz. 7.
4 Druk op de FM DATA toets voor FM-multiplex ontvangst. De DATA aanduiding verschijnt wanneer er een FM-multiplex uitzending in uw gebied ontvangen kan worden. (Zie blz. 14 voor nadere bijzonderheden betreffende de DATA aanduiding.) Het onderstaande scherm verschijnt (Totale Index scherm) samen met de menu's die bij de functietoetsen horen.* To Retrieve Stored Data While Receiver Downloads. M2 * De menu's kunnen verschillen afhankelijk van de deelnemende radiozenders in uw gebied.
Kijken naar de FM-data uitzending 1 Druk op de functietoets die bij H-PAGE hoort. 2 Kies, indien nodig, het gewenste menu door op de bijbehorende functietoets te drukken. DATA aanduiding Wanneer de DATA aanduiding (1) verschijnt, is FM-multiplex ontvangst in uw gebied beschikbaar. DATA Aanduiding licht op De zender waarop u heeft afgestemd, zendt FM-multiplex informatie uit en de ontvangst is goed.
Wanneer urgente informatie wordt ontvangen Als tijdens ontvangst van een FM-data uitzending een urgent bericht wordt uitgezonden, hoort u een pieptoon via de hoofdtelefoon en schakelt het FM-data scherm automatisch over naar de urgente informatie. Bij ontvangst van urgente informatie verschijnen de DATA en MSG aanduidingen aan de linkerzijde van het uitleesvenster. Druk op een willekeurige toets om de pieptoon uit te schakelen.
Om een oproepbericht te zien, gebruikt u de BACK toets om het onderstaande selectiescherm te laten verschijnen en drukt dan op de functietoets die bij PAGE hoort. H-PAGE MSG PAGE Om terug te keren naar het FM-data scherm, drukt u op de BACK toets. Opmerkingen • Wanneer u op H-PAGE, MSG of PAGE drukt om data te ontvangen, verschijnt “Ontvangst bezig!” in het uitleesvenster. Als er geen data is die ontvangen kan worden, zal er na ongeveer 20 seconden worden teruggekeerd naar het vorige scherm.
Om alleen de normale FM (geluid)uitzending te ontvangen, om op een andere zender af te stemmen of om zenders in het geheugen vast te leggen Druk op de FM DATA toets. Om terug te keren naar het vorige scherm Om terug te keren naar de homepage Druk op de functietoets die bij H-PAGE hoort. 17-NL Kijken naar FM-data Druk op de BACK toets.
Opslaan van de informatie die u ziet U kunt in totaal 8 pagina's informatie opslaan die u dan naderhand weer kunt oproepen. SAVE/MENU Functietoetsen 2 1 Laat de informatie die u wilt opslaan in het uitleesvenster verschijnen. 2 Druk op de SAVE/MENU toets. 3 Druk op de functietoets die bij Schr. hoort. Opmerking Geheugen VOL! Als u probeert om een pagina Om ruimte te maken, informatie op te slaan terwijl onnodige gegevens er reeds 8 pagina's in het geheugen wissen a.u.b.
Oproepen van informatie die opgeslagen is Druk op de SAVE/MENU toets. Druk vervolgens op de functietoets die bij Lees hoort. Om naar de volgende opgeslagen pagina te gaan, drukt u nogmaals op de functietoets die bij Lees hoort. 1 Druk op de functietoets die bij Lees hoort totdat de informatie die u wilt wissen in het uitleesvenster wordt getoond. 2 Druk op de functietoets die bij Wis hoort. Wilt u de informatie inderdaad wissen, druk dan op de functietoets die bij Ja hoort.
Instellen van de functies Volg de onderstaande aanwijzingen voor het instellen van de diverse functies zoals de automatische uitschakelfunctie en het ontvangstgebied. SAVE/MENU POWER Functietoetsen 2 1 Druk op de POWER toets om het apparaat in te schakelen. 2 3 Druk op de SAVE/MENU toets. Druk op de functietoets die bij Config hoort. Het configuratiehoofdmenu (Mode 1 Hoofdmenu) verschijnt. Instelmenu Inst. Functies Onderhoudsfunctie 4 Druk op de functietoets die bij INst hoort.
Opmerking Als u per ongeluk “Onderhoudsfunctie” in het “Instelmenu” kiest, druk dan op de BACK toets om terug te keren naar het vorige scherm. De onderhoudsfunctie heeft u niet nodig voor de radio. Instellen van de automatische uitschakelfunctie Wanneer de automatische uitschakelfunctie “AAN” staat en er dan gedurende 120 minuten geen toets wordt ingedrukt terwijl het apparaat ingeschakeld is, zal het apparaat automatisch worden uitgeschakeld.
Instellen van het ontvangstgebied Kies de vereiste instelling (EURO of USA) om het formaat van het ontvangstsignaal in te stellen overeenkomstig het gebied waar u bent. 1 2 Druk op de functietoets die bij ↑ Op of ↓ Neer hoort om de cursor naar “Ontvangstgebied” te brengen. Instelfunctie Autom. Uitschak. UIT Ontvangstgebied Druk op de functietoets die bij + of - hoort om “EURO” of “USA” in te stellen. Zet op “USA” wanneer u het apparaat in de Verenigde Staten gebruikt.
”Aanvullende informatie Identificatiecodes (ID-codes) Onder de ID-codes worden de volgende drie codes verstaan: Uw ID: code voor persoonlijke berichten (radiooproepberichten) DDJ Groeps-ID: code voor groepinformatie Wachtwoord-ID: code voor gratis extra informatie De ID-codes zijn op de fabriek ingesteld. Voor gebruik van de radio hoeft u deze codes niet te registreren of te controleren. Volg de onderstaande aanwijzingen wanneer het servicebedrijf contact met u opneemt.
Controleren van de DDJ groepscode Druk op de functietoets die bij ↑ Op of ↓ Neer hoort om de cursor naar “DDJ Groeps-ID” te brengen en druk dan op de functietoets die bij Inv. hoort om de optie te selecteren. DDJ Groeps-ID ## ########## Jan. 9,99 ########## VDNG DG-ID3 DG-ID4 DG-ID5 Als er een DDJ groepscode geregistreerd is, ziet u de code en de vervaldatum in het uitleesvenster. In totaal kunt u 12 groepscodes registreren.
Wachtwoord-ID ## Wwd-ID Wwd-ID Wwd-ID Wwd-ID Wwd-ID 1 2 3 4 5 2281701### Als er een wachtwoordcode geregistreerd is, ziet u de code in het uitleesvenster. In totaal kunt u 8 wachtwoordcodes registreren. Druk op de functietoets die bij ↑ Op of ↓ Neer hoort om de lijst naar boven of beneden te schuiven. Registreren of wijzigen van een wachtwoordcode Wachtwoord-ID ## Wwd-ID # 2281701### Druk op de functietoets die bij + of - hoort om de wachtwoordcode in te voeren.
Controleren van de verloopdatum Druk op de functietoets die bij ↑ Op of ↓ Neer hoort om de cursor naar “Verloopdata” te brengen. Druk vervolgens op de functietoets die bij Inv. hoort om de optie te selecteren. Verloopdata Categori Categori Categori Categori Categori 1 VDNG 2 Sep.10,99 3 4 5 Als er een verloopdatum geregistreerd is, ziet u deze in het uitleesvenster. In totaal kunt u 15 verloopdata registreren.
Gebruik van de standaard Klap indien nodig de standaard aan de achterkant van het apparaat uit om de informatie in het uitleesvenster beter te kunnen zien.
Voorzorgsmaatregelen • Gebruik het apparaat uitsluitend op 1,5 V gelijkstroom van twee R6 (AA-formaat) batterijen. • Leg het apparaat niet te dicht bij een warmtebron en stel het niet bloot aan direct zonlicht, veel stof of zand, vocht, regen of mechanische schokken. Laat het apparaat niet liggen in een afgesloten auto die in de zon geparkeerd staat.
Waarschuwing Als er bliksem is terwijl u het apparaat gebruikt, moet u de hoofdtelefoon onmiddellijk afzetten. Mocht u vragen of problemen met de bediening van het apparaat hebben, aarzel dan niet contact op te nemen met de dichtstbijzijnde Sony handelaar. Verhelpen van storingen Als zich bij gebruik van het apparaat een van de onderstaande problemen voordoet, neemt u dan even de lijst met controlepunten door. Is de storing aan de hand hiervan niet te verhelpen, raadpleeg dan a.u.b.
Plaats van de bedieningsorganen Zie de paginanummers tussen haakjes voor nadere bijzonderheden.
Uitleesvenster 1 DATA 2 3 MSG PAGE FM 87.5 0MHz Voorinstelling 87.5 92.0 98.0 104.3 108.
Index A S, T Automatische uitschakelfunctie ............................................... 21 Gebruik van de standaard ............................................... 27 B, C U Batterijen ................................ 5 Urgente informatie ............. 15 D V DATA aanduiding ............... 14 DDJ groepscode .................. 24 Vervaldatum ........................ 26 W, X, Y, Z E Externe voedingsbronnen ... 6 F, G, H, I, J, K, L, M, N FM-multiplex uitzending ..............................
Informazioni generali PER VOSTRA DOCUMENTAZIONE Per farvi riferimento in caso di smarrimento o furto di questo apparecchio, annotarsi sotto il numero di modello e il numero di serie, che sono riportati sul retro dell'apparecchio. Conservare queste informazioni. Numero di modello Numero di serie Numero di identità Data di acquisto Luogo di acquisto Digital DJ System E2 è un marchio registrato di Digital DJ Inc.
Indice Prima di cominciare ..................................................................... 4 Caratteristiche ............................................................................... 4 Preparativi Inserimento delle pile .................................................................. 5 Selezione della lingua .................................................................. 7 Uso della radio Sintonia manuale ..........................................................................
Prima di cominciare Grazie per aver scelto il ricevitore dati FM Sony! Il ricevitore di dati FM vi fornirà numerose ore di ascolto piacevole e visualizzerà informazioni aggiornate. Prima di usare il ricevitore di dati FM, leggere attentamente queste istruzioni e conservarle per riferimenti futuri. Caratteristiche • Radio stereo FM • Ricevitore dati ad alta velocità che può ricevere testo e grafica. • Cinque tasti di funzione per operazioni facili e operazioni di ricezione informazioni intuitive.
”Preparativi Aprire il coperchio del comparto pile e inserire due pile tipo R6 (formato AA) (non in dotazione) con la polarità corretta. R6 (AA-formaat) × 2 DC IN 3V ÷ Durata delle pile (ore circa) Alcaline Sony LR6 (SG) Sony R6 (SR) Solo audio 35 14 Ricezione FM multiplex 23 9 * Per il massimo delle prestazioni consigliamo di usare pile alcaline. Quando sostituire le pile Sostituire le pile quando viene visualizzato “PILA DEBOLE”. Note • Inserire le pile con la polarità corretta.
Se la radio si spegne improvvisamente Quando si imposta la funzione di spegnimento automatico su ON, la radio si spegne automaticamente circa 120 minuti dopo per evitare uno scaricamento inutile delle pile. Per continuare ad ascoltare la radio, premere POWER. Se la radio non si accende quando si preme POWER, o se la radio si spegne indipendentemente dalla funzione di spegnimento automatico, le pile sono scariche. Sostituire entrambe le pile con altre nuove.
Selezione della lingua POWER ENTER Tasti di funzione 2 1 Tenendo premuto ENTER, premere POWER per accendere l'apparecchio. Appare LANGUAGE SELECT MENU. LANGUAGE SELECT MENU 1:English 2:French 3:German 4:Italian 5:Spanish ENT VUP vDWN 2 Premere il tasto di funzione corrispondente a ↑ UP o ↓ DWN per spostare il cursore sulla lingua desiderata e premere il tasto di funzione corrispondente a ENT. Le indicazioni sul display appaiono nella lingua selezionata.
Per cambiare la lingua selezionata Premere POWER per spegnere l'apparecchio e ripetere il procedimento dal punto 1. Note • La lingua selezionata non traduce i dati FM. Solo le indicazioni sul display appaiono nella lingua selezionata e i dati FM sono visualizzati nella lingua della zona. • Le tre visualizzazioni mostrate sotto sono visualizzate in inglese anche quando si è selezionata una lingua diversa dall'inglese.
”Uso della radio Sintonia manuale POWER TUNE +/– VOLUME Tasti di funzione 2 NEWS•MUSIC 1 Collegare le cuffie stereo alla presa 2. 2 Premere POWER per accendere l'apparecchio. 3 Premere TUNE +/– per sintonizzare manualmente la stazione desiderata. Se si tiene premuto TUNE +/–, la frequenza cambia rapidamente. Rilasciare il tasto per fermare lo scorrimento. 4 Regolare il volume con VOLUME. Per spegnere l'apparecchio Premere POWER.
Preselezione delle stazioni L'apparecchio inizialmente dispone di 5 stazioni FM già preselezionate. Si possono preselezionare fino a 5 stazioni preferite. 1 Premere POWER per accendere l'apparecchio. 2 Premere TUNE +/– per sintonizzare manualmente la stazione desiderata. 3 Premere ENTER. Quando “PRESELEZIONATO” lampeggia sul display, premere uno dei tasti di funzione per preselezionare la stazione.
Per ascoltare una stazione preselezionata Una volta che le stazioni FM preferite sono state preselezionate, basta premere il tasto di funzione corrispondente per richiamare e sintonizzare la stazione desiderata. Premere POWER per accendere l'apparecchio. 2 Premere il tasto di funzione corrispondente alla stazione preselezionata che si desidera richiamare. Per migliorare la ricezione FM Estendere completamente il filo delle cuffie, che funge da antenna FM.
”Visione di dati FM Visione delle informazioni sul ricevitore Si possono ricevere informazioni aggiornate che possono essere lette sul display del ricevitore quando si ricevono trasmissioni radio FM tramite la trasmissione FM multiplex, emessa solo da specifiche stazioni FM. Inoltre si può scegliere tra 7 lingue (inglese, francese, tedesco, italiano, spagnolo, olandese, svedese) la lingua per le indicazioni sul display. (Vedere pagina 7 “Selezione della lingua”.
4 Premere FM DATA per ricevere trasmissioni FM multiplex. L'indicazione DATA appare quando una trasmissione FM multiplex è ricevibile nella zona. (Per dettagli sull'indicazione DATA vedere pagina 14.) Appare quindi la seguente visualizzazione (indicazione di indice totale) con i menu corrispondenti ai tasti di funzione.* To Retrieve Stored Data While Receiver Downloads. Visione di dati FM M2:Free Programs M2 * I menu possono differire a seconda delle stazioni radio partecipanti nella zona.
Per vedere la trasmissione dati FM 1 Premere il tasto di funzione corrispondente a H-PAGE. 2 Selezionare il menu desiderato premendo il tasto di funzione corrispondente per ricevere ulteriori informazioni quando appropriato. Indicazione DATA L'apparizione dell'indicazione DATA (1) mostra la disponibilità di trasmissioni FM multiplex. DATA Indicazione visualizzata La stazione sintonizzata trasmette informazioni FM multiplex e la ricezione è forte.
Quando si ricevono informazioni urgenti Quando sono trasmesse informazioni urgenti durante la ricezione di trasmissioni dati FM, si sente un segnale acustico nelle cuffie e la visualizzazione della trasmissione dati FM passa automaticamente alle informazioni urgenti. Quando si ricevono le informazioni urgenti, le indicazioni DATA e MSG appaiono sul lato sinistro del display. Premere un tasto qualsiasi per fermare il segnale acustico.
H-PAGE MSG PAGE Per tornare alla visualizzazione della trasmissione dati FM, premere BACK. Note • Quando si preme H-PAGE, MSG o PAGE per ricevere i dati, viene visualizzato “RICEZIONE DATI”. Se non esistono dati ricevibili, dopo circa 20 secondi il display torna alla visualizzazione precedente. (( )) RICEZIONE DATI • Quando la ricezione è scadente, l'indicazione DATA scompare ma “RICEZIONE DATI” viene visualizzato per circa 10 secondi.
Per ricevere solo trasmissioni FM audio, per cambiare stazione o preselezionare una stazione Premere FM DATA. Per tornare alla visualizzazione di un livello superiore Premere BACK. Premere il tasto di funzione corrispondente a H-PAGE sul display.
Memorizzazione delle informazioni per la visione Si possono salvare fino a 8 pagine di informazioni importanti che si desidera richiamare in seguito. SAVE/MENU Tasti di funzione 2 1 2 Visualizzare le informazioni che si desidera salvare. Premere SAVE/MENU. SCRIV LEGG 3 CONFIG Premere il tasto di funzione corrispondente a SCRIV sul display.
Per richiamare le informazioni che sono state salvate Premere SAVE/MENU. Quindi premere il tasto di funzione corrispondente a LEGG sul display. Per passare alla pagina successiva premere di nuovo il tasto di funzione corrispondente a LEGG. CANC LEGG 8 CONFIG 1 Premere il tasto di funzione corrispondente a LEGG per visualizzare le informazioni che si desidera cancellare. CANC LEGG 8 2 CONFIG Premere il tasto di funzione corrispondente a CANC.
Impostazione delle funzioni Si possono impostare le funzioni come lo spegnimento automatico e l'area di ricezione. SAVE/MENU POWER Tasti di funzione 2 1 2 3 4 5 Premere POWER per accendere l'apparecchio. Premere SAVE/MENU. Premere il tasto di funzione corrispondente a CONFIG. Viene visualizzato Menù di Base Modello. Premere il tasto di funzione corrispondente a IMPOS sul display. Impost. Funzioni Modo Manutenzione Spegnim. Autom.
Nota Se si seleziona “Modo Manutenzione” in “Menu Impostazione”, premere BACK per tornare alla visualizzazione precedente. Modo Manutenzione non è necessario per le operazioni radio. Per impostare lo spegnimento automatico Quando si imposta questa funzione su ON e non si preme alcun tasto per 120 minuti mentre l'apparecchio è acceso, l'apparecchio si spegne automaticamente. Premere il tasto di funzione corrispondente a ↑ SU o ↓ GIÙ per spostare il cursore su “Spegnim. Autom.”.
Per impostare l'area di ricezione Per impostare il formato del segnale di ricezione in base all'area, selezionare tra i seguenti modi: EURO o USA. 1 2 Premere il tasto di funzione corrispondente a ↑SU o ↓ GIÙ per spostare il cursore su “Area ricezione”. Spegnim. Autom. Area ricezione OFF Premere il tasto di funzione corrispondente a + o – per selezionare “EURO” o “USA”. Quando si usa l'apparecchio negli Stati Uniti selezionare “USA”.
”Altre informazioni Numeri di identità ID indica i tre numeri di identità seguenti: ID Utente: per servizi di messaggi personali (messaggi di cercapersone radio) ID Gruppo DDJ : per servizi di informazioni di gruppo Codice segreto: per servizi di informazioni addizionali gratuiti Questi numeri di identità sono fissati in fabbrica. Non è necessario registrare o verificare questi numeri di identità per le operazioni radio. Se l'azienda che fornisce i servizi ne fa richiesta, procedere come segue.
Per verificare I’ID gruppo DDJ Premere il tasto di funzione corrispondente a ↑ SU o ↓ GIÙ per spostare il cursore a “ID Gruppo DDJ” e premere il tasto di funzione corrispondente a ENTER per selezionare ID Gruppo DDJ. ID Gruppo DDJ ## ########## Gen. 9,99 ########## SNS ID-GD 3 ID-GD 4 ID-GD 5 VSU vGIÙ Quando l’ID Gruppo DDJ è registrato, il numero di identità e la data di scadenza appaiono sul display. Si possono registrare fino a 12 servizi su abbonamento di ID-DDJ.
Quando il codice segreto è registrato, il numero di codice appare sul display. Si possono registrare fino a 8 codici segreti. Premere il tasto di funzione corrispondente a ↑ SU o ↓ GIÙ per far scorrere la visualizzazione.
Per verificare le scadenze Premere il tasto di funzione corrispondente a ↑ SU o ↓ GIÙ per spostare il cursore a Scadenze. Premere il tasto di funzione corrispondente a ENTER per selezionare Scadenze. Scadenze Categor. Categor. Categor. Categor. Categor. 1 SNS 2 Set.10,99 3 4 5 VSU vGIÙ Quando sono registrate le scadenze, queste appaiono sul display. Si possono registrare fino a 15 scadenze. Premere il tasto di funzione corrispondente a ↑ SU e ↓ GIÙ per far scorrere la visualizzazione.
Uso del sostegno Alzare e usare il sostegno sulla base dell'apparecchio per vedere il display ad un'angolazione ottimale.
Precauzioni • Alimentare l'apparecchio solo a 1,5 V CC con due pile tipo R6 (formato AA). • Evitare di esporre l'apparecchio a estremi di temperatura, luce solare diretta, umidità, sabbia, polvere o scosse meccaniche. Non lasciare mai l'apparecchio in un'auto parcheggiata al sole. • Se qualcosa penetra nell'apparecchio, estrarre le pile e far controllare l'apparecchio da personale qualificato prima di usarlo ulteriormente.
Avvertimento Se ci sono fulmini mentre si usa l'apparecchio, togliersi immediatamente le cuffie. In caso di interrogativi o problemi riguardanti l'apparecchio, consultare il proprio rivenditore Sony. Soluzione di problemi Se si hanno difficoltà con l'apparecchio, usare i seguenti controlli per verificare se sono necessarie riparazioni. Se il problema rimane insoluto, consultare il proprio rivenditore Sony. La ricezione è instabile e disturbata.
Indice delle parti e dei comandi Fare riferimento alla pagina indicata tra parentesi per dettagli.
Display 1 DATA 2 3 MSG PAGE FM 87.50MHz PRESELEZIONATO 87.5 92.0 98.0 104.3 108.
Indice analitico A, B, C, D, E T Area di ricezione ............... 22 Codice segrento ........... 24, 25 Trasmissioni FM multiplex .......................................... 4,14 F, G, H U, V, W, X, Y, Z Fonti di alimentazione esterne ............................... 6 Uso del sostegno ............... 27 I, J, K, L ID Gruppo DDJ ................. 24 Indicazione DATA ............ 14 Informazioni urgenti ........ 15 M, N, O Messaggi di cercapersone .............................................
34-IT
Sony 36-ITCorporation Printed in Japan