SONY.
Reorient or relocate antenna. WARNING - Increase the receiving the separation equipment between Precautions the and receiver. On safety - Connect the equipment into an outlet on a circuit different from that to To prevent fire or shock hazard, do not expose the unit to rain or moisture. • Should any solid object or liquid fall into the cabinet, unplug which the receiver is connected. - Consult the dealer or an experienced radio/TV technician personnel further. for help.
For detailed safety precautionS, see the "IMPORTANT SAFEGUARDS" leaflet. TABLE OF CONTENTS If you have any question or problem concerning your receiver, please consult your nearest Sony dealer.
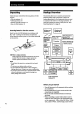
Unpacking Hookup Overview Check that you received the following receiver: • FM wire antenna (1) • AM loop antenna (1) • Remote controller (remote) • Size AA (R6) batteries (2) Inserting batteries items with the (1) The receiver allows you to connect and control the following audio/video components. Follow the hookup procedures for the components that you want to connect to the receiver on the pages specified. To learn the locations and names of each jack, see "Rear Panel Descriptions" on page 21.
"_1 If you have poor AM reception Antenna Hookups Connect a 20 to 50 ft. (6 to 15-meter) insulated wire (not supplied) to the AM antenna terminal in addition to the AM loop antenna. Try to extend the wire outdoors and keep it horizontal. Overview This section describes how to connect AM and FM antennas to the receiver. If you want to receive radio broadcasts with the receiver, complete these connections first, then go to the following pages.
Hookups The an'ow For Optimum _ CD player indicates signal Receiver flow. speakers surround as shown soured effect, place your below. Rear speaker CD player "" / '... \4so/ 60 .." - ".... .: Turntable Receiver Turntable What cords will I need7 Speaker cord (not supplied) (1 for each speaker) STR-DE315 US) 1-1 (-I Twist the stripped ends of the cord about 2/3 inch (15 mm).
"_i° If you have an additional front speaker system Connect them to the FRONT SPEAKERSB terminals. "_'lf your TV monitor usesseparate speakers You can connect one of them to the SURROUND SPEAKER CENTER terminals for use with Dolby Pro Logic Surround sound (see page 15). • Video cable (not supplied) Yellow _ _ The arrow ==_ indicates WIDBS Selecting the speaker system the speakers, select Yellow Hookups Receiver To drive (1 for a TV monitor) signal flow.
Where do I go next? Go on to the next section to connect the AC power cord and complete your home theater system. Selecting a Component To listen to or watch a connected component, first select the function on the receiver or with the remote. Before you begin, make sure you have: • Connected all components securely and correctly as indicated on pages 5 to8. • Turned MASTER VOLUME to the leftmost position (0) to avoid damaging your speakers. AC Hookups Connecting the AC power cord / ".....
To Mute the sound Do this Press one of the SYSTEM CONTROL/FUNCTION Press buttons to select the component you want to use. The SYSTEM CONTROL/FUNCTION buttons on the remote are factory-set as follows: MUTING on the remote. Press again to restore the sound Reinforce the bass Press BASS BOOST to turn on the BASS BOOST indicator. Adjust the balance Turn the BALANCE control left or right. Adjust the tone quality Adjust the BASS and TREBLE controls.
Operatingone componentwhile using another(BackgroundOperation) You can temporality operate other components listening to or watching a program. while ooo ooo ooo Numeric buttons r_l r_l r--1 k-_ r-_l r---7 .r-_ r-_ r-_ czl r-_ ci] c:D c!:_ c::_ BACKGROUND 1 Hold down BACKGROUND. 2 Press both the corresponding numeric button of the component you're going to use (see the table below) and one of the following buttons at the same time; VISUAL POWER, TV/VIDEO, CH PRESET +/-, ANT TV/VTR, D.SKIP, D..
" " _. • . •< 1 _,: : '._,':_7_ - _ < L : " • i_. • i . . 6 Receiving Broadcasts adjust the direction of the AM loop antenna for optimum reception. This receiver lets you enter a station's frequency directly by using the numeric buttons (direct tuning). If you don't know the frequency of the station you want, see "Receiving broadcasts by scanning stations (automatic tuning)" on this page.
Presetting Radio Stations You'll most likely want to preset the receiver with the radio stations you listen to often so that you don't have to tune in the station every time. The receiver can store a total of 30 FM or AM stations. You can store the stations on preset numbers combining 3 characters (A, B, C) and numbers (0 - 9). For example, you can store a station as preset number A1, B6 or C9, etc. PRESETTUNING NUMERICBUTTONS .
Recording.on a video tape Recording This receiver makes it easy to record to and from the components connected to the receiver. You don't have to connect playback and recording components directly: once you select a program source on the receiver, you can record and edit as you normally would using the controls on each component. Before you begin, make sure you've connected components properly. N..
STR-DE415/DE315/D360Z Choosing a Surround Mode • You can take advantage selecting modes of surround sound one of the three pre-programmed according to the type of music SURROUND MODE V simply by surround you wish to play. SURROUND ON/OFF only . PRO LOGIC* --_ C. STUDIO --* * "DOLBY" appears in the display. ** "S HALL" and "L HALL" :: HALL appears in the display. To turn off surround sound Press SURROUND ON/OFF.
Getting the Most Out of Dolby Pro Logic Surround Sound To obtain the best possible Dolby Pro Logic Surround sound, first select the center mode according to the speaker system you have. Then, adjust each speaker volume and delay time. Note that you must have at least one additional pair of speakers and/or one center speaker to do the following adjustments. CENTER LEVEL+/- SURROUND SURROUND MODE ON/OFF I :::°.. === o ooo ....
Adjusting the speaker volume [-_ Adjusting the delay time _ The test tone feature lets you set the volume of your speakers to the same level. (If all of your speakers have equal performance, you don't have to adjust the speaker volume.) You can make the surround sound more effective by Using the controls on the remote lets you adjust the volume level from your listening position.
Radio stations cannotbe tuned in. -1. Check that the antennas are connected Troubleshooting If you experience any of the following difficulties while using the receiver, use this troubleshooting guide to help you remedy the problem. Should any problem persist, consult your nearest Sony dealer. There's no sound or only a very low-level sound is heard. ,-b. Check that the speakers and components are _" connected securely. -,b Make sure you select the correct component on the receiver.
Specifications Dynamicpower output (For USonly) Audio power specifications (USAonly) 8 ohms:" STR-DE515/D460Z: 150W+ 150W STR-DE415/D36OZ: 145 W + 145 W STR-DE315: 100 W + 100 W 4 ohms: STR-DE515/D460Z: 200W + 200 W POWER OUTPUT ,AND TOTAL HARMONIC DISTORTION With 8-ohm load, both channels driven, from 20 20,000 Hz, rated 100 watts (STR-DE515/D460Z/DE415/ D360Z), or 60 watts (STRD315) per channel minimum RMS power, with no more than 0.
AC outlets US MODEL: 1 switched, total 120 W/1A Max AUSTRALIAN MODEL: I switched, total 100 W Dimensions • PHANTOM mode Front speaker (L) 17 x 5 7/8 x 11 s/s inches (430 x 148 x 295 mm) Preset Select PHANTOM mode if you have front and rear speakers but no center speaker. The sound of the center channel is output from the front speakers. Front speaker (R) FM wire antenna (1) AM loop antenna (1) Remote controller (remote) (1) (2) * 5.1/DVD is for STR-DE515/D460Z only.
A,B Adjusting delay time 16 speaker volume 16 tone 9 volume 8 Antenna hookups 5 Audio component hookups 6 Automatic tuning 11 Background operation 10 Hookups AC power cord 8 antennas 5 audio components 5, 6 overview 4 speakers 6, 7 video component 7 5, C Scanning preset stations 12 radio stations 11 Selecting a program source using the remote 9 Speakers connection 6, 7 impedance 18 placement 6 selecting speaker system Storing radio stations.
STR- DE515/DE415/D460Z/D360Z [] [] [] [] [] /I I [] [] ANTENNA [] r_ ground terminal @[] (AM/FM) [] PHONO [] CD [] TAPE/MD [] TV/DBS [][][][] [] [] 5.
For buttons not described on previous pages and buttons with names different from the buttons on the main unit. Remote Button Operates Function Remote Button Operates Function 0-9 Receiver Selectspresetnumbers. RMS DIRECTION Tape deck CD player/MD recorder/DVD Selectstracknumbers. 0 selects trackI0. Selects tape direction (for tape decks with the RMS* function.) RMS CLEAR Tape deck Clears RMS* program (for tape decks with the RMS function.
Receiving Broadcasts (direct tuning) Example: Receiving FM 102.50 MHz TUNER Presetting Radio Stations Selecting a Component Example: Presetting a station as A7 Example 1"Playing a CD I I TUNER I tF Turn on the CD player. Tune in the station you want. V-----'-I Select FM. Start playing. 4, MEMORY r----n Example 2: Watching a video tape 4, SHIFT F--1P--1_-1 P--1 P---I V-'-----! Select A. J ] VIDEO ,I, Turn on the VCR. Display !,Ftl ,° ,u2.50_ Start playing.
Sony Corporation Printed in U.S.A.