4-448-425-13(1) Multi Channel AV Receiver Operating Instructions STR-DH540
WARNING To reduce the risk of fire or electric shock, do not expose this apparatus to rain or moisture. To reduce the risk of fire, do not cover the ventilation opening of the appliance with newspapers, tablecloths, curtains, etc. Do not expose the appliance to naked flame sources (for example, lighted candles). For customers in the United States Owner’s Record The model and serial numbers are located on the rear of the unit. Record these numbers in the space provided below.
9) Do not defeat the safety purpose of the polarized or grounding-type plug. A polarized plug has two blades with one wider than the other. A grounding type plug has two blades and a third grounding prong. The wide blade or the third prong are provided for your safety. If the provided plug does not fit into your outlet, consult an electrician for replacement of the obsolete outlet.
CAUTION You are cautioned that any changes or modifications not expressly approved in this manual could void your authority to operate this equipment. Properly shielded and grounded cables and connectors must be used for connection to host computers and/or peripherals in order to meet FCC emission limits. To reduce the risk of electric shock, the speaker cord should be connected to the apparatus and the speakers in accordance with the following instructions. 1) Disconnect the AC power cord from the MAINS.
collection point for the recycling of waste batteries. For more detailed information about recycling of this product or battery, please contact your local Civic Office, your household waste disposal service or the shop where you purchased the product. Notice for customers: The following information is only applicable to equipment sold in countries applying EU Directives. This product has been manufactured by or on behalf of Sony Corporation, 1-7-1 Konan Minato-ku Tokyo, 108-0075 Japan.
All other trademarks and registered trademarks are of their respective holders. In this manual, ™ and ® marks are not specified. “Made for iPod” and “Made for iPhone” mean that an electronic accessory has been designed to connect specifically to iPod or iPhone, respectively, and has been certified by the developer to meet Apple performance standards. Apple is not responsible for the operation of this device or its compliance with safety and regulatory standards.
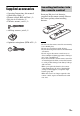
Table of Contents About This Manual ....................... 5 Supplied accessories ..................... 9 Description and location of parts ...................................... 10 Getting started ............................. 17 Connections 1: Installing the speakers ............ 19 2: Connecting the speakers ......... 20 3: Connecting the TV .................. 21 4a: Connecting the video equipment ............................. 22 4b: Connecting the audio equipment .............................
Using the Remote Control Reassigning the input button .......66 Resetting the input buttons ..........67 Additional Information Precautions ..................................68 Troubleshooting ..........................69 Specifications ..............................76 Index ............................................
Supplied accessories • • • • • Operating Instructions (this manual) Quick Setup Guide (1) Remote control (RM-AAU168) (1) R6 (size AA) batteries (2) FM wire antenna (aerial) (1) Inserting batteries into the remote control Insert two R6 (size-AA) batteries (supplied) in the remote control. Observe the correct polarity when installing batteries. • AM loop antenna (aerial) (1) • Optimizer microphone (ECM-AC2) (1) Notes • Do not leave the remote control in an extremely hot or humid place.
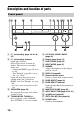
Description and location of parts Front panel A ?/1 (on/standby) (page 28, 40, 46, 52) B ?/1 (on/standby) indicator Lights up as follows: Green: The receiver is turned on. Amber: The receiver is in standby mode, and – “Control for HDMI” (page 59) is set to “On”. – “Pass Through” (page 60) is set to “On”* or “Auto”. Lights off when the receiver is in standby mode and “Control for HDMI” and “Pass Through” are set to “Off”. * For USA, Canada and Australia models only.
Indicators on the display panel A Input indicator Lights up to indicate the current input. HDMI The receiver recognizes the equipment connected via an HDMI IN jack. ARC TV input is selected and the Audio Return Channel (ARC) signals are detected. COAX Digital signal is input through the COAXIAL jack (page 51). OPT Digital signal is input through the OPTICAL jack (page 51). B D.C.A.C. Lights up when the measurement results of the “Auto Calibration” function are applied.
Note These indicators may not light up depending on the speaker pattern setting. L USB Lights up when iPod/iPhone or USB device is detected. * When playing a Dolby Digital or DTS format disc, make sure that you have completed the digital connections and that INPUT MODE is not set to “ANALOG” (page 51) or “Analog Direct” is not selected.
Rear panel A DIGITAL INPUT/OUTPUT section HDMI IN/OUT* jacks (page 21, 24) OPTICAL IN jacks (page 21, 25) COAXIAL IN jack (page 26) B TUNER section E VIDEO INPUT/OUTPUT section (page 21, 25) Yellow VIDEO IN/OUT* jacks * You must connect the HDMI TV OUT or MONITOR OUT jack to your TV to watch the selected input image (page 21).
Remote control B TV ?/11) (on/standby) Turns the TV on or sets it to the standby mode. Use the supplied remote control to operate this receiver and other equipment. The remote control is assigned to operate Sony audio/video equipment. You can reassign the input button to match the equipment connected to your receiver (page 66). C Input buttons RM-AAU168 D TOP MENU1) Selects the equipment you want to use. When you press any of the input buttons during standby mode, the receiver turns on.
S PREVIEW (HDMI) MEM Stores a station during tuner operation. Selects the “Preview for HDMI” function. Turns on a live picture-in-picture preview of HDMI inputs connected to this receiver. Press V/v repeatedly to select each HDMI input preview, then press to enter/confirm the selection. (This feature is powered by Silicon Image InstaPrevue™ technology) K SOUND FIELD +/–2) Selects a sound field (page 42). L PURE DIRECT (page 46) M SLEEP Sets the receiver to turn off automatically at a specified time.
Notes • The above explanation is intended to serve as examples. • Depending on the model of your connected equipment, some functions explained in this section may not work with the supplied remote control. To control other Sony equipment Name TV 2 TV ?/1 z DVD player Blu-ray Disc player CD player 4 TOP MENU, REPEAT z z z POP UP/MENU, SHUFFLE z z z 7 V/v/B/b, z 8 OPTIONS z I HOME z J .
Getting started You can enjoy your audio/video equipment connected to the receiver by following the simple steps below. Before connecting cords, be sure to disconnect the AC power cord (mains lead). Installing and connecting the speakers (page 19, 20) Preparing the receiver See “6: Connecting the AC power cord (mains lead)” (page 27) and “Turning on the receiver” (page 28).
Digital audio formats supported by the receiver Digital audio formats that this receiver can decode depend on digital audio output jacks of the equipment connected. This receiver supports the following audio formats. Audio format [Display] Maximum number of channels Connection between the playback equipment and the receiver COAXIAL/OPTICAL HDMI 5.1 a a Dolby Digital Plusa) [DOLBY D +] 7.1c) × a Dolby TrueHDa) [DOLBY HD] 7.1c) × a DTS [DTS] 5.1 a a DTS 96/24 [DTS 96/24] 5.
Connections Connections 1: Installing the speakers This receiver allows you to use up to a 5.2 channel system (5 speakers and 2 subwoofers). Tips • The angle A should be the same. To fully enjoy theater-like multi channel surround sound requires five speakers (two front speakers, a center speaker, and two surround speakers) and a subwoofer. Example of speaker system configuration • Since the subwoofer does not emit highly directional signals, you can place it wherever you want.
2: Connecting the speakers Before connecting cords, be sure to disconnect the AC power cord (mains lead). Surround speaker Right Center speaker Left B B A A B Right Subwoofer* A Monaural audio cord (not supplied) B Speaker cord (not supplied) * When you connect a subwoofer with an auto standby function, turn off the function when watching movies.
3: Connecting the TV TV A** Audio signals Audio/Video signals or ARC B C* A Optical digital cord (not supplied) B Audio cord (not supplied) C HDMI cable (not supplied) Video signals D Recommended connection Alternative connection Sony recommends that you use an HDMI-authorized cable or Sony HDMI cable. D Video cord (not supplied) 21GB Connections You can watch the selected input image when you connect the HDMI TV OUT or MONITOR OUT jack to a TV.
To enjoy the TV broadcast in multi channel surround sound from the receiver * If your TV is compatible with the Audio Return Channel (ARC) function, connect C. Be sure to set the “Control for HDMI” to “On” in HDMI Settings menu (page 59). If you want to select an audio signal using other than an HDMI cable (e.g., via an optical digital cord or an audio cord), switch the audio input mode using INPUT MODE (page 51). ** If your TV is not compatible with the ARC function, connect A.
Notes on HDMI connections • DSD signals of Super Audio CD are not input or output. • Depending on the TV or the video equipment, 4K or 3D images may not be displayed. • Refer to the operating instructions of each connected equipment for details. If you want to connect several digital equipment, but cannot find an unused input See “Using other audio input jacks (Audio Input Assign)” (page 51). When connecting cords • Before connecting cords, be sure to disconnect the AC power cord (mains lead).
Connecting equipment with HDMI jacks If your equipment does not have an HDMI jack, see page 25. Blu-ray Disc player DVD player PlayStation 3 Satellite tuner, Cable TV tuner Audio/video signals Audio/video signals Audio/video signals Audio/video signals A A A HDMI cable (not supplied) Sony recommends that you use an HDMI-authorized cable or Sony HDMI cable.
Satellite tuner, Cable TV tuner Audio signals Video signals VCR, DVD recorder, Video game Audio signals Video signals or A B C A Optical digital cord (not supplied) B Audio cord (not supplied) C Video cord (not supplied) B C Recommended connection Alternative connection Note Be sure to change the default setting of the VIDEO input button on the remote control so that you can use the button to control your DVD recorder. For details, see “Reassigning the input button” (page 66).
4b: Connecting the audio equipment Connecting an iPod, iPhone, USB device Connecting a Super Audio CD player, CD player Before connecting cords, be sure to disconnect the AC power cord (mains lead).
6: Connecting the AC power cord (mains lead) Before connecting the antennas (aerials), be sure to disconnect the AC power cord (mains lead). Connect the AC power cord (mains lead) to a wall outlet. AC power cord (mains lead) AM loop antenna (aerial) (supplied) FM wire antenna (aerial) (supplied) To the wall outlet Notes • To prevent noise pickup, keep the AM loop antenna (aerial) away from the receiver and other equipment. • Be sure to fully extend the FM wire antenna (aerial).
Preparing the Receiver Turning on the receiver ?/1 Press ?/1 to turn on the receiver. You can also turn on the receiver using ?/1 on the remote control. When you turn off the receiver, press ?/1 again. “STANDBY” flashes on the display panel. Do not disconnect the AC power cord (mains lead) while “STANDBY” is flashing. This may cause a malfunction.
Notes Note • The speakers emit very loud sound during the calibration and the volume cannot be adjusted. Provide consideration to your neighborhood and to the children in presence. • If the muting function has been activated before you perform Auto Calibration, the muting function will shut off automatically. • The correct measurements may not be able to take or Auto Calibration cannot be performed when special speakers, such as dipole speakers are used.
Guide to on-screen display (OSD) operation You can display the menu of the receiver on the TV screen and select the function you want to use on the TV screen by pressing V/v/B/b and on the remote control. When you start operating the receiver, make sure to press AMP on the remote control first. Otherwise, operations that follow may not be aimed at the receiver. 3 Press V/v repeatedly to select a menu you want, then press to enter the menu. The menu item list appears on the TV screen.
Overview of the home menus Description Watch Selects the video source to be input to the receiver (page 31). Listen Selects the music source to be input to the receiver (page 31). You can also enjoy FM/AM radio of the built-in receiver (page 39). Sound Effects Enables you to enjoy sound development provided by various Sony proprietary technologies or functions (page 42). Settings Adjusts the settings of the receiver (page 53).
5 Press 2 +/– to adjust the volume. You can also use MASTER VOLUME on the receiver. 6 Press SOUND FIELD +/– to enjoy the surround sound. You can also use A.F.D./2CH, MOVIE or MUSIC on the receiver. For details, see page 42. Tips • You can turn INPUT SELECTOR on the receiver or press input buttons on the remote control to select the equipment you want. • You can adjust the volume differently using the MASTER VOLUME knob on the receiver or the 2 +/– button on the remote control.
Playing an iPod/iPhone You can enjoy music contents from the iPod/iPhone by connecting it to the on the receiver. For details on connecting the iPod/iPhone, see page 26.
Selecting the iPod/ iPhone control mode You can select the iPod/iPhone control mode using the OSD menu or iPhone CTRL on the remote control. You can use the OSD menu to browse contents on the iPod/iPhone. You can also control all operations by viewing the information on the display panel when TV screen is turned off. Operating the iPod/ iPhone using “System OSD” mode 1 2 Make sure that “System OSD” is selected in step 4 in “Selecting the iPod/iPhone control mode” (page 34).
To operate the iPod/iPhone using the remote control USB iPhone CTRL Notes on iPod/iPhone • The iPod/iPhone is charged when connected to the receiver while the receiver is turned on. • You cannot transfer songs onto the iPod/ iPhone from this receiver. • Do not remove the iPod/iPhone during operation. To avoid data corruption or damage to the iPod/iPhone, turn the receiver off when connecting or removing the iPod/iPhone.
Playing a USB device Product name Model name NWZ-S636F / S638F / S639F You can enjoy music from the USB device by connecting it to the (USB) port on the receiver. For details on connecting a USB device, see “Connecting an iPod, iPhone, USB device” (page 26).
To operate the USB device using the remote control Operating the USB device V/v/B/b, USB HOME Press HOME. The home menu is displayed on the TV screen. 2 Select “Listen”, then press . When the USB device is connected, “USB” appears on the TV screen. 3 Select “USB”, then press . You can operate the USB device using the remote control of the receiver. The information of music contents appear on the TV screen. m/M N ./> x X Press USB before you use the following buttons.
Notes on the USB device • Do not remove the USB device during operation. To avoid data corruption or damage to the USB device, turn the receiver off when connecting or removing the USB device. • Do not connect the receiver and the USB device through a USB hub. • It may take about 10 seconds before “Reading” appears depending on the type of USB device connected. • When the USB device is connected, the receiver reads all the files on the USB device.
FM/AM screen You can select and operate each item on the screen by pressing V/v/B/b and . Tuner Operations Listening to FM/AM radio You can listen to FM and AM broadcasts through the built-in tuner. Before operation, be sure you have connected the FM and AM antennas (aerials) to the receiver (page 27). Tip The tuning scale for direct tuning is shown below. FM AM USA, Canada 100 kHz 10 kHz* Europe, Australia 50 kHz 9 kHz * The AM tuning scale can be changed (page 40).
Tuning to a station directly (Direct Tuning) Changing the AM tuning scale You can enter the frequency of a station directly by using the numeric buttons. (USA and Canada models only) 1 2 Press D.TUNING. Press the numeric buttons to enter the frequency, then press . You can change the AM tuning scale to either 9 kHz or 10 kHz using the buttons on the receiver. ?/1 Example 1: FM 102.
Presetting FM/AM radio stations (Preset Memory) You can store up to 30 FM and 30 AM stations as your favorite stations. Naming preset stations (Name Input) 1 2 3 V/v/B/b, OPTIONS 1 3 Select a preset number, then press . Repeat steps 1 to 3 to store another station. You can store station as follows: • AM band: AM 1 to AM 30 • FM band: FM 1 to FM 30 Tuning to preset stations 1 2 3 Select “FM” or “AM” from the menu, then press . Select “Select Preset”, then press .
Simply select a station on the FM band. When you tune to a station that provides RDS services, the Program Service name* appears on the TV screen and the display panel. * If an RDS broadcast is not received, a Program Service name will not appear. Notes • RDS may not work properly if the station you tuned to is not transmitting the RDS signal or if the signal strength is weak. • Some letters that can be displayed on the TV screen cannot be displayed on the display panel.
However, for USA and Canada models, this receiver will generate a low frequency signal for output to the subwoofer when there is no LFE signals. x Multi Stereo (MULTI ST.) Outputs 2 channel left/right signals from all speakers. However, sound may not be output from certain speakers depending on the speaker settings. x 2ch Stereo (2CH ST.) The receiver outputs the sound from the front left/right speakers only. There is no sound from the subwoofer.
Music mode You can take advantage of surround sound simply by selecting one of the receiver’s pre-programmed sound fields. They bring the exciting and powerful sound of concert halls into your home. When headphones are connected You can only select this sound field if the headphones are connected to the receiver. x HP 2CH Reproduces the acoustics of a jazz club. This mode is selected automatically if you use headphones (except “Analog Direct”).
Using the Night Mode function This function allows you to retain a theaterlike environment at low volume levels. When watching a movie late at night, you will be able to hear the dialog clearly even at a low volume level. This function can be used with other sound fields. 1 2 3 Select “Sound Effects” from the home menu, then press . Select “Night Mode”, then press . Tips • You can also set the Night Mode function on and off by using NIGHT MODE on the receiver (page 10).
Notes • This function does not work when “Analog Direct” is being used. • Frequencies for Bass and Treble are fixed. • Depending on the audio format, the receiver may play back signals at a lower sampling frequency than the original sampling frequency of the input signals. Resetting sound fields to the default settings Be sure to use the buttons on the receiver to perform this operation. ?/1 MUSIC Using the Pure Direct function The Pure Direct mode lets you enjoy higher fidelity sound.
“BRAVIA” Sync Features What is “BRAVIA” Sync? The “BRAVIA” Sync function allows communication between Sony products such as TV, Blu-ray Disc player, DVD player, AV amplifier, etc. that supports the Control for HDMI function.
If your TV is not compatible with the “Control for HDMIEasy Setting” function V/v/b, HOME 1 Press HOME. 2 3 4 5 6 7 8 9 The home menu is displayed on the TV screen. Select “Settings” from the home menu, then press . The Settings menu list appears on the TV screen. Select “HDMI Settings”, then press . Select “Control for HDMI”, then press . Select “On”, then press . The Control for HDMI function is set to on. Press HOME to exit the OSD menu.
Tip You can also select a connected equipment, such as Blu-ray Disc/DVD player from the TV menu. The receiver and TV will automatically switch to the appropriate HDMI input. System Audio Control You can enjoy the TV sound from the speakers connected to the receiver by a simple operation. You can operate System Audio Control function using the TV menu. For details, refer to the operating instructions of the TV.
Scene Select Remote Easy Control The optimum picture quality and sound field are selected automatically according to the scene selected on your TV. For details on the operation, refer to the operating instructions of the TV. You can use the TV remote control to operate the menu of the receiver. Select the receiver (AV AMP) recognized by the TV. Note Notes The sound field may not switch depending on the TV. • The receiver is recognized as “Tuner (AV AMP)” by the TV.
Notes Other Operations Switching between digital and analog audio • Based on the input, “------” appears on the display panel, and other modes cannot be selected. • When “Analog Direct” is being used, audio input is set to “ANALOG”. You cannot select other modes. (INPUT MODE) When you connect equipment to both digital and analog audio input jacks on the receiver, you can fix the audio input mode to either of them, or switch from one to the other, depending on the type of material you intend to watch.
Input name Assignable audio input jacks BD DVD GAME SAT/ CATV VIDEO SA-CD/ CD OPT1 a a a a* a a OPT2 a a a a a a COAX a a a a a a* None a* a* a* a a* a * Default setting Notes • When you assign the digital audio input, the INPUT MODE setting may change automatically. • One reassignment is allowed for each input.
3 Adjusting Settings Select the menu item you want, then press . Example: When you select “Speaker Settings”. Using the Settings menu You can adjust various settings for speakers, surround effects, etc. using the Settings menu. V/v/B/b, 4 RETURN O HOME 1 Press HOME. The home menu is displayed on the TV screen. Select the parameter you want, then press . To return to the previous screen Press RETURN O. To exit the menu Press HOME to display the home menu, then press HOME again.
Settings menu list Settings Easy Setup (page 55) Speaker Settings (page 55) Auto Calibration Calibration Type Speaker Pattern Manual Setup Crossover Freq. Test Tone Distance Unit Audio Settings (page 58) Night Mode Equalizer Sound Field A/V Sync. Auto Volume Dual Mono D.Range Comp.
3 Save the measurement result. Easy Setup Select “Save&Exit” in step 2. Note Re-runs the Easy Setup to make the basic settings. Follow the on-screen instructions (page 28). If you reposition your speaker, we recommend that you perform Auto Calibration again to enjoy the surround sound. Tips Speaker Settings menu You can adjust each speaker manually. You can also adjust the speaker levels after the Auto Calibration is completed. Note The speaker settings are only for the current seating position.
Message list after Auto Calibration measurement Display and explanation Error 30 Headphones are connected to the PHONES jack on the receiver. Remove the headphones and perform the Auto Calibration again. Error 31 The SPEAKERS is set to off. Set to other speaker settings and perform the Auto Calibration again. Error 32 Error 33 Speakers were not detected or not connected properly. • None of the front speakers are connected or only one front speaker is connected.
Note When one of the sound fields for music is selected, no sound is output from the subwoofer if all the speakers are set to “Large” in the Speaker Settings menu. However, the sound will be output from the subwoofer if – the digital input signal contains LFE signals. – the front or surround speakers are set to “Small”. – “Multi Stereo”, “PLII Movie”, “PLII Music”, “HD-D.C.S.” or “Portable Audio” is selected.
x Crossover Freq. (Speaker crossover frequency) Lets you set the bass crossover frequency of speakers that the speaker size has been set to “Small” in the Speaker Settings menu. Measured speaker crossover frequency is set for each speaker after the Auto Calibration. 1 Select the parameter under the speaker which you want to adjust the crossover frequency, then press . 2 Adjust the value, then press . x Test Tone Lets you select the test tone type on the “Test Tone” screen.
x Auto Volume This receiver can adjust the volume automatically depending on the input signal or content from the connected equipment. This function is useful, for example, when the sound of a commercial is louder than the TV programs. • On • Off Notes • Be sure to reduce the volume level before you turn on/off this function. • As this function is available only when Dolby Digital, DTS or Linear PCM signals are input, the sound may suddenly increase when you switch to other formats.
x Pass Through Lets you output the HDMI signals to the TV even when the receiver is in standby mode. • On*: When the receiver is in the standby mode, the receiver continuously outputs HDMI signals from the receiver’s HDMI TV OUT jack. • Auto: When the TV is turned on while the receiver is in the standby mode, the receiver outputs HDMI signals from the receiver’s HDMI TV OUT jack. Sony recommends this setting if you use a “BRAVIA” Sync compatible Sony TV.
x Input Edit x Auto Standby Lets you set the following items for each input. • Watch: Displays an input to the Watch menu. • Listen: Displays an input to the Listen menu. • Watch+Listen: Displays an input to both the Watch and Listen menus. Lets you set the receiver switch to standby mode automatically when you do not operate the receiver or when there is no signals input to the receiver. • On: Switches to standby mode after approximately 30 minutes. • Off: Does not switch to standby mode.
To return to the previous display Press B or RETURN O. To exit the menu Press AMP MENU. Note Some parameters and settings may appear dimmed on the display panel. This means that they are either unavailable or fixed and unchangeable.
Overview of the menus The following options are available in each menu. For details on navigating through menus, see page 61. Parameters [Display] Auto Calibration settings [] Auto Calibration start [A.CAL START] Auto Calibration typea) [CAL TYPE] FULL FLAT, ENGINEER, FRONT REF, OFF Level settings [] Test toneb) [TEST TONE] OFF, AUTO xxxc) Front left speaker level [FL LEVEL] FL –10.0 dB to FL +10.0 dB (0.5 dB interval) Front right speaker level [FR LEVEL] FR –10.0 dB to FR +10.
Menu [Display] Parameters [Display] Settings Surround left speaker distanceb) [SL DIST.] SL 1.00 m to SL 10.00 m (SL 3’3” to SL 32’9”) (0.01 m (1 inch) interval) Surround right speaker distanceb) [SR DIST.] SR 1.00 m to SR 10.00 m (SR 3’3” to SR 32’9”) (0.01 m (1 inch) interval) Subwoofer distanceb) [SW DIST.] SW 1.00 m to SW 10.00 m (SW 3’3” to SW 32’9”) (0.01 m (1 inch) interval) Distance unit [DIST.
Menu [Display] Parameters [Display] Settings Audio settings [
To view the information on the display panel The display panel provides various information of the receiver status such as sound field. 1 Select the input for which you want to check the information. 2 Press AMP, then press DISPLAY repeatedly. Each time you press DISPLAY, the display will change cyclically as follows.
3 Referring to the following table, press the corresponding button for the category you want, then release TV ?/1. Example: Press 1, then release TV ?/1. Now you can use the SAT/CATV button to control the Blu-ray Disc player.
On placement Additional Information Precautions On safety Should any solid object or liquid fall into the cabinet, unplug the receiver and have it checked by qualified personnel before operating it any further. On power sources • Before operating the receiver, check that the operating voltage is identical with your local power supply. The operating voltage is indicated on the nameplate on the back of the receiver.
Troubleshooting Power The receiver is turned off automatically. • “Auto Standby” is set to “On” (page 61). • The Sleep Timer function is working (page 15). • “PROTECTOR” is working (page 75). Image No image appears on the TV. • Select the appropriate input using the input buttons. • Set your TV to the appropriate input mode. • Move your audio equipment away from the TV. • Make sure that cables are correctly and securely connected to equipment.
Sound There is no sound, no matter which equipment is selected, or only a very low-level sound is heard. • Check that all connecting cords are inserted to their input/output jacks for the respective jacks of the receiver, speakers and the equipment. • Check that both the receiver and all equipment are turned on. • Check that MASTER VOLUME control is not set to “VOL MIN”. • Check that the SPEAKERS is not set to “SPK OFF” (page 10). • Check that headphones are not connected to the receiver.
There is no sound from a specific equipment. 71GB Additional Information • Check that the equipment is connected correctly to the audio input jacks for that equipment. • Check that the cord(s) used for the connection is (are) fully inserted into the jacks on both the receiver and the equipment. • Check the INPUT MODE (page 51). • Check that the equipment is connected correctly to the HDMI jack for that equipment. • You cannot listen to the Super Audio CD by connecting HDMI.
– Depending on the connected equipment and TV, you may need to set up the equipment and TV. Refer to the operating instructions supplied with each equipment and TV. – Change the input of the receiver to the HDMI input connected to the equipment. • Check that the selected digital audio input jack is not reassigned to other inputs (page 51). The left and right sounds are unbalanced or reversed. • Check that the speakers and equipment are connected correctly and securely.
Outdoor FM antenna (aerial) iPod/iPhone Receiver Radio stations cannot be tuned in. • Check that the antennas (aerials) are connected securely. Adjust the antennas (aerials) and connect an external antenna (aerial), if necessary. • The signal strength of the stations is too weak with automatic tuning. Use direct tuning. • Make sure you set the tuning scale correctly (when tuning in AM stations with direct tuning) (page 40).
– File or folder names are not displayed on this receiver. – Playback is not possible. – The sound skips. – There is noise. – A distorted sound is output. There is noise, skipping, or distorted sound. • Turn off the receiver and reconnect the USB device, then turn on the receiver. • The music data itself contains noise, or the sound is distorted. The USB device is not recognized. • Turn off the receiver, then disconnect the USB device. Turn on the receiver again and reconnect the USB device.
Remote control The remote control does not function. The Control for HDMI function does not work. • Check the HDMI connection (page 22). • Make sure “Control for HDMI” is set to “On” in HDMI Settings menu. • Make sure the connected equipment is compatible with the Control for HDMI function. • Check the Control for HDMI settings on the connected equipment. Refer to the operating instructions of the connected equipment.
Clearing the memory Specifications Reference sections To clear See All memorized settings page 52 Customized sound fields page 46 AUDIO POWER SPECIFICATIONS POWER OUTPUT AND TOTAL HARMONIC DISTORTION: (USA model only) With 6 ohm loads, both channels driven, from 20 – 20,000 Hz; rated 90 watts per channel minimum RMS power, with no more than 0.09% total harmonic distortion from 250 milliwatts to rated output. Amplifier section Power Output1) Minimum RMS Output Power (6 ohms, 20 Hz – 20 kHz, THD 0.
3) INPUT SHORT (with sound field and equalizer bypassed). 4) Weighted network, input level. FM tuner section Tuning range 87.5 MHz – 108.0 MHz Antenna (aerial) FM wire antenna (aerial) Antenna (aerial) terminals 75 ohms, unbalanced Tuning scale 10 kHz step 9 kHz step 530 kHz – 1,710 kHz Europe, Australia – Antenna (aerial) Loop antenna (aerial) Video section Inputs/Outputs Video: 1 Vp-p, 75 ohms iPod/iPhone section DC 5V 1.
Index Numerics 2 channel 42 5.2 channel 19 A A.F.D./2CH mode 42 A/V Sync.
R Input 31 INPUT MODE 51 Input Settings 60 iPod/iPhone 33 Remote control 14 Remote Easy Control 50 Resetting 52 L Language 61 Level Settings 63 M Manual Setup 56 Menu 53, 63 Message Auto Calibration 56 Error 75 iPod/iPhone 35 USB 38 Movie mode 43 Music mode 44 Muting 32 S Satellite tuner 24, 25 Scene Select 50 Settings menu 53 Sleep Timer 15 Sound field 42 Speaker Pattern 56, 63 Speaker Settings 55, 63 Super Audio CD player 26 Surround Settings 64 System Audio Control 49 System Power-Off 49 System Sett
4-448-425-13(1) ©2013 Sony Corporation Printed in Malaysia