To prevent fire or shock hazard, do not expose the unit to rain or moisture. ZC L(eh)] RISK OF ELECTRIC SHOCK DO NOT OPEN CAUTION © TO REDUCE THE RISK OF ELECTRIC SHOCK, DO NOT REMOVE COVER (OR BACK), NO USER-SERVICEABLE PARTS INSIDE REFER SERVICING TO QUALIFIED SERVICE PERSONNEL. This symbol is intended to alert the user to the presence of insulated “dangerous voltage” within the product's enclosure that may be of suffix sent magnitude to constitute a risk of electric shock to persons.
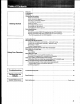
Table of Conch Getting Started Using Your Receiver Troubleshooting Getting into the Details Quick Reference Installing Connecting the system Notes on connection Audio connection diagram .. VCR and TV connection diagram Connecting the speakers Using AC outlets .
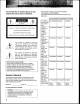
The S TR-GX40ES, S TR-GXS0ES or S TR-GX60ES is a receiver which controls audio and video sources, The unit allows you to switch easily among a variety of audio/video programs. Amplifier + Optical Legato Linear A System allows the receiver to operate automatically as a class A amplifier when the level is low and as a class B amplifier when the level is high without disturbing the sound signal. This minimizes total harmonic distortion at every sound stage.
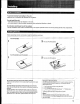
Installing Notes on Installation To prevent internal heat buildup in the unit, i place the unit in a location with adequate air collection. . | Do not install the unit: ~near heat sources such as radiators or air ducts. ~in a place subject to direct sunlight, excessive dust, mechanical vibration or shock, Do not place anything on top of the cabinet. | | The top ventilation holes must be unobstructed for the proper operation of the unit and to prolong the life of its components.
LCE The power cord should be connected fast of all, after making sure that the POWER switch is turned off, « The cable connectors should be fully inserted into the jacks. A loose connection may cause hum and noise. » Cord plugs and jacks are color coded.
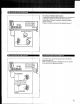
i Monitor TV, A | VIDEO MONITOR for playback (S TR-GXS0ES/ { S TR-GX60ES) | {parts equipped only with S TR-GXS0ES and S TR-GX60ES.
Right speaker SIO Receiver i = 15mm 3 Set the SPEAKER IMPEDANCE SELECTOR according to the impedance of the used speakers, using a screwdriver. SPEAKER IMPEDANCE SELECTOR 4-60) [8-180 ee CAUTION When you operate two speaker systems simultaneously, be sure to use the speakers with the Impedance of more than 8 ohms and set the SPEAKER IMPEDANCE SELECTOR to 4-80. Note Once the speakers have been connected, move SPEAKERS selector {on the front panel) to A, Bor A + B setting.
| © Connecting the AM Ananias For areas with difficult AM reception in areas with troubled reception, connect a 6 to 15-meter (20 to 50-fool) insulated wire to the AM antenna terminal. Extend this out of doors if possible, keeping the greater Receiver portion horizontal. | (There is no need to disconnect the supplied antenna.) 3 toolmaker ede] Belem : se 9 slo ole ole ojo of wl lollop ojo slop lone g r Supplied loop antenna = ” Adjust the direction.
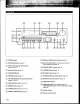
Parts Identification _ ELEV POWER switch SPEAKERS selector (page 8) SHIFT (memory page select) button {pages 16 and 17} Numeric buttons (page 16} HEADPHONES jack [BE] FM MODE Hutton {page 15) FM TUNE MODE (FM tuning mode) selector {pages 16 and 16) BAND selectors {pages 15 and 16} [9] MEMORY button {page 16) TUNING buttons (pages 15 and 16} PRESET TUNING buttons (page 17) 10 BASS and TREBLE tone controls (page 14) REC OUT SELECTOR (recording output selector) (S TR-GXS0ES only) (page 19) SOURCE DIRECT switch
NCAA Eg | 103 (supplied with the STI GX40ES) POWER switch DB button This button does not operate with this receiver, TUNER PRESET and SHIFT buttons (pages 16 and 17) VOLUME buttons SURROUND button This button does not operate with this receiver. [1] MUTING button (page 14) CD player operation buttons*® D {disc} SKIP: When your CD player is equipped with a multi-dies changer, use this button to select loaded disc. COM: Selects the CD function and starts CD playback.
Program control section (RM-P303 only} Mode selector and indicator (page 24) i SONY STD: To control Sony equipment] USER STD: To control equipment whose remote control functions are stored. LEARN: To store functions of other remote Fs commanders emitting infrared rays. i PROGRAM CLEAR button: Clears the stored functions. {Z] Power control section | ; SYSTEM OFF button: Tums off the power of the whole stern: LDP, VTR, TV and AUDIO. LDP/VTR/TV/AUDIO POWER buttons: Control the power of each unit.
For getting the optimum sound, you can adjust volume and sound quality using the functions below. S TR-GXE0ES: ADAPTER BASS and TRIBE ATTENUATION LOUDNESS DIRECT Volume Adjustment ATTENUATION Balance Adjustment BALANCE Sound Quality Adjustment BAGS TONE — TREBLE vo o Ny oily SOURCE LOUDNESS DIRECT ADAPTER ONION To adjust volume Tum ATTENUATION. To reduce the sound to a low level temporarily (—20 dB attenuation) Crass MUTING. Press again to restore the same listening level as before.
i CE ZI Tat Te When sweeping does not stop at the desired station The signal strength is weak. To stop sweeping, press FM TUNE MODE again. AUTO indicator disappears and automatic tuning stops. Then tune in the station as described in “Manual Tuning”. [REFS 1 7 When an FM stereo program is noisy or hard to receive Press FM MODE. The AMONG indicator appears (the sound is heard in monaural, but the reception will be improved). To return to the stereo mode, press the button again or tune in another stations.
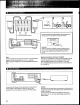
Memorizing a Station When you do not know the frequency of an FM/AM station, proceed as follows: ED 1 ? ATP total of 30 FM/AM stations can be memorized in any desired sequence. {POWER — ON) ATTENUATION ) TET TT § Select § SPEAKERS 2 4 Select 1 | SPEAKERS Ting in the desired station. TUNER | TUNING + 2 Select Select the memory page (A, B, and CO). FA BAD TUNE OE 3 MEMORY AUTO indicator disappears.
{POWER =t=. [EE = QOD: -@ Select T = SPEAKERS TUNER TUNER 2 Select the page. nN SHIFT ~ PRESET TUNING + * For lower preset For higher preset number number Select the — + number. ATTENUATION ATTENUATION Replacing a preset station Preset another station on the number of the station to be replaced. The previously preset station will be erased.
Listening gram Sources Other than Broadcasts Eire | EEE 1 3 con Select speakeasy [TRADE SSM] 2 1 Select the program source, 2 Start the program. FUNCTION Phonon record PHONON Compact disc co Video programs VIDEO 1 or 2 3 VIDEO (STRONGBOXES) ATTENUATION Taped programs TAPE or TAPE MONITOR DAT programs: DAT S TR-GX40ES TUNER PONG re Note on TAPE MONITOR button MONITOR VIDEO TAPE The TAPE MONITOR button has priority over other HI OFF function selectors.
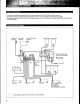
{POWER Tee T 10 TAPE or DAT REC OUT 3 [DAT or tape Beck Note on recording Turntable stern] 4 VCR turntable TO player | i | S TR-GX40ES, S TR-GXS0ES 1 Turn on the receiver and the equipment to be used. 2 Select the desired program source. 3 Set the DAT (S TR-GXS0ES only) or tape deck in the recording mode. 4 Start the desired program source. Tae monitor recorded sound while recording 1f a tape recorder with three-head system is connected to TAPE MONITOR jacks, recorded sound can be monitored.
= TT to TAPE MONITOR to TAPE IN NEC OUT Tape deck 2 Tape deck 1 2,5 (for playback) (for recording 3,6 | ° cams DAT IN to TAPE REC OUT or TAPE IN or DAT REC QUT Tape deck Tampa deck 2, or DAT deck or DAT deck (for playback) gor recording) * SEWER =o 4 to TAPE REC OUT 2 5 DAT deck 3% | (for playback) Tape deck {for recording) S TR-GX40ES 1 Turn on the receiver and the equipment {o be used.
Recording Audio Pro gr: {S TR-GX40ES only) | Q O-; fry r ta VIDEO AUDIO OUT [Irritable shyster record an audio program source on a video tape, proceed as follows: Turn on the receiver and the equipment to be used. Select the desired program source, Insert a video tape into the VCR and adjust the recording feel. WN Start the program source and set the VCR in the recording mode.
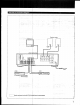
EES 23 Fi ==.0 Twvoeoz 10 VIED T VIDEO IN/ VIDEO QUT/ AUDIO IN AUDIO OUT 1 4 5 VOR 2 4 VOR 1 {for playback) {or recording) a Audio signals wi Video signals 22 1 Turn on the receiver and the equipment to be used. 2 Press VIDEO 2. 3 Select VIDEO with REC OUT SELECTOR (S TR-GXBOES only). 4 Set the VCR 1 to the recording mode. 5 Set the VCR 2 to the playback mode. With the S TR-GX60ES, you can listen to another program source during video tape editing by selecting FUNCTION selectors.
During video tape editing, you can replace the sound previously recorded on a video tape with sound from another audio solstice, thus making your own personalized video tape. Fowler 2 EE : CEDES bey Monitor TV LL Dated i => Audio Signals }
TUBER STD STD LEARN — Other manufacturer's remote commander Approx, § om (2 inches) USER 8TD Sr on LEARN — 24 The RM-P303 learns various functions of other remote commanders emitting infrared rays and allows you to contra most of audio and video equipment from a distance. —_ 3 4 Set the mode selector to LEARN. Program a signal. (i) Press and hold the button which shall “learn” the remote-control signal until the LEARN indicator fights up.
i the LEARN indicator flashes or does not go out in step 20.6. | The memory capacity has become full. This occurs when other signals stronger than the remote-control signals have been stored because the signals were programmed ina noisy environment or the remote commanders were placed 100 far apart from each other, ! ~> Clear all the signals following the procedure orn the right and program again from the beginning under the proper conditions.
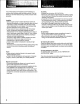
Before proceeding through the check list below, examine the connections and the procedures outlined the manual. Should any problem persist after you have checked the following items, consult your nearest Sony dealer. Problem Cause Remedy Sound is not heard. For The TAPE MONITOR jacks are notion use and the TAPE MONITOR button is pressed to ON. Press the TAPE MONITOR button to set to OFF, For S TR-GXBOES: The ADAPTER jacks are notion use and the ADAPTER button is ON. Press the ADAPTER button to set to OFF.
! Broadcast program STEREO indicator flickers or does not appear when receiving stereo programs. Avery weak FM station or a noisy FM program is received. { | Adjust the antenna or connect an external FM antenna. Press the FM MODE button to disengage the stereo mode. The desired station cannot be found The signal strength is too weak for Adjust the antenna. | | during Automatic Tuning. Automatic Tuning. . Tun in the station with the Manual Tuning system. (See page 16.) Preset stations cannot be tuned in.
AUDIO POWER SPECIFICATIONS Other Specifications Amplifier section POWER OUTPUT AND TOTAL HARMONIC Dynamic power output DISTORTION: S TR-GX40ES 75 watts -+ 75 watts {8 ohms, at 1 kHz IHF) . .
FM/AM tuner section mer section AN tuner section Tuning 87.5108 MHz 530 — 1,710 kHz {with the AM tuning interval set at 10 kHz) 581 — 1,710 kHz (with the AM tuning interval set at 8 kHz) Antenna 300 ohms, balanced | External antenna 75 ohms, unbalanced | terminal, soap antenna Intermediate 10.7 MHz 450 kHz frequency Sensitivity at 18.3 dB, 4.51V 0 4B quieting {mono} Le 38.3 Bf, 45uY {stereo) Usable sensitivity | 11.
Tuning in an FM/AM station manually Fh Band Tuning in an FM station automatically -—p PU-BAND FM TUNE MODE TARO ar Memorizing a station Tune in the SHIFT desired station," NG Desired number, MEMORY (0430.0 “ 104305. w 10430. RE Tuning in a preset station GD POWER | wp TUNER Press Desired number.