
Installation Guide
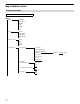
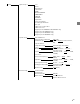
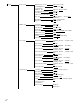
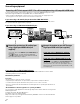
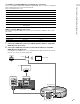
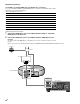
Table Of Contents
- Cover
- GB
- Map of GUI Menu System
- Connections & settings (multi room/single room)
- Preparing the receiver
- Connecting equipment
- Setting up the receiver
- Outputting a test tone from each speaker (Test Tone)
- Displaying a test screen (Test Picture)
- Adjusting the sound balance automatically (Auto Calibration)
- List of messages after Auto Calibration measurements
- Saving/loading settings of the receiver
- Updating the firmware with a USB flash drive
- Setting up through a web browser
- Using the PING button
- Using the hidden commands
- Accessories
- Others
- FR
- Carte du système de l’IGU
- Branchements et réglages (plusieurs pièces/pièce unique)
- Préparation de l’ampli-tuner
- Raccordement d’un équipement
- Raccordement d’un téléviseur 4K prenant en charge HDCP 2.2 sur un décodeur de flux 4K à l’aide d’un câble HDMI compatible 4K
- Raccordement sur une chaîne Hi-Fi
- Établissement d’une connexion pour PoE (Power over Ethernet) (uniquement pour STR-ZA3000ES)
- Établissement d’une connexion sur plusieurs zones
- Mixage d’entrées audio/vidéo distinctes (dernier mode vidéo)
- Réglage de l’ampli-tuner
- Reproduction d’une tonalité de test depuis chacune des enceintes (Test Tone)
- Affichage d’une mire (Test Picture)
- Réglage automatique de la balance du son (Auto Calibration)
- Liste des messages après les mesures d’Auto Calibration
- Enregistrement/chargement des réglages sur l’ampli-tuner
- Mise à jour du micrologiciel à l’aide d’une clé USB
- Configuration via un navigateur Web
- Utilisation du bouton PING
- Utilisation des commandes cachées
- Accessoires
- Autres
- ES
- Mapa del sistema de menú de la interfaz gráfica de usuario
- Conexiones y configuraciones (varias habitaciones/una sola habitación)
- Cómo preparar el receptor
- Cómo conectar el equipo
- Cómo conectar una TV 4K compatible con HDCP 2.2 a un transmisor de 4K utilizando un cable HDMI compatible con 4K
- Cómo enlazar un sistema de música de alta fidelidad
- Cómo realizar una conexión PoE (alimentación a través de Ethernet) (solo para STR-ZA3000ES)
- Cómo realizar una conexión de varias zonas
- Cómo combinar entradas de audio y video diferentes (último modo de video)
- Cómo configurar el receptor
- Cómo reproducir un tono de prueba por cada altavoz (Test Tone)
- Cómo mostrar una pantalla de prueba (Test Picture)
- Cómo ajustar el balance de sonido automáticamente (Auto Calibration)
- Lista de mensajes después de las medidas de Auto Calibration
- Cómo guardar o cargar la configuración del receptor
- Cómo actualizar el firmware con una unidad flash USB
- Cómo realizar la configuración a través de un navegador web
- Cómo utilizar el botón PING
- Cómo utilizar comandos ocultos
- Accesorios
- Otros
- GB

10
GB
Connection pattern 2
Use the HDCP 2.2 compatible HDMI In jack of the 4K Bravia TV as noted below
If you are using XBR-55X900A or XBR-65X900A, please confirm its compatibility with your 4K
media player on the following website:
https://www.4kactivation.com/
Model name HDMI In jack
XBR-xxX850A HDMI In 4
XBR-xxX900A HDMI In 4
XBR-84X900 Please use Connection pattern 1 with an Xperia Tablet
XBR-xxX950B HDMI In 2
XBR-xxX850B HDMI In 2
XBR-xxX900B HDMI In 2
Other Models Please refer to the FMP-X1 support web page (below) for details:
http://esupport.sony.com/US/p/model-home.pl?mdl=FMPX1&template_id=1®ion_
id=1&tab=manuals#/manualsTab
1 Connect the HDMI OUT1 jack of your FMP-X1 with the HDCP2.2 compatible
HDMI IN jack of 4K Bravia TV.
2 Connect the HDMI OUT2 jack of your FMP-X1 with the HDMIIN jack of the
receiver.
To output audio from HDMI OUT2 of the FMP-X1, you need to complete settings as noted
below:
https://us.en.kb.sony.com/app/answers/detail/a_id/43404/p/47329,82420,85498/c/65,66/kw/receiver
Internet
The receiver
Router
4K TV
4K media player