
Installation Guide

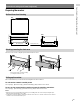
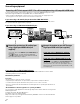
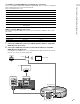
Table Of Contents
- Cover
- GB
- Map of GUI Menu System
- Connections & settings (multi room/single room)
- Preparing the receiver
- Connecting equipment
- Setting up the receiver
- Outputting a test tone from each speaker (Test Tone)
- Displaying a test screen (Test Picture)
- Adjusting the sound balance automatically (Auto Calibration)
- List of messages after Auto Calibration measurements
- Saving/loading settings of the receiver
- Updating the firmware with a USB flash drive
- Setting up through a web browser
- Using the PING button
- Using the hidden commands
- Accessories
- Others
- FR
- Carte du système de l’IGU
- Branchements et réglages (plusieurs pièces/pièce unique)
- Préparation de l’ampli-tuner
- Raccordement d’un équipement
- Raccordement d’un téléviseur 4K prenant en charge HDCP 2.2 sur un décodeur de flux 4K à l’aide d’un câble HDMI compatible 4K
- Raccordement sur une chaîne Hi-Fi
- Établissement d’une connexion pour PoE (Power over Ethernet) (uniquement pour STR-ZA3000ES)
- Établissement d’une connexion sur plusieurs zones
- Mixage d’entrées audio/vidéo distinctes (dernier mode vidéo)
- Réglage de l’ampli-tuner
- Reproduction d’une tonalité de test depuis chacune des enceintes (Test Tone)
- Affichage d’une mire (Test Picture)
- Réglage automatique de la balance du son (Auto Calibration)
- Liste des messages après les mesures d’Auto Calibration
- Enregistrement/chargement des réglages sur l’ampli-tuner
- Mise à jour du micrologiciel à l’aide d’une clé USB
- Configuration via un navigateur Web
- Utilisation du bouton PING
- Utilisation des commandes cachées
- Accessoires
- Autres
- ES
- Mapa del sistema de menú de la interfaz gráfica de usuario
- Conexiones y configuraciones (varias habitaciones/una sola habitación)
- Cómo preparar el receptor
- Cómo conectar el equipo
- Cómo conectar una TV 4K compatible con HDCP 2.2 a un transmisor de 4K utilizando un cable HDMI compatible con 4K
- Cómo enlazar un sistema de música de alta fidelidad
- Cómo realizar una conexión PoE (alimentación a través de Ethernet) (solo para STR-ZA3000ES)
- Cómo realizar una conexión de varias zonas
- Cómo combinar entradas de audio y video diferentes (último modo de video)
- Cómo configurar el receptor
- Cómo reproducir un tono de prueba por cada altavoz (Test Tone)
- Cómo mostrar una pantalla de prueba (Test Picture)
- Cómo ajustar el balance de sonido automáticamente (Auto Calibration)
- Lista de mensajes después de las medidas de Auto Calibration
- Cómo guardar o cargar la configuración del receptor
- Cómo actualizar el firmware con una unidad flash USB
- Cómo realizar la configuración a través de un navegador web
- Cómo utilizar el botón PING
- Cómo utilizar comandos ocultos
- Accesorios
- Otros
- GB

6
GB
Table of Contents
Map of GUI Menu System ................................................................................................2
Using the home menu ..................................................................................2
Connections & settings (multi room/single room)
Preparing the receiver ...................................................................................................... 7
Outline dimensional drawing ....................................................................... 7
Attaching/removing the front cover ............................................................ 7
Setting up the receiver ................................................................................. 7
Connecting equipment ....................................................................................................8
Connecting a 4K TV that supports HDCP 2.2 to a 4K streaming box
using a 4K-compatible HDMI cable ......................................................8
Linking with a Hi-Fi music system ...............................................................11
Making a connection for PoE (Power over Ethernet)
(for STR-ZA3000ES only)......................................................................12
Making a multi-zone connection ................................................................13
Mixing separate audio/video inputs (Last video mode) ............................13
Setting up the receiver ................................................................................................... 14
Outputting a test tone from each speaker (TestTone) ............................. 14
Displaying a test screen (Test Picture) ....................................................... 14
Adjusting the sound balance automatically (Auto Calibration) ................ 14
List of messages after Auto Calibration measurements ............................15
Saving/loading settings of the receiver .....................................................15
Updating the firmware with a USB flash drive ............................................15
Setting up through a web browser ............................................................ 16
Using the PING button ............................................................................... 16
Using the hidden commands
Performing commands using the receiver .....................................................................17
Performing commands using the supplied remote control ......................................... 18
Turning on transmitting mode of the discrete code for the main zone ... 18
Turning on transmitting mode of the discrete code for zone2/zone3 .... 19
Accessories
Mounting the receiver using the rack mount kit ...........................................................20
Others
Zone distribution .............................................................................................................21
In-Ceiling Speaker mode................................................................................................ 22