
User Guide


Messages
10
Messages
There are two kinds of messages: error messages and
warning messages. This section lists these messages
together with their possible causes and remedies. Note
the messages and act accordingly.
Besides error and warning messages, other messages
stating the operating status of the unit are also displayed.
Those messages are not described here.
Error Messages
If a problem occurs, the ALARM indicator lights and an
error message stating the problem appears on the LCD
window. Note the message and perform whatever action
is necessary to solve the problem.
In the error messages introduced in the following table,
“nn” indicates the number of the symbol displayed in the
actual message.
Error messages Possible causes and remedies
SET FILM The film sheets have run out.
t Load the film into the film tray.
SET TRAY The film tray is not installed.
t Install the film tray.
REMOVE PRINTS The maximum number of printouts has
accumulated on the film tray.
t Remove the printouts. Printing
starts again.
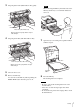
CLOSE COVER One of the front, top, or rear cover is
open.
t Close the opened cover.
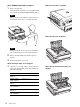
REMOVE FILM
TRAY:J0
The film has jammed near the film
tray.
t Pull out the film tray and remove
the jammed film.(page 12)
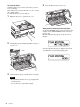
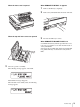
REMOVE FILM
REAR:J1
The film has jammed around the rear
of the unit.
t Open the rear cover and remove the
jammed film.(page 12)
REMOVE FILM
REAR & TOP:J2
The film has jammed between the rear
and top of the unit.
t Open the rear and top covers and
remove the jammed film.(page 12)
REMOVE FILM
TOP:J3
The film has jammed around the top of
the unit.
t Open the top cover and remove the
jammed film.(page 12)
REMOVE FILM TOP
& FRONT:J4
The film has jammed between the top
and front of the unit.
t Open the top and front covers and
remove the jammed film.(page 12)
REMOVE FILM
FRONT:J5
The film has jammed around the front
of the unit.
t Open the front cover and remove
the jammed film.(page 13)
REMOVE FILM TOP
& INNER:J6
The film has jammed around the front
or inside the unit.
t Open the top cover, then the inner
cover and remove the jammed
film.(page 13)
REMOVE FILM
TRAY:J7
The film has jammed near the film
tray.
t Pull out the film tray and remove
the jammed film.(page 13)
REMOVE FILM
SOME PLACES:J8
The film has jammed at several points.
t Open all of the covers and remove
the jammed film.(page 13)
CALIBRATION
INVALID
The unit takes certain measurements to
estimate a value for automatic
calibration. However, the correct value
could not actually be measured. The
unit can print, but the automatic
calibration value is not updated.
t Try calibration again. If white strips
or scratches appear on the printout,
clean the thermal head and rollers.
MECHA TROUBLE
S nn
Mechanical trouble has occurred in the
sensor system of the unit.
t Turn off the power once and then
turn it on. The unit may operate
correctly. However, if the message
still remains on the LCD, turn off
the power immediately and contact
your Sony dealer.
MECHA TROUBLE
M nn
Mechanical trouble has occurred in the
motor system of the unit.
t Turn off the power once and then
turn it on. The unit may operate
correctly. However, if the message
still remains on the LCD, turn off
the power immediately and contact
your Sony dealer.
MECHA TROUBLE
U nn
Mechanical trouble has occurred in the
unit system of the unit.
t Turn off the power once and then
turn it on. The unit may operate
correctly. However, if the message
still remains on the LCD, turn off
the power immediately and contact
your Sony dealer.
DICOM TROUBLE Trouble has occurred in the DICOM
part of the unit.
t Turn off the power immediately and
contact your Sony dealer.
TAG INVALID Trouble has occurred in the IC tag part.
t Turn off the power immediately and
contact your Sony dealer.
Error messages Possible causes and remedies