
User's Manual
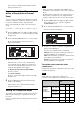


Table Of Contents

12
7
Use the + or – button to select “YES,” then press the
SET button on the transmitter.
This sets the transmit channel and compander mode.
Adjusting the Monitor Audio Level
You can set the monitor audio level within the range 1 to
16.
1
Press the MENU button to display the meter screen,
and use the + or – button to display PHONES.
The current monitor audio level is displayed.
2
Press and hold the SET button for at least one second.
Press and hold until the monitor audio level flashes.
3
Use the + or – button to set the desired monitor audio
level, then press the SET button.
The setting value is stored. The setting is retained
even after the power is turned off.
Menu Displays and
Detailed Settings
Menu Structure and Hierarchy
Menu structure
UTILITY menu
You can display the UTILITY menu from the meter
screen which displays information on tuners 1 and 2. This
menu allows you to configure basic settings for the unit.
RX1 (tuner 1) menu
This menu allows you to configure settings for RX1
(tuner 1).
RX2 (tuner 2) menu
This menu allows you to configure settings for RX2
(tuner 2).
EXT.IN menu
This menu allows you to configure settings for the
microphone connected to the external input connector.
Menu hierarchy
MENU
<UTILITY>
Meter screen PHONES
OUT LEVEL
TIME
PWR SOURCE
BATTERY
CONTRAST
RESET
VERSION
RX1 GP/CH
AUTO SET
BAND
CLR SCAN
SYNC
COMPANDER
ACT SCAN
ASSIGN
RX2 GP/CH
AUTO SET
BAND
CLR SCAN
SYNC
COMPANDER
ACT SCAN
ASSIGN
EXT.IN MIC SELECT
INPUT LEVEL
LCF
PHASE
ASSIGN
To meter screen