
Operation Manual


116 | CHAPTER 4
Selecting a subclip in its parent media
1.
Right-click a subclip in the Project Media window and choose Open in Trimmer from the shortcut menu.
2.
Right-click the media file in the Trimmer window and choose Select Parent Media from the shortcut menu. The subclip’s
original media file is opened in the Trimmer, and the portion of the media that represents the subclip is selected.
Opening files in the Trimmer by default
You can automatically load files into the Trimmer window by selecting the Double-click on media file loads into Trimmer instead
of tracks check box on the General tab in the Preferences dialog.
For more information, see General tab on page 415.
When this check box is selected, no events are created when you double-click a media file in the Explorer window or Project Media
window. Instead, the Trimmer is displayed to allow you to choose a portion of the file you want to use.
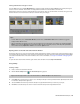
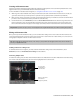
Removing red eye from still images
1.
Right-click a still image on the timeline (or in the Project Media window) and choose Red Eye Reduction from the shortcut
menu.
2.
Click the center of the red eye and drag to create a selection around the red portion of the eye.
3.
Click the Zoom In ( ) and Zoom Out ( ) buttons to change the magnification of the image, or roll the mouse wheel forward
or backward to zoom around the cursor position.
4.
Drag to position the selection box over the portion of the eye you want to correct.
5.
Drag the borders of the selection box to adjust its size. Vegas Pro automatically adjusts the portion of the image in the
selection box to remove red eye.
6.
Readjust the selection box as needed, and repeat this procedure for each red eye in the image.
Using the Edit Details window
The Edit Details window displays a database for all of the media in your project. It shows information about how the files are being
used and allows you to modify many of those properties. You can sort, add or change information, rearrange columns, and edit
items in the project.
This window provides an alternate method for working with events, audio CD track list items, command markers, markers, and
regions after they are placed in your project.
You can dock the Edit Details window in the window docking area or float it on the workspace. For more information, see Window
docking area and floating window docks on page 25.
Tip:
If you want to open the original media file that was used to create the subclip in the Trimmer, right-click an event on the
timeline (or a subclip in the Project Media window) and choose Open Parent Media in Trimmer from the shortcut menu.
Tip:
For keyboard shortcuts to help you navigate in the Red Eye Reduction window, see Red eye reduction commands on page
481.
Tip:
Right-click a selection box and choose Delete from the shortcut menu to remove it.
Note:
If an image is used multiple times in your project, removing the red eyes once will affect all instances of the image.