
Operation Manual


WORKING WITH XDCAM VIDEO | 147
4.
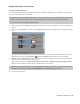
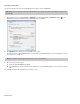
Choose render settings:
a.
Select the Render format radio button.
b.
In the File path box, type the path to the file you want to render, or click the Browse button to browse to the folder you
want to use and then type a file name.
This path is used to render an MXF file to your hard drive before transferring to your XDCAM device. You can delete the file
after the transfer is complete.
c.
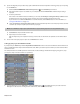
Select the Enable multichannel mapping check box if you want to map render multiple channels of audio.
You can click the Channels button if you want to map the busses in your project to channels in the rendered file. If you
don't specify a channel mapping, Vegas Pro will not render a multichannel file.
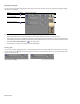
In the Channel Mapping dialog, select the check box for each bus you want to include in the rendered file. Each stereo bus
will be saved to two channels in the rendered file. If you want to save a bus to a single channel, select the (Mono
downmix) check box for that bus.
If you want to change order of the busses in the channel mapping, select the bus and click the Move Up or Move Down
button.
Click OK to close the Channel Mapping dialog and return to the Export Video to XDCAM Disc dialog. For more information,
see Setting up your project for multichannel audio on page 144.
d.
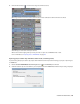
From the Tem pla te drop-down list, choose the setting that matches your destination disc.
Information about the selected rendering template is displayed in the Description box.
If you choose Default Template, the number of channels will match the number of channels specified in the Channel
Mapping dialog.
e.
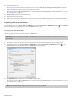
Select the Render loop region only check box if you want to export only the portion of your project that you selected in
step 1.
f.
Select the Delete file after print check box if you want to delete the rendered file from your hard drive after exporting it to
disc. If the export fails, the rendered file remains on disk so you can adjust your XDCAM device settings and export again
without having to render again.
g.
Select the Use project output rotation setting check box if you’re rendering a rotated project and want to use the Output
rotation setting from the Project Properties dialog for your rendered file.
When the check box is cleared, the media is rotated according to its Media Properties setting, but the project itself is
unrotated—you can use this setting to proof your project on an unrotated display.
5.
Click OK. Your project is rendered and transferred to your camera or deck.