
Operation Manual


284 | CHAPTER 15
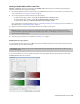
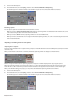
Modifying properties for multiple files
• When multiple files are selected, check boxes appear for slider settings that do not match across all selected files. When you
drag the slider or type a new value, the check box is automatically selected, and the new value is applied to all selected files
when you click OK. Clear the check box to leave the setting unchanged for the selected files.
• If values already match for a slider setting, no check box is displayed, and any changes made to the setting are applied to all
selected files.
• If values do not match for a drop-down setting, the setting is blank. If you choose a value for a blank drop-down setting, that
value is applied to all selected files.
Restoring default values
• Double-click a slider ( ) to restore the setting to the clip default.
•Click the Clip Default button to restore all settings to the clip default.
•Click the Factory Default button to restore all settings to the default settings of the camera.
For more information about the settings in the R3D Decode Properties window, refer to your RED camera documentation or
http://www.red.com/support. These settings map directly to settings on the RED cameras.
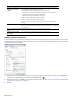
Modifying project video properties
You can access project video properties by clicking the File menu and choosing Properties or by clicking the Project Video
Properties button ( ) on the Video Preview window. Many of these settings are identical to the settings found on the Project tab
of the Custom Template dialog. Final render properties set up in the Custom Template dialog override the following Project
Properties settings.
For more information, see Working with project properties on page 408.
These properties control all of the default settings for your project. Without making any changes, these are also the settings that are
used to create a final rendered movie file.
Item Description
Template Select a preset template from this drop-down list to automatically configure the
remaining video controls in this dialog. Many popular formats are included, but you
should consult your hardware manuals if you have any questions. You can also save
your own custom template.
Match Media Settings
Click the Match Media Settings button ( ) to set your project properties to match
the properties of a media file of your choosing.
Width/Height Use the values in these boxes to set the frame size of your final movie. The maximum
frame size for AVI, MPEG, QuickTime, RealMedia, Windows Media, and still-image
output is 2048x2048.
Note:
The maximum frame size is 4096x4096.
Field order Choose an option from this drop-down list to set the field order:
• None (progressive scan) Select this option for video to be viewed on a computer
monitor.
• Upper field first Select this option for video that will be viewed on a television.
• Lower field first Select this option for DV output or if Upper field first produces
jittery or shaky output.
Pixel aspect ratio Choose the pixel aspect ratio for the final movie’s destination from this drop-down list.
For more information, see Pixel Aspect Ratio on page 470.
Output rotation Choose a setting from the drop-down list to rotate your project’s output. Use output
rotation to edit projects for display in portrait (rather than landscape) or inverted
orientation.
Tip:
If you want to rotate a media file’s orientation, you can use the Rotation drop-
down list on the Media Properties dialog.
For more information, see Editing
properties for a video file on page 287.
For more information about working with rotated projects, see Working with rotated
projects on page 39.