
Operation Manual

348 | CHAPTER 19
The Video Preview window also displays a transport bar similar to the transport bar on below the project timeline. For more
information, see Transport bar controls on page 24.
Using the Video Preview window shortcut menu
Right-click the Video Preview window to adjust the following options.
Optimizing the Video Preview window
Timing and synchronization are critical aspects of any multimedia production. Because complex multimedia projects are
challenging for any computer, a number of tools are provided to maintain real-time playback even though the computer may not
be able to process the data quickly enough.
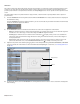
Adjusting preview quality and resolution
You can adjust the resolution of the Video Preview window and the quality of the preview rendering in order to improve playback.
Lower-resolution previews are less clear but allow more frames to be displayed per second. This may be particularly important with
projects that use overlays, transitions, and effects. Click the Preview Quality button and choose a setting from the menu to change
the quality and resolution for rendering your video preview.
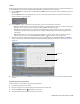
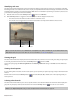
Copy Snapshot to
Clipboard
Copies the current frame to the clipboard.
You can change the size of the image using the Preview Quality button. Choose
Auto or Full to capture the frame at its full resolution, or choose Half or Quarter
to capture a smaller image.
Save Snapshot to File Saves the current frame as an image file.
You can change the size of the image using the Preview Quality button. Choose
Auto or Full to capture the frame at its full resolution, or choose Half or Quarter
to capture a smaller image.
The Save Snapshot to File dialog is displayed to allow you to choose the format
and location where you want to save the file. The file is automatically added to
the Project Media window.
For more information, see Capturing a timeline snapshot on page 274.
Item Description
Default Background Sets the background color for the window.
Black Background
White Background
Simulate Device Aspect Ratio Displays the output in square pixels. This can prevent distortion of the preview when
using sources with rectangular pixels. This does not affect the final render.
Scale Video to Fit Preview
Window
Scales the video to fill the Video Preview window. This setting is used for previewing
only.
Adjust Size and Quality for
Optimal Playback
Emphasizes frame rate during playback. When this option is not selected, video
quality is emphasized, and the frame rate will be reduced if necessary.
Show Toolbar Toggles the toolbar at the top of the window.
Show Status Bar Toggles the information display at the bottom of the window.
Show Transport Bar Toggles the transport bar at the bottom of the window.
Video Preview Preferences Displays the Video tab of the Preferences dialog, allowing you to configure video
preview settings.
Preview Device Preferences Displays the Preview Device tab of the Preferences dialog, allowing you to configure
an external monitor.
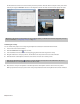
Note:
If you want to emphasize frame rate during preview, right-click in the Video Preview window and select Adjust Size and
Quality for Optimal Playback from the shortcut menu. When this option is not selected, video quality is emphasized, and the frame
rate will be reduced if necessary.
Button Description