
Instructions) Instruction Manual
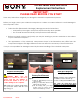

VPCEA Series Hard Disk Drive
Replacement Instructions
P/N
989201978
Rev. B 2/3
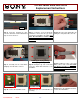
Step 4.
Using the included pry stick,
insert the stick at the notch indicated and
lift up to remove the door.
Step 5.
Using the enclosed magnetic
screwdriver, remove the two (2) screws
securing the Hard Drive Assembly. Put
aside the Hard Drive Screws to re-
secure the Hard Drive later in the
procedure.
Step 6.
Disconnect the Hard Drive by
pulling the clear plastic tab to the left.
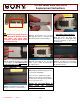
Step 7. Carefully lift the Hard Drive
straight up from the unit to remove.
Step 8. Identify the (4) side screws that
secure the Hard Drive Bracket to the
Hard Drive.
Step
9
.
Holding the edge of the Hard
Drive, remove each screw. Put aside
the Bracket Screws to secure the
Bracket to the New Hard Dive later
in the procedure.
Step 12. Place the Hard Drive bracket
over the New Hard Drive.
Step
10
.
Set the old Hard Drive aside.
Step
11
.
Prepare the new Hard Drive for
assembly.
Hard Drive Disassembly
(Steps 8-13)
Lift To Remove
Old Hard Drive
O
ld
H
ard
Drive
New Hard Drive