
Manual

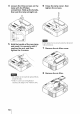
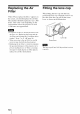

9 Place a new air filter.
After removing the air lilter, do not touch
the fan inside the prujeclor.
10 Attach the air filter cover.
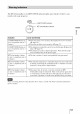
11 Wipe dust off the Ventilation
holes (intake) with a soft cloth.
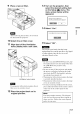
13 Turn on the projector, then
select the desired setting item
on the Setup _ menu. The
menu screen below will be
appeared.
Se[llngs for lamp replacement ]
Has the proiection lamp been replaced ?
14 Select "Yes".
i Lamp replacement process is now complete. ]
15 Select "OK".
[[R_lllt;_
Do not put your hands into the lamp
replacement slot, and do not allow any liquid
or other objects into the slot to avoid
electrical shock or fire.
o
33-
[1_
Ventilation holes (intake)
[ I_£,_
The projecter will net lurn on unless the air
filter cover is securely closed.
12 Place the project back on its
original position.
• Be sure to use an LMP-H 160 Prqiector Lamp
R)r replacement. If you use lamps other than
the LMP-HI60, the pwjector may
malfunction.
• Be sure to turn off the projector and unplug
the power cord before replacing the lamp,
then check the I/(_) (On/standby) indicator
has already been turned off.
• The proiector will not turn on unless the lamp
is securely installed in place.
• The prqiector will not turn on unless the lamp
cover are securely closed.
• To cancel a message displayed on the screen.
press either the button ea the remote control
or the one on the control panel on the
projector.
Note
The lamp contains mercury. The disposal
rules for used fluorescent tubes depend on
where you live. Follow the waste disposal
policy in your area.
57