
Operating Instructions Data Projector VPL-CX155/CX125, VPL-CW125


6
Preparation
3 Install the software according to the
“wizard” within the installer.
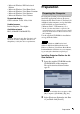
When you use Windows XP Service
Pack 2/Vista and the following dialog
box appears during installation, check
the [Register automatically] radio button
and click [Next].
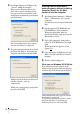
The [Autoconfiguration done] appears
after the installation is completed.
4 To go on projecting the pictures, check
the [Start Air Shot v2 and connect to
Projector] check box and click [OK].
With the check, the Projector Station for
Air Shot Version 2 starts up
automatically.
When you are not going to project the
pictures, click [OK].
Starting from the hard disk or
external memory without installing
Projector Station for Air Shot
Version 2 into the computer
1 Install the external memory (“Memory
Stick”, USB memory, etc.) into the
computer.
It is not necessary to copy it to the hard
disk.
2 Put the supplied CD-ROM into the
CD-ROM drive of the computer.
When the application software
installation window appears, press the
Exit button to exit it.
3 Open [My computer], then put the
cursor on [CD-ROM drive] and right-
click.
When the item list appears, select
[Open (O
)].
4 Copy the folder of [PjStation for Air
Shot v2] to the hard disk or external
memory.
5 Execute [AutoConfig.exe].
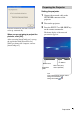
When you use Windows XP SP2/Vista
If the following window appears in the
middle of the operation, check the [Register
automatically] radio button and click [Next].
[Autoconfiguration done] appears after the
installation is completed.
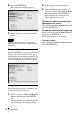
To continue projecting the pictures, check
the [Start Air Shot v2 and connect to
Projector] check box and click [OK].