
User Guide


50
English
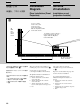
Ceiling Installation
(Front Projection)
Français
Installation au platfond
(projection frontale)
天井
Ceiling
Plafond
Techo
Decke
Soffitto
B
スクリーンの中心(水平)
Center of the screen (H)
Centre de l’écran (H)
Centro de la pantalla (H)
Mitte des Projektionsschirms (H)
Centro dello schermo (O)
レンズの中心(水平)
Center of the lens (H)
Centre de l’objectif (H)
Centro del objetivo (H)
Mitte des Objektivs (H)
Centro dell’obiettivo (O)
プロジェクターサスペンションサポートPSS-610(別売り)
PSS-610 Projector Suspension Support (not supplied)
Support de suspension pour projecteur PSS-610 (non fourni)
Soporte de suspensión para proyector PSS-610 (no suministrado)
Projektoraufhängung PSS-610 (nicht mitgeliefert)
Supporto di sospensione del proiettore PSS-610 (non in dotazione)
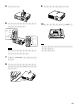
プロジェクターを天井からつり下げて設置する
場合の設置例を示します。(B、C)
天 井 つりの 場 合 は、プロジェクターサ スペン
ションサポートPSS-610をご使用ください 。
設置は、代理店またはソニーサービスにおま
かせください。
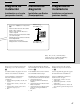
設置寸法については、52、53ページの表をご
覧ください 。
イラスト中 の ア ル ファベットは 、以下の距離を示
します。
a’ : PSS-610天井用マウントブラケ ット穴 中 心
(後側)スクリーンまでの距離
a” : SET 底面PSS-610取り付け穴(前側)
からスクリーンまでの距離
b : 天 井 か ら プロ ジェクタ ーマウントブ ラケッ
ト取り付け面間での距離
アジャストメントパイプ(b)を使った場合:
150/175/200 mm
アジャストメントパイプ(c)を使った場合:
250/275/300 mm
x:天井からスクリーン の 中 心 ま で の 距 離
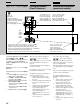
This section describes the examples for
installing the projector on the ceiling.
(B and C)
When installing the projector on the ceiling,
use the PSS-610 Projector Suspension
Support.
For ceiling installation, ask for qualified
Sony personnel only.
See the charts on pages 52 to 53 concerning
the installation measurements.
The alphabetical letters in the illustration
indicate the distances below.
a’ : distance from the center of upper
ceiling mount bracket hole (rear) to
the screen
a” : distance from PSS-610 mounting hole
(front) on bottom surface of set to
screen
b : distance between the ceiling and the
surface of the mounting bracket
Using adjustment pipe (b):
150/175/200 mm (6/7/7
7
/8 inches)
Using adjustment pipe (c):
250/275/300 mm (9
7
/8 /10
7
/8 /11
7
/8
inches)
x : distance between the ceiling and the
center of the screen
Cette section décrit des exemples
d’installation du projecteur au plafond.
(B et C)
Lorsque vous installez le projecteur au
plafond, utilisez le support de suspension
pour projecteur PSS-610.
Pour une installation au plafond, adressez-
vous uniquement à un personnel qualifié
Sony.
Reportez-vous aux tableaux des pages 52 à
53 sur les mesures d’installation.
Les caractères alphabétiques dans
l’illustration indiquent les distances ci-
dessous.
a’ : distance entre le centre de l’orifice
(arrière) du haut du support de
montage au plafond et l’écran
a” : distance entre l’orifice (avant) de
montage du PSS-610 sur la face
inférieure du projecteur et l’écran
b : distance entre le plafond et la surface
du supprt de montage
Utilisation du tube de réglage (b):
150/175/200 mm (6/7/7
7
/8 pouces)
Utilisation du tube de réglage (c):
250/275/300 mm (9
7
/8 /10
7
/8 /11
7
/8
pouces)
x : distance entre le plafond et le centre
de l’écran
スクリーンの中心(上下)
Center of the screen (V)
Centre de l’écran (V)
Centro de la pantalla (V)
Mitte des Projektionsschirms (V)
Centro dello schermo (V)
日本語
天井つり、フロント投影
a’
x
b
216.6
(8
5
/
8
)
29
(1
3
/
16
)
168
(6
5
/
8
)
82
(3
1
/
4
)
43
(1
3
/
4
)
天井への
取り付け穴
Ceiling mounting hole
L’orifice de montage au plafond
El orificio de montaje del techo
Deckenmontageloch
Foro di montaggio sul soffitto