
Projector User Manual


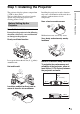


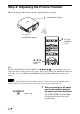
Table Of Contents
- Table of Contents
- Precautions
- Location of Controls
- Connections and Preparations
- Projecting
- Projecting the Picture on the Screen
- Using the Picture Position
- Selecting the Wide Screen Mode
- Watching 3D Video Images
- Selecting the Picture Viewing Mode
- Adjusting the Picture Quality
- Adjusting the Picture Using Real Color Processing
- Using the Supplied Software to Adjust the Picture Quality (ImageDirector3)
- Using the Menus
- Others
- About the Control for HDMI
- About the x.v.Color
- About the simulated 3D feature
- Troubleshooting
- Replacing the Lamp and the Air Filter and Cleaning the Ventilation Holes (intake)
- Cleaning the Air Filter
- Cleaning and the Screen of the Projector
- How to Use the USB Charging AC Power Adaptor
- Specifications
- Ceiling Installation
- Index

20
Step 2: Adjusting the Picture Position
Project an image on the screen and then adjust the picture position.
Tip
The
?/1 (ON/STANDBY), INPUT, MENU, and M/m/</,/ (joystick) buttons on the side
panel of the projector function the same as those on the remote control. The LENS button functions
in the same way as the LENS ADJUSTMENT (FOCUS, ZOOM, SHIFT) button of the remote
control.
Depending on the installation location of the projector, you may not control it with the remote
control. In this case, point the remote control to the screen instead of the projector.
Note
1 After connecting the AC power
cord to the projector plug the
AC power cord into a wall outlet.
The ON/STANDBY indicator lights
in red and the projector goes into
standby mode.
ON/STANDBY indicator
Remote control detector
3, 4, 5
POSITION
button
2
1
?/1 (ON/
STANDBY)
switch
Lights in red.