
Projector User Manual
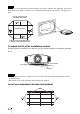
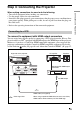
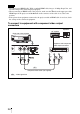
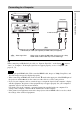
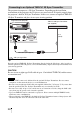
Table Of Contents
- Table of Contents
- Precautions
- Location of Controls
- Connections and Preparations
- Projecting
- Projecting the Picture on the Screen
- Using the Picture Position
- Selecting the Wide Screen Mode
- Watching 3D Video Images
- Selecting the Picture Viewing Mode
- Adjusting the Picture Quality
- Adjusting the Picture Using Real Color Processing
- Using the Supplied Software to Adjust the Picture Quality (ImageDirector3)
- Using the Menus
- Others
- About the Control for HDMI
- About the x.v.Color
- About the simulated 3D feature
- Troubleshooting
- Replacing the Lamp and the Air Filter and Cleaning the Ventilation Holes (intake)
- Cleaning the Air Filter
- Cleaning and the Screen of the Projector
- How to Use the USB Charging AC Power Adaptor
- Specifications
- Ceiling Installation
- Index

23
Connections and Preparations
When adjusting the window position, do not touch the lens unit, otherwise your fingers may be
pinched by the moving parts.
To adjust the horizontal position
Press </,.
The picture projected on the screen moves right or left by a maximum of 25% of the screen
width from the center of the lens.
To adjust the vertical position
Press M/m.
The picture projected on the screen moves up or down by a maximum of 65% of the screen
height from the center of the lens.
Note
Top view
: Picture position when moving the picture to the left
at maximum
: Picture position when moving the picture to the
right at maximum
25% 1 screen width 25%
65%
1
screen
height
65%
Side view
: Picture position when moving the picture upward at
maximum
: Picture position when moving the picture downward at
maximum