
Projector User Manual
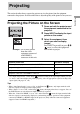

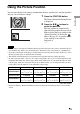
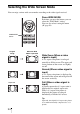
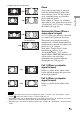

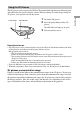

Table Of Contents
- Table of Contents
- Precautions
- Location of Controls
- Connections and Preparations
- Projecting
- Projecting the Picture on the Screen
- Using the Picture Position
- Selecting the Wide Screen Mode
- Watching 3D Video Images
- Selecting the Picture Viewing Mode
- Adjusting the Picture Quality
- Adjusting the Picture Using Real Color Processing
- Using the Supplied Software to Adjust the Picture Quality (ImageDirector3)
- Using the Menus
- Others
- About the Control for HDMI
- About the x.v.Color
- About the simulated 3D feature
- Troubleshooting
- Replacing the Lamp and the Air Filter and Cleaning the Ventilation Holes (intake)
- Cleaning the Air Filter
- Cleaning and the Screen of the Projector
- How to Use the USB Charging AC Power Adaptor
- Specifications
- Ceiling Installation
- Index

34
Selecting the Wide Screen Mode
You can enjoy various wide screen modes according to the video signal received.
Press WIDE MODE.
Each time you press the button, you can
select the “Wide Mode” setting.
You can also select it using the menu
(1 page 56).
Wide Zoom (When a video
signal is input)
A 4:3 aspect ratio picture is enlarged
naturally to fill the screen. The upper and
lower portions of the screen are slightly
cut off.
Normal (When a video signal is
input)
A 4:3 aspect ratio picture is displayed in
the center of the screen and enlarged to fill
the screen vertically.
Full (When a video signal is
input)
A picture squeezed to 4:3 aspect ratio is
displayed in its original aspect ratio.
When a 4:3 aspect ratio picture is
displayed, the picture is enlarged
horizontally to fill the 16:9 screen.
Tip
Squeezed: An original 16:9 aspect ratio picture
is recorded horizontally compressed to a 4:3
picture.
WIDE MODE
button
Original
image
When the Wide
Mode is operated
Squeezed