
Projector User Manual
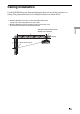


Table Of Contents
- Table of Contents
- Precautions
- Location of Controls
- Connections and Preparations
- Projecting
- Projecting the Picture on the Screen
- Using the Picture Position
- Selecting the Wide Screen Mode
- Watching 3D Video Images
- Selecting the Picture Viewing Mode
- Adjusting the Picture Quality
- Adjusting the Picture Using Real Color Processing
- Using the Supplied Software to Adjust the Picture Quality (ImageDirector3)
- Using the Menus
- Others
- About the Control for HDMI
- About the x.v.Color
- About the simulated 3D feature
- Troubleshooting
- Replacing the Lamp and the Air Filter and Cleaning the Ventilation Holes (intake)
- Cleaning the Air Filter
- Cleaning and the Screen of the Projector
- How to Use the USB Charging AC Power Adaptor
- Specifications
- Ceiling Installation
- Index

91
Others
Attaching the PSS-H10 projector suspension support
For details on installation on a ceiling, refer to the Installation manual for Dealers of the
PSS-H10. Make sure to consult with a qualified Sony personnel for installation.
The installation measurements are shown below when installing the projector on a ceiling
using the PSS-H10.
Top view
Install the projector so that the center of the lens is parallel to the center of the screen.
Front of the cabinet
Upper ceiling
mount bracket
Center of the supporting pole
(The center of the supporting pole
is different from that of the unit.)
204.8 (8
1
/
16
) 130 (5
1
/
8
)
249.8 (9
27
/
32
)