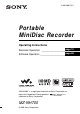
3-266-469-11(1) Portable MiniDisc Recorder Operating Instructions page 10 Recorder Operation _____________________________ page 86 Software Operation ______________________________ “WALKMAN” is a registered trademark of Sony Corporation to represent Headphone Stereo products. is a trademark of Sony Corporation.
WARNING To prevent fire or shock hazard, do not expose the unit to rain or moisture. Do not install the appliance in a confined space, such as a bookcase or built-in cabinet. Information IN NO EVENT SHALL SELLER BE LIABLE FOR ANY DIRECT, INCIDENTAL OR CONSEQUENTIAL DAMAGES OF ANY NATURE, OR LOSSES OR EXPENSES RESULTING FROM ANY DEFECTIVE PRODUCT OR THE USE OF ANY PRODUCT.
Notice for users On the supplied software • Copyright laws prohibit reproducing the software or the manual accompanying it in whole or in part, or renting the software without the permission of the copyright holder. • In no event will SONY be liable for any financial damage, or loss of profits, including claims made by third parties, arising out of the use of the software supplied with this recorder.
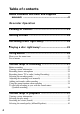
Table of contents About available functions and supplied manuals ............................................................. 8 Recorder Operation Looking at controls ............................................. 11 Getting started .................................................... 14 Recording a disc right away! .............................. 18 Playing a disc right away! ................................... 22 Using menus ........................................................
Editing recorded tracks ...................................... 44 Before editing ..............................................................................................44 Adding titles (Title) .....................................................................................44 Assigning tracks or groups as a new group (Group Set) .............................47 Releasing a group setting (Group Release) .................................................49 Moving recorded tracks or groups (Move) ....
Software Operation What you can do with MD Simple Burner/ SonicStage ....................................................... 86 Installing ............................................................. 88 Providing the required system environment ...............................................88 Installing the software onto your computer ................................................89 Using MD Simple Burner ..................................... 91 Before using MD Simple Burner ...........................
About available functions and supplied manuals This section explains the functions of this portable MiniDisc recorder and the manuals that have been supplied with it. Please refer to the manual that applies to each use of the recorder. Learning more about Hi-MD “Hi-MD” is a new MiniDisc format with advanced capabilities over the standard MD format. The “What you can do with the Hi-MD Walkman” flyer This flyer explains the major features of Hi-MD Walkman and how it differs with standard MD Walkman.
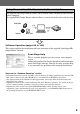
Using the recorder while it is connected to a computer The supplied SonicStage software allows you to transfer audio data between the recorder and the computer. The supplied MD Simple Burner software allows you to record audio data to the recorder. Audio CDs Internet Music files Software Operation (pages 86 to 110) This section explains the installation and basic operations of the supplied SonicStage/MD Simple Burner software.
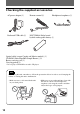
Checking the supplied accessories AC power adaptor (1) Remote control (1) Dedicated USB cable (1) NH-7WMAA Nickel metal hydride rechargeable battery (1) Headphones/earphones (1) Optical cable (except Canada and Mexico models) (1) CD-ROM (SonicStage/MD Simple Burner) (1)* Battery carrying case (1) Carrying pouch (1) * Do not play a CD-ROM on an audio CD player. Note When using this unit, remember to follow the precautions below in order to avoid warping the cabinet or causing the unit to malfunction.
Looking at controls The recorder 1 8 2 9 q; 3 qa 4 qs qd 6 qf 7 qg A Display window B T MARK/REC (+N) button C Jog dial Operation Function Press towards > find the beginning of the next track, fast forward Press towards VOL +1) or VOL –. volume Recorder Operation 5 1) There are tactile dots beside the NENT and VOL + buttons. D 5-way control key Operation Function Press NENT 1) play, enter Press towards .
L LINE IN (OPT) jack M MIC (PLUG IN POWER) jack There is a tactile dot beside the MIC (PLUG IN POWER) jack. N HOLD switch Slide the switch in the direction of the arrow to disable the buttons on the recorder. To prevent the buttons from being accidentally operated when you carry the recorder, use this function. O i (headphones/earphones) jack The display window of the recorder 1 2 7 A Character information display Displays the disc and track names, date, error messages, track numbers, etc.
The headphones/earphones with a remote control 4 1 5 2 6 3 7 A Clip B HOLD switch To prevent the buttons from being accidentally operated when you carry the recorder, use this function. C (group) +, – buttons D Volume control (VOL +, –) Turn to adjust the volume. E NX (play, pause) button F x (stop) button G ., > buttons Operation Function Press .
Getting started Charge the rechargeable battery before using. 1 Insert the rechargeable battery. 1 Slide OPEN to open the 2 Insert the NH-7WMAA battery compartment lid. 3 Close the lid. rechargeable battery E end first. e E 2 Charging the rechargeable battery. 1 Connect the AC power adaptor to DC IN 3V on the recorder and the AC power adaptor to a wall outlet. To a wall outlet 2 Press x • CANCEL/CHG. “Charging” flashes, e appears in the display, and charging starts.
z Full charging of a completely discharged rechargeable battery takes about 2 hours. Charging time may vary depending on the battery condition. 3 Make connections and unlock the controls. 1 Connect the headphones/earphones 2 Slide HOLD to the opposite direction of with the remote control to i. the arrow (.) on the recorder or the remote control to unlock the controls.
For models supplied with the AC plug adaptor If the AC power adaptor does not fit the wall outlet, use the AC plug adaptor. When using the dry battery Insert one LR6 (size AA) alkaline dry battery (not supplied) instead of the rechargeable battery. When to charge the rechargeable battery or replace the dry battery You can check the battery condition on the display window of the recorder. Battery power decreasing m Weak battery m The battery is drained.
MD mode (Unit: approx.hours)(JEITA) Batteries SP LP2 LP4 Stereo Stereo Stereo NH-7WMAA 4.5 LR6 7.5 6 6.5 9.5 11 When playing continuously Hi-MD mode (When using a 1GB HiMD disc) (Unit: approx.hours)(JEITA) Batteries Linear Hi-SP PCM NH-7WMAA 4.5 LR6 11 Hi-LP 7.5 9 18.5 21.5 Hi-MD mode (When using a 60/74/80minute standard disc) (Unit: approx.hours)(JEITA) Batteries Linear Hi-SP PCM NH-7WMAA 4 LR6 9.5 Hi-LP 7.5 9 17 20 MD mode (Unit: approx.
Recording a disc right away! This section explains the basic procedure for making digital recordings using an optical cable connected to a CD player, Digital TV or other digital equipment. Make sure to use the optical cable. 1 Make connections. (Insert the cables firmly and completely into the appropriate jacks.) 1 Connect the AC power adaptor to the 2 Connect the optical cable to the recorder and a house current. recorder and an external component. CD player, MD player, DVD video player, etc.
2 Insert a recordable disc. 1 Slide OPEN to open the lid. 2 Insert a disc with the label side facing front, and press the lid down to close. Make sure to check the record-protect tab is closed. 3 Confirm the operation mode. This recorder has two operation modes, “Hi-MD mode” and “MD mode”. The operation mode is automatically recognized whenever the disc is inserted. After you insert a disc, check the operation mode on the display window of the recorder.
4 Record a disc. 1 Select and pause the sound source to be recorded. 2 Make sure that disc indication has stopped rotating in the display window on the recorder. PAUSE Make sure that disc indication has stopped. Connected component 3 While the recorder is stopped, press and hold T MARK/REC and press NENT on the recorder. “REC” lights up and recording starts. T MARK/REC 4 Play the source you want to record. If you insert a previously recorded disc, the recording starts after the existing contents.
If the recording does not start • Make sure the recorder is not locked (pages 12, 15). • Make sure the disc is not record-protected (pages 19, 65). • Premastered discs cannot be recorded over. Notes • When you record on a 1GB Hi-MD disc, connect the AC power adaptor to the recorder, charge the rechargeable battery fully (battery level indication shows ), or use a new alkaline dry battery (battery level indication shows ).
Playing a disc right away! 1 Insert a recorded disc. 1 Slide OPEN to open the lid. 2 Insert a disc with the label side facing front, and press the lid down to close. 2 Play a disc. 1 Press the 5-way control key (NENT) 2 Press the 5-way control key towards on the recorder. Press NX on the remote control. A short beep sounds in the headphones/ earphones when you operate. VOL + or – to adjust the volume on the recorder. Turn the volume control towards VOL + or – on the remote control.
To Operation on the recorder Operation on the remote control Stop Press x. Press x. Pause Press X. Press X again to resume play. Press NX. Press NX again to resume play. Turn the jog dial to select a track, Select a track directly viewing track number or and then press NENT to enter. name — Find the beginning of the current track Press the 5-way control key towards .. Press the 5-way control key towards . repeatedly until you reach the beginning of the desired track. Press .. Press .
Using menus How to use the menu items The recorder has many menus with useful functions for recording, playback, editing, etc. To set the menu items, do the following procedure. If you are doing a menu operation for the first time after purchasing the recorder, “Menu Mode” flashes in the display. Before the menu operation, you can set “Menu Mode” to “Simple” (only basic menu items appear) or “Advanced” (all menu items appear).
List of menus The following table shows the menu items that you can select. Menu items can be set with the recorder only. Items listed under “Menu 1” are the selectable items which appear when you enter the menu, and items listed under “Menu 2” are the selectable items which appear when you select an item in Menu 1. It is possible to display all menu items only when “Menu Mode” is set to “Advanced”. Menu items with an asterisk (*) are not displayed when “Menu Mode” is set to “Simple”.
Menu 1 Menu 2 Function Site page Sound Normal Customizes the equalizer mode settings. page 42 Sound EQ Useful* Search* Searches for tracks by track name, group name, page 42 artist name, or album name. REC Set REC Mode Selects the recording mode (PCM, Hi-SP, or Hi-LP for Hi-MD mode/SP, LP2, LP4, or monaural for MD mode). Option 26 page 31 RECVolume* Manually adjusts the recording level. page 32 MIC AGC* Sets the microphone recording level adjustment mode.
Various ways of recording Before recording Selecting the operation mode This recorder has two operation modes, “Hi-MD mode” and “MD mode”. The operation mode is automatically recognized whenever the disc is inserted. After you insert a disc, check the operation mode on the display window of the recorder. “Hi-MD” lights up when the operation mode is Hi-MD and “MD” lights up when the operation mode is MD.
While the recorder is stopped A/B/ Viewing various information C You can check the remaining time, track number, etc. when recording or during stop.
While recording A/B/C A B C Elapsed time Level meter Group number and track number Remaining Group number and time for recording. track number “RecRemain” • Disc name • Group and artist name and name (Hialbum MD)1) name (HiMD)2) • Disc name (MD)1) • Group name (MD)2) Track name Recording from a microphone Stereo microphone* NAVI/MENU 1) Track number appears if the currently selected track is not in a group. 2) The disc name appears when the currently selected track is not in a group.
2 Turn the jog dial until “Sens High” or “Sens Low” appears in the display, and then press NENT to enter the selection. Sens High: When recording a soft sound or a sound with a normal volume. Sens Low: When recording with a loud or close-range sounds, such as those during an oral recording or a music concert. To change the microphone recording level adjustment mode When recording with a microphone, you can select automatic adjustment mode which sets the microphone recording level to suit the sound source.
Recording from a TV or radio (Analog Recording) This section explains how to record from equipment with analog output, such as a cassette recorder, radio, or TV. This operation can be done on the recorder only. TV, cassette recorder, etc. Selecting the recording mode Select each recording mode according to the recording time that you want. Discs recorded in Hi-MD or MD (MDLP) mode can be played back only on MD players or recorders with Hi-MD or MD (MDLP) playback mode.
Recording Display mode Recording time Hi-SP stereo • Approx. 140 min. on an 80minute standard disc • Approx. 475 min. on a 1GB Hi-MD disc Hi-LP stereo Hi-SP Hi-LP • Approx. 610 min. on an 80minute standard disc • Approx. 2,040 min. on a 1GB Hi-MD disc Notes • It is recommended that you use the AC power adaptor for long recordings. • When you record in LP4 mode, momentary noise may be produced on very rare occasions with certain sound sources.
4 While observing the level meter in the display, adjust the recording level by turning the jog dial. Set the level so that the meter segments light up around –12dB segment. If a high sound level causes the level meter to reach the OVER segment, lower the recording level. Each level meter shows the following.
To cancel Time Mark Select “Off” in step 1. Using Time Mark to add track marks while recording When the elapsed recording time exceeds the time interval for Time Mark: The recorder adds track marks at the point you set the time interval and from that point the recorder adds a track mark whenever the time interval has elapsed. Example: Eight minutes of recording has been completed when the Time Mark time interval is set to 5 minutes.
Note It will not be possible to make a group setting if the tracks, groups and disc name on a disc exceed the maximum number that can be input (in MD mode only). T MARK/REC Jog dial NAVI/ MENU Recording tracks to an existing group You can add a track to an existing group. Adding a new track at the end of the selected group 1 GROUP X 5-way control key (NENT) To create a new group automatically when recording The recorder is factory set to create a new group automatically when recording.
To start/stop recording in sync with the sound source (Synchro-recording) During synchro-recording, the starting and stopping of recording occurs are synchronized with the sound source. This simplifies digital recordings (e.g., from a CD player) since the need to operate the recorder or the sound source is eliminated. Synchro-recording is only possible with the optical cable connected. Jog dial NAVI/ MENU 5-way control key (NENT) 1 2 Make connections.
Various ways of playback Display window A/B/C Viewing various information You can check the track name, disc name, etc. during playback. A B Group number and track number Elapsed time • Track name and artist name (HiMD) • Track name (MD) Jog dial NAVI/ MENU 5-way control key (NENT) 1 2 While playing, enter the menu and select “Display” Turn the jog dial until the information you want appears in the display, and then press NENT to enter the selection. Each turn changes the display as follows.
Note Depending on the group settings, the operating conditions, and the disc settings, you may not be able to select certain indications or the indications may appear differently. Playing tracks in Main play mode 1 z If you want to check the remaining time or the recording position while recording or in stop mode, see “Viewing various information” (page 28). Selecting the play mode You can listen to tracks in various play modes.
Playing tracks in normal mode (Normal Play) 1 2 3 Do step 1 and select “Normal” in step 2 of “Playing tracks in Main play mode” (page 38). When selecting a track out of a group, skip this step. When selecting a track within a group, turn the jog dial until the group that the desired track belongs to appears in the display, and then press NENT to enter. A list of the tracks in the selected group appears in the display.
Listening to tracks of a selected album (Album Play) (in Hi-MD mode only) If the track data includes the album name, you can listen to tracks of a selected album only. 1 2 3 Do step 1 and select “Album” in step 2 of “Playing tracks in Main play mode” (page 38). A list of the albums on the disc appears in alphabetical order. Listening to selected tracks only (Bookmark Play) You can bookmark tracks on a disc and play them only. The sequence of bookmarked tracks cannot be changed.
Playing tracks in Sub play mode/Repeat Play By specifying Sub play modes, you can listen to tracks selected in Main play mode in various ways. For example, by selecting “Group” in Main play mode and “Shuffle” in Sub play mode, the recorder will play the tracks in the selected group in random order. 1 2 Enter the menu and select “SubPMode”. Turn the jog dial to select the desired play mode, and then press NENT to enter the selection. Each time you turn the jog dial, A changes as follows.
Searching for a track (Search) You can easily search for a track by track name, group name, artist name, or album name. Artist names and album names can be viewed in the case of discs used in HiMD mode only. Jog dial NAVI/ MENU x 5-way control key (NENT) 1 2 Enter the menu and select “Useful” “Search”. Turn the jog dial to select the item you want to use for searching, and then press NENT to enter.
2 Turn the jog dial repeatedly to select the sound mode and then press NENT to enter the selection. To modify and store the sound You can modify the sound and store the results in “Custom1” and “Custom2”. 1 A 2 While playing, enter the menu and select “Sound” - “Sound EQ” “Custom1” or “Custom2”. Press the 5-way control key towards . or > to select the frequency. Level of the each frequency (100 Hz - 10 kHz) B Frequency (100 Hz) From the left, you can select 100 Hz, 250 Hz, 630 Hz, 1.
Editing recorded tracks Before editing Adding titles (Title) You can edit your recordings by adding/ erasing track marks or labeling tracks and discs. You can add titles to tracks, groups and discs. You can add artist names and album names to tracks on a disc used in Hi-MD mode.
About the character palette During operations on the recorder, characters can be selected from the character palette in the display. The character palette has the following configuration. Character palette for Hi-MD mode Character palette for MD mode Note If you enter the symbol “//” between the characters in disc names such as “abc//def”, you may be unable to use the group function (in MD mode only). 5-way control key (NENT, .
2 Select one of the following, and then press the jog dial. The buttons used for character input and their functions are listed below. Title Display Functions1) Track name “Track” Group name “Group” To move the 5-way control key cursor in the up character palette. Artist name (to a track)1) “Artist” Album name (to a track)1) “Album” Disc name “Disc” 1) Appears left right down only for discs used in Hi-MD mode. Turn the jog dial (move the cursor to the right or left).
Functions1) Operations To switch between Press X. capital letters and small letters. 1) Functions of the buttons or the control may differ depending on when the cursor is in the letter input area or in the character palette. 5 6 Repeat step 4, and then enter all characters of the label name. Press NENT for 2 seconds or more. Note When the recording is stopped or the recording moves on to the next track while labeling titles during recording, the input at that point is entered automatically.
3 Notes • When the total number of characters in the titles on a disc exceed the maximum that can be input: —If the disc is being used in Hi-MD mode, you can make a group setting, but cannot add a group name in step 4. —If the disc is being used in MD mode, you cannot make a group setting. • The tracks or groups must be sequential.
Releasing a group setting (Group Release) Moving recorded tracks or groups (Move) Select a group you want to release and check the contents (see “Playing tracks in a group (Group Play)” (page 39)). You can change the order of the recorded tracks or groups. Jog dial Jog dial NAVI/ MENU NAVI/ MENU 5-way control key (NENT) 1 2 3 4 x Select a group that you want to release and check the contents (see page 39). Press x. Enter the menu and select “Edit” “ : Release”.
2 3 Turn the jog dial until the destination track number flashes in the display. For the example, since track C will be moved to track “02”, turn the jog dial until “02” appears in the display. Press NENT to enter the selection. The track moves to the selected destination track. 2 3 Moving a track in a disc with group setting When moving a track out of a group, skip this step.
z If the track or group has been labeled, press the 5-way control key towards > to make the track or group name appear in the display during operation. Press the control key towards . to return to the track or group number display. Jog dial NAVI/ MENU Note If all tracks are moved out of the group, the group automatically disappears from the disc. 5-way control key (NENT) x To erase a track Erasing tracks and the entire disc (Erase) You can erase unnecessary tracks or all tracks on a disc.
To erase a group 3 You can erase tracks in a selected group. Note that once a recording has been erased, you cannot retrieve it. Be sure to check the contents of the group before you erase it. 1 Select a group you want to erase and check the contents (see page 39). 2 3 Press x. 4 Press NENT to erase the group. The group is erased. Enter the menu and select “Edit” “Erase” - “ : Erase”. “Group Erase OK?” and “PUSH YES:ENTER NO:CANCEL” appear in the display.
Dividing a track (Divide) You can divide a track with a track mark, creating a new track from the part following the track mark. The track numbers will increase as follows. Notes To add track marks while recording (except while synchro-recording) Press T MARK at the point you want to add a track mark. You can use Time Mark to add track marks automatically at specified intervals (except while digital recording) (page 33).
Combining tracks (Combine) When you record with analog (line) input, unnecessary track marks may be recorded where recording level is low. You can erase a track mark to combine the tracks before and after the track mark. The track numbers will change as follows. 2 3 Notes • You cannot erase a track mark on a track that Find the track mark by pressing the 5way control key towards . slightly. For example, to erase the third track mark, find the beginning of the third track.
Formatting the disc (Format) When using a disc in Hi-MD mode, you can use the Format function to restore a disc to the condition it was in at the time of purchase. You can use this function only when using a disc in Hi-MD mode. Disc type After performing the Format function 1GB Hi-MD disc “NO TRACK” appears. All data including non-audio data will be erased. NOTE: Transfer authorization of the transferred tracks can be restored by connecting the recorder with the disc inserted to the computer.
Other operations Changing the displayed menu items (Menu Mode) You can specify the display of all items in the menu (Advanced mode) or only basic items (Simple mode). Refer to “List of menus” (page 25) to check the menu items that cannot be displayed. Protecting your hearing (AVLS) The AVLS (Automatic Volume Limiter System) function keeps down the maximum volume to protect your ears.
Turning off the beep sound You can turn off/on the beep sound. Jog dial NAVI/ MENU 5-way control key (NENT) 1 2 Storing the settings for individual discs (Disc Memory) The recorder is factory set to automatically store settings for each disc. The recorder automatically stores the settings for a disc and retrieves them whenever the disc is inserted. The following setting can be stored: • Bookmark • “Custom1” and “Custom2” settings of 6-Band Equalizer You can check the setting as follows.
Notes Note • Settings for up to 64 discs can be stored. Any settings stored afterwards will replace the settings with the lowest frequency of use among the 64. The numbers of discs that can be stored depend on the numbers of tracks recorded on the discs. More tracks recorded per disc means fewer discs can be stored. • If you try to erase the disc information of a disc that have never been stored, “NO DISC MEMORY” appears in the display for a few seconds.
Notes • Even if you select “MD” as the “Disc Mode” setting, the operation mode can only be “HiMD” when using a 1GB Hi-MD disc. • The operation mode set in the “Disc Mode” menu is applied to a blank 60/74/80-minute standard disc used on the recorder even if a different operation mode was selected in the SonicStage software or a different operation mode appeared on the display after the disc was formatted by the SonicStage software.
Using the recorder with a computer What you can do through connection with a computer Connecting the recorder to your computer To use the recorder connected to a computer, you must install the software from the supplied CD-ROM. For details on the installation procedure, refer to the “Software Operation” section. When you connect the dedicated USB cable directly to the USB connecting jack on the recorder, power (bus power) is supplied from the USB port of the computer.
Computer To the USB port Dedicated USB cable When you unplug the dedicated USB cable from the computer or remove the disc from the recorder Be sure to remove the recorder or the disc as follows. If not, damage to the data may occur. 1 2 3 To the USB cable connecting jack Make sure that “REC” is not displayed in the display window. Press x on the recorder. “EJECT DISC OK” appears in the display. Depending on the conditions, it may take some time until “EJECT DISC OK” appears in the display.
• We do not ensure trouble-free operation on all computers that satisfy the system requirements. Storing non-audio data to a disc If you connect the recorder to a computer with a disc in Hi-MD mode inserted, the disc is recognized as storage media by the Windows Explorer, allowing you to store non-audio data such as text data or image data. For the storage space for each disc, refer to the next page.
The storage space for each disc (formatted with the recorder/the SonicStage software) Disc type Total size Disc management space1) Free space 60-minute standard disc 219 MB (229,965,824 bytes) 832 KB (851,968 bytes) 218 MB (229,113,856 bytes) 74-minute standard disc 270 MB (283,312,128 bytes) 832 KB (851,968 bytes) 269 MB (282,460,160 bytes) 80-minute standard disc 291 MB (305,856,512 bytes) 832 KB (851,968 bytes) 290 MB (305,004,544 bytes) Hi-MD disc 964 MB (1,011,613,696 bytes) 832 KB (8
Additional information • Never wrap the recorder in anything when it is Precautions On safety Do not put any foreign objects in the DC IN 3V jack. being used with the AC power adaptor. Heat build-up in the recorder may cause malfunction or damage. On the headphones/earphones Road safety On power sources • Use house current, nickel metal hydride rechargeable battery, or LR6 (size AA) battery. • For use in your house: use the AC power adaptor supplied with this recorder.
• Because of the battery’s characteristics, the capacity of the rechargeable battery may be smaller than normal when it is used for the first time or after a long period of disuse. In this case, charge and discharge the battery several times. The normal battery life will be restored. • If the capacity of the rechargeable battery drops to half the normal amount, replace with the new one.
Inputs Specifications Audio playing system MiniDisc digital audio system Laser diode properties Material: GaAlAs Wavelength: λ = 790 nm Emission duration: continuous Laser output: less than 44.6 µW (This output is the value measured at a distance of 200 mm from the lens surface on the optical pick-up block with 7 mm aperture.) Recording and playback time When using HMD1G (1GB disc): Maximum 34 hours in Hi-LP stereo When using MDW-80 in Hi-MD mode: Maximum 10 hours and 10 min.
Optional accessories Optical Cable POC-151HG, POC-152HG, POC-MZ1, POC-MZ2, POC-15B, POC-15AB, POCDA12SP Line Cable RK-G129, RK-G136 Stereo Microphones ECM-MS907, ECM-MS957 MDR-series Stereo Headphones/earphones* SRS-series Active Speakers Recordable MDs MDW-series Recordable Hi-MD disc HMD1G Your dealer may not handle some of the above listed accessories. Please ask the dealer for detailed information about the accessories in your country.
Troubleshooting and explanations Troubleshooting If a problem occurs during recorder operation, follow the steps described below before consulting the nearest Sony dealer. If any messages appear, it is recommended to take notes. 1 2 Check to see if the problem is listed in, “Troubleshooting” (page 68). Check “Messages” (page 76) for the problem as well. If after step 1 you still cannot solve the problem, consult your nearest Sony dealer.
While recording Symptom Cause/Remedy “NotENOUGH POWER TO REC” appears and recording cannot be done on a 1GB Hi-MD disc. • Recording is not possible when using a 1GB Hi-MD disc even when the battery level indication shows enough power remaining while the recorder is stopped or playing. This is because of a mechanism that disables recording when the remaining battery power is estimated by the recorder to be insufficient due to the high power consumption required for 1GB Hi-MD disc recording.
Symptom Cause/Remedy Stereo sound is heard in the headphones/ earphones while recording in monaural. • This is normal. During digital recording, the sound will be stereo in the headphones/earphones, even though the recorded sound is monaural. Momentary noise is heard when recording. • Due to the special digital audio compression technology used in LP4 stereo mode, momentary noise may occur on very rare occasions with certain sound sources. , Record in SP or LP2 mode.
While playing Symptom Cause/Remedy A disc is not played normally. • Repeat play is selected. , Enter the Sub play mode to change back to the normal play (page 41). • Playback mode is changed. , Enter the Main play mode or Sub play mode to change back to the normal play (page 41). A disc is not played from the first track. • Disc playing stopped before it came to the last track. , Press the 5-way control key (NENT) on the recorder or press NX on the remote control for 2 seconds or more to start playing.
Symptom Cause/Remedy • There is no R-channel output if the cassette deck or an amplifier is There is no Rconnected with a monaural cord. channel sound output , Make sure to use a stereo connecting cord. If, however, the when playing a track connected equipment is monaural, there will be no R-channel recorded from a sound output even with a stereo connecting cord. cassette deck or through an amplifier, or when listening to sound from a cassette deck or amplifier.
Symptom Cause/Remedy Tracks cannot be combined. • You cannot combine tracks recorded in different recording modes, e.g., a track recorded in stereo and a track recorded in monaural; nor can you combine a track recorded with digital connection and a track recorded with analog connection. The disc cannot edit on other component. • The component does not support MDLP or Hi-MD. , Edit on other component that support MDLP or Hi-MD.
Symptom Cause/Remedy The playing time of This is due to a calculation discrepancy between the recorder and the a transferred track is computer. different from the time that appears on your computer monitor. You cannot transfer tracks that will fill up the remaining recording time on the disc. • The minimum recordable time on a disc is normally 2 seconds in stereo, 4 seconds in LP2 stereo mode, and 8 seconds in LP4 stereo mode.
Symptom Cause/Remedy The recorder does not work or works poorly. • The AC power adaptor is not firmly connected. , Connect the AC power adaptor firmly to the DC IN 3V jack on the recorder. • The rechargeable battery or dry battery is weak (“LOW BATTERY” flashes or nothing appears). , Charge the rechargeable battery, replace the dry battery with a new one, or use the supplied AC power adaptor. • The disc is damaged or does not contain proper recording or editing data. , Reinsert the disc.
Messages If the following messages flash in the display window, check the chart below. Message Meaning/Remedy AVLS NO VOLUME OPERATION • AVLS is set to “AVLS On” and so the volume cannot rise higher. , Set AVLS to “AVLS Off” (page 56). BLANKDISC • A disc with no recording on it is inserted. BUSY WAIT A MOMENT • The recorder is accessing disc information. • You tried to operate the recorder while it was accessing the recorded data.
Message Meaning/Remedy DC IN TOO HIGH • Voltage of the power supply is too high (The supplied AC power adaptor or the recommended car battery cord is not used). , Use the supplied AC power adaptor or the recommended car battery cord. DISC FULL • Recording may not be done if the remaining recordable time on the disc is 48 seconds or less. , Replace the disc. D-L READY • MD Simple Burner is now ready to record an audio CD to the disc in the recorder using Simple mode.
Message Meaning/Remedy NO DIGITAL COPY • You tried to make a copy from a disc that is protected by the Serial Copy Management System. You cannot make copies from a digitally connected source which was itself recorded using digital connection. , Use analog connection instead (page 31). NO DISC • You tried to play or record with no disc in the recorder. , Insert a disc. NO DISC MEMORY • You tried to erase a setting in the Disc Memory on a disc that contains no settings in the Disc Memory (page 57).
Message Meaning/Remedy PROTECTED DISC • You tried to record or edit on a disc with the tab in the record-protect position. , Slide the tab back (page 65). PUSH STOP BUTTON • You tried to open the lid by sliding the OPEN switch while the recorder was storing disc information with the dedicated USB cable connecting the recorder to a computer. , Operation must be done only after pressing x and “SYSTEM FILE WRITING” has disappeared from the display.
Explanations About Hi-MD “Hi-MD” is a new MiniDisc format. Incorporating the new ATRAC3plus audio compression technology, Hi-MD is a new recording format that delivers longer recording times than ordinary MDs. Hi-MD discs can also be used as a computer storage medium for non-audio data such as text and images. For more details on Hi-MD, refer to the supplied flyer “What you can do with the Hi-MD Walkman”. About ATRAC3plus ATRAC3plus is an enhanced version of ATRAC3.
List of the recording time for each disc When using a disc in Hi-MD mode Recording time1) When recording on the recorder Recording Codec/ mode on Bit rate the recorder 1GB Hi-MD disc 80-minute standard disc 74-minute standard disc 60-minute standard disc PCM Linear PCM/ 1.
When using a disc in MD mode Recording time1) When recording on the recorder Recording mode on the recorder Codec/ Bit rate 80-minute standard disc 74-minute 60-minute standard disc standard disc SP ATRAC/292kbps 80 minutes 74 minutes 60 minutes LP2 ATRAC3/ 132kbps 2 hours and 40 minutes 2 hours and 28 minutes 2 hours LP4 ATRAC3/66kbps 5 hours and 20 minutes 4 hours and 56 minutes 4 hours MONO (monaural) Monaural 2 hours and 40 minutes 2 hours and 28 minutes 2 hours Recording time1)
Note on digital recording This recorder uses the Serial Copy Management System, which allows only first-generation digital copies to be made from premastered software. You can only make copies from a home-recorded disc by using the analog (line out) connections. Premastered software such as CDs or MDs. Microphone, record player, tuner, etc. (with analog output jacks).
Difference between digital (optical) and analog (line) inputs The input jack of this recorder works as both digital and analog input jacks. Connect the recorder to a CD player or a cassette recorder using either digital (optical) input or analog (line) input. To record, see “Recording a disc right away!” (page 18) to record using digital (optical) input, and “Recording from a TV or radio (Analog Recording)” (page 31) to record using analog (line) input.
What you can do with MD Simple Burner/SonicStage What you can do with MD Simple Burner MD Simple Burner allows you to record music tracks from an audio CD in the CD drive of your computer to an MD Walkman, without first recording the music tracks to the computer. MD Walkman Audio CD What you can do with SonicStage SonicStage allows you to import audio data to your computer from music sources such as audio CDs and the Internet, and then transfer the audio data stored in your computer to an MD.
Basic operational flow using an MD Walkman MD Simple Burner SonicStage Providing the required system environment (page 88) Installing the software onto your computer (page 89) Recording music tracks from an audio CD in the CD drive of your computer (page 91) Importing audio data to your computer (page 95) Connecting an MD walkman to your computer (see “Recorder Operation”) Software Operation Connecting an MD walkman to your computer (see “Recorder Operation”) Transferring audio data from your compu
Installing Providing the required system environment System requirements The following system environment is required in order to use the SonicStage/MD Simple Burner software for the MD Walkman. Computer IBM PC/AT or Compatible • CPU: Pentium II 400 MHz or higher (Pentium III 450 MHz or higher is recommended.) • Hard disk drive space: 200 MB or more (1.5 GB or more is recommended) (The amount space will vary according to Windows version and the number of music files stored on the hard disk.
Installing the software onto your computer Before installing the software • Make sure to close any virus-check software, as such software usually demands a large amount of system resources. • When you use the MD Walkman, make sure to install the software with the supplied CDROM. — If OpenMG Jukebox, SonicStage or Net MD Simple Burner is installed already, the previous software will be overwritten by the new version. The new version retains the functions of the older version, but with new functions added.
3 Click [Install SonicStage and MD Simple Burner] and then follow the displayed instructions. Click [Install SonicStage and MD Simple Burner] Read the instructions carefully. Depending on your region, the buttons other than [Install SonicStage and MD Simple Burner] may differ from those in the illustration above. The installation may take 20 to 30 minutes, depending on your system environment. Make sure to restart your computer only after the installation is completed.
Using MD Simple Burner Before using MD Simple Burner MD Simple Burner allows you to record music tracks from an audio CD in the CD drive of your computer to the MD Walkman. There are two ways to record from an audio CD. • Simple mode (page 92) You can use MD Walkman operations to record an entire CD or only the first track without launching MD Simple Burner. • Standard mode (page 93) You can launch MD Simple Burner to record using computer operations. Record an entire CD or selected tracks.
Recording using MD Walkman operations (Simple mode) 1 Insert a recordable disc into the MD Walkman and then connect the MD Walkman to the computer. For details about connections, see the “Recorder Operation” section. Do not disconnect the power source or the dedicated USB cable before the transfer has completed. 2 Insert the audio CD that you want to record into the CD drive of your computer. The CDDB registration window appears when you use the CDDB for the first time.
Recording by computer operations (Standard mode) To start MD Simple Burner, click [Start] – [All Programs]* – [MD Simple Burner] – [MD Simple Burner]. ∗ [Programs] in the case of Windows 2000 Professional/Windows Millennium Edition/Windows 98 Second Edition z There are other ways to start up MD Simple Burner as follows: • Double-click the MD Simple Burner icon in the task tray, or right-click and select [Show Standard Mode]. • Double-click the MD Simple Burner shortcut icon on the desktop.
The window for recording selected tracks from an audio CD [CONFIG] Click here to do the following: -Set the CD-ROM drive -View version information for MD Simple Burner -Confirm CD information registered in the CDDB Total time of the Track information (MD) Artist name selected tracks of CD You can change the [REC/ Disc name track name and track Album Title STOP] (MD) number Track information (CD) [Get CD info] Information of an audio CD (album name, track title, etc.) will be reflected in the track list.
Using SonicStage Importing audio data This section explains how to record and store audio data from an audio CD to My Library of SonicStage on the hard disk drive of your computer. You can record or import music from other sources such as the Internet and your computer’s hard disk. Refer to SonicStage Help for details. Notes • Only audio CDs with a mark can be used with SonicStage. • We do not guarantee normal operation in the case of the copy-controlled CDs.
4 If necessary, click to uncheck tracks you do not want to record. If you unchecked a box by mistake, click it again to restore the check. To check all boxes, click . To uncheck all boxes, click . 5 If necessary, change the format and bit rate for audio CD recording. When you click [Format/Bit Rate] on the right side of the screen, “CD Recording Format [My library]” dialog box will appear. The dialog box will ask you to select the format and bit rate for recording the audio CD. 6 Click .
Transferring audio data from your computer to the MD Walkman Audio data stored in My Library of SonicStage can be transferred to your MD Walkman an infinite number of times. Transfer Destination list [Transfer] The My Library list [Transfer Mode] 1 Connect your MD Walkman to the computer. After making the connections, “Hi-MD” or “Net MD” is displayed in the Transfer Destination list in the upper right of the screen. For details about connections, see “Recorder Operation”.
4 If necessary, change the transfer mode. As the default setting, tracks in the OpenMG (LPCM/ATRAC3/ATRAC3plus) format will be transferred in the same format and bit rate (normal transfer). If the device connected to the computer does not support the above format, the format and bit rate will be converted to those of the device. In some case, this process may take time.
Transferring back audio data from the MD Walkman to your computer Transfer Destination list [Transfer] The My Library list List of tracks on the MD Transferring from the MD Walkman back to your computer Audio data that has been transferred from your computer and stored on the MD can be transferred back to My Library of SonicStage on your computer. 1 Connect your MD Walkman to the computer. For details about connections, see “Recorder Operation”.
To stop transferring Click . Note Tracks transferred to the MD Walkman from another computer cannot be transferred back to My Library on your computer. Importing tracks recorded on a Hi-MD Walkman* to your computer Tracks that have been recorded on a Hi-MD Walkman* can be imported to My Library of SonicStage on your computer only once. ∗ Only tracks recorded in Hi-MD mode 1 Insert recordable disc into the Hi-MD Walkman and connect the device to your computer.
To stop importing Click . Note Notes • You cannot import tracks that were recorded in a Net MD mode to your computer, or tracks that have been recorded on a device that does not support Hi-MD mode. • Before importing tracks recorded on the Hi-MD Walkman to the computer, click [Properties] on the right side of the screen to confirm the status of the [Import Settings] check box (it is checked by default).
Using SonicStage Help SonicStage Help provides further details on how to use SonicStage. SonicStage Help allows you to search easily for information from a list of operations, such as “Importing audio data” or “Transferring audio data”, or from large list of keywords, or by typing in words that might lead you to the appropriate explanations. To display SonicStage Help Click [Help] – [SonicStage Help] while SonicStage is running.
Understanding SonicStage Help The right side frame The left side frame 1 Double click [Overview] in the left-side frame. 2 Click [About This Help File]. The explanation will appear in the right-side frame. 3 Read the text. Scroll the display if necessary. Click underlined words to jump to their explanations.
Referring to SonicStage Help Click [Contents] on the left side of the Help window to view a list of items for each operation. Click on any items for details.
Backing up audio data We recommend that you back up your music data as a precaution against hard disk crashes or computer replacement.
Other information Uninstalling SonicStage/MD Simple Burner To uninstall SonicStage/MD Simple Burner, follow the procedures below. 1 Click [Start]–[Control Panel]*. ∗ [Settings]–[Control Panel] in the case of Windows 2000 Professional/Windows Millennium Edition/Windows 98 Second Edition 2 Double-click [Add/Remove Programs]. 3 Click [SonicStage 2.x.xx] or [MD Simple Burner 2.0.xx] in the “Currently Installed Programs” list, and then click [Change and Remove]*.
On copyright protection The OpenMG technology allows you to enjoy digital music, while maintaining the copyrights of its holders. SonicStage encrypts audio files in OpenMG format and stores them on the hard disk of your computer to prevent unauthorized distribution. Restrictions on audio content High-quality digital audio content is widely available through music distribution services on the Internet.
Troubleshooting Please refer to the following steps if you encounter a problem while using SonicStage/MD Simple Burner. 1 Check the symptoms in this “Troubleshooting” section. 2 Check the symptoms in SonicStage Help when you use SonicStage. 3 If the problem cannot be solved after checking the above references. Check the following table and then consult your nearest Sony dealer.
The software cannot be installed onto your computer Problem Cause/Remedy The installation was not successful. You are using an OS that does not support this software. tSee page 88 for more details. All windows applications are not closed. tIf you start the installation while other programs are running, a malfunction may occur. This is especially true for programs that require large amounts of system resources, such as virus-check software. There is not enough hard disk space on your hard disk.
Using a MD Walkman connected to the computer Problem Cause/Remedy Your computer does not recognize the MD Walkman. The MD Walkman is not firmly connected with the supplied dedicated USB cable to the computer. tReconnect the MD Walkman to the computer firmly. tRemove and reconnect the MD Walkman. If the computer still does not recognize the MD Walkman, disconnect the cable, restart the computer, and then make the connection again. A disc is not inserted in the MD Walkman.
Index Numerics E 6-Band Equalizer 42 EMD service 88 Erasing a whole disc 52 groups 52 tracks 51 A Accessories optional 67 supplied 10 ATRAC3plus 80 AVLS 56 F Format 55 B G Battery battery life 16 dry battery 16 rechargeable battery 14 BEEP 57 Bookmark add 40 play 40 G-PROTECTION 83 Group erasing 52 moving 50 recording 34 releasing 49 setting 47 C Hard disk free space 88 Hi-MD 80 HOLD 12 CD drive 88 CDDB 88, 92 CD-ROM 89 Charging 14 Checking playing position 37 remaining time 28, 37 Cleaning 65 C
P W Play mode Main Play Mode 38 Repeat Play 41 Sub Play Mode 41 Windows 2000 Professional 88, 93, 95, Q Quick mode 58 R Recording adding track marks 33 analog 31 digital 18 from microphone 29 level 30, 32 mode (Hi-MD/MDLP) 31 Recording mode 92 Recording mode (Bit rate) 96, 100 Relabeling 47 S Search 42 Simple Mode 92 SonicStage 95 SonicStage Help 102 Start (software) MD Simple Burner 93 SonicStage 95 Synchro-recording 36 System environment 88 System limitations 88 T Time Mark 33 Title 44 Track mark A
This warranty is valid only in Canada.