
user manual
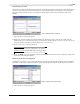

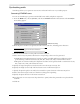
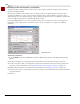

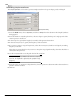
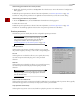
Table Of Contents
- Introduction
- Optimizing for Sound Forge
- Learning the Sound Forge Workspace
- Getting Started
- Navigating, Zooming, and Selecting
- Changing File Attributes and Formats
- Using Markers, Regions, and the Playlist/Cutlist
- Why use markers, regions, and the playlist?
- Using markers
- Using command markers in streaming media files
- Using regions
- Using the Regions List
- Using the playlist
- Displaying the playlist
- Adding regions to the playlist
- Understanding the playlist display
- Customizing the playlist display
- Repeating a region during playlist playback
- Playing from the playlist
- Arranging the playlist
- Replicating a region in the playlist
- Using stop points
- Deleting a region from the playlist
- Creating a new file from the playlist
- Configuring the playlist as a cutlist
- Saving a playlist/cutlist file
- Opening a playlist/cutlist file
- Copying the playlist/cutlist to the clipboard
- Recording, Extracting, and Burning
- Recording audio
- Recording manually
- Recording automatically
- Recording a specific length (punch-in)
- Choosing a recording mode
- Adjusting for DC offset
- Playing back recorded audio
- Using remote recording mode
- Synchronizing with other devices
- Viewing input levels
- Inserting markers while recording
- Configuring gap detection
- Automatically labeling windows and regions
- Changing blinking status
- Extracting audio from CDs
- Burning CDs
- Proper use of software
- Recording audio
- Editing, Repairing, and Synthesizing Audio
- Processing Audio
- Applying Effects
- Adding an effect
- Adding a chain of effects
- Applying effects using the Plug-In Chainer
- Adding plug-ins to a chain
- Selecting the processing mode for audio tail data
- Arranging plug-ins on a chain
- Bypassing effects
- Removing plug-ins from a chain
- Configuring chained plug-ins
- Saving individual plug-in settings as a custom preset
- Saving plug-in chains
- Loading plug-in chains
- Managing effects
- Automating Effect Parameters
- Adjusting envelopes
- Using Acoustic Mirror and Wave Hammer
- Working with MIDI/SMPTE
- Sampling
- Looping
- Working with Video
- Using Spectrum Analysis
- Working in the frequency domain
- Using a spectrum graph
- Displaying a spectrum graph
- Monitoring an input and output source
- Displaying frequency and amplitude values, notes and statistics
- Navigating a spectrum graph
- Changing the graph type
- Changing the zoom level
- Working with stereo files
- Updating a spectrum graph
- Viewing multiple spectrum graphs
- Creating and comparing snapshots of the Spectrum Analysis window
- Printing the graph
- Using a sonogram
- Adjusting Spectrum Analysis settings
- Shortcuts
- Microsoft Audio Compression Manager
- SMPTE Timecode
- Using CSOUND, MTU, IRCAM, BICSF, and EBICSF Files
- Index

CHP. 9 EDITING, REPAIRING, AND SYNTHESIZING AUDIO
141
Synthesizing audio
Sound Forge allows you to generate custom tones and waveforms for use in your audio projects.
Generating DTMF/MF tones
You can use Sound Forge to generate standard dial tones used by telephone companies.
1.
From the Too l s menu, choose Synthesis, and choose DTMF/MF Tones from the submenu. The DTMF/MF
Tones dialog appears.
2.
Enter the phone number to be generated in the Dial string edit box, including pause characters.
Note:
Sound Forge ignores unknown characters.
3.
Use the Amplitude fader to set the peak level of the waveform.
4.
Select the Tone style to generate radio button corresponding to the tone to be generated.
• DTMF (Dual Tone Multi-Frequency) signals are used by standard push-button telephones and are
generated using combinations of 679, 770, 852, 941, 1209, 1336, 1477, and 1633 Hz sine waves.
• MF signals are used internally by the telephone networks and are generated with a combination of 700,
900, 1100, 1300, 1500, and 1700 Hz sine waves.
5.
Specify the output length (in seconds) of each tone in the Single tone length box.
6.
Specify the length (in seconds) of silence between tones in the Break length box.
7.
Specify the pause length (in seconds) to be inserted for a pause character in the Pause length box.
8.
Select the Fade the edges of each tone check box to help prevent glitching.
9.
Specify the pause character in the Pause character box.
10.
Use the Insert new tone sequence at drop-down list to specify where the generated tone is placed in the
audio file.
11.
Click OK.
DTMF/MF Tones Dialog