
user manual

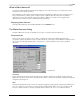
Table Of Contents
- Introduction
- Optimizing for Sound Forge
- Learning the Sound Forge Workspace
- Getting Started
- Navigating, Zooming, and Selecting
- Changing File Attributes and Formats
- Using Markers, Regions, and the Playlist/Cutlist
- Why use markers, regions, and the playlist?
- Using markers
- Using command markers in streaming media files
- Using regions
- Using the Regions List
- Using the playlist
- Displaying the playlist
- Adding regions to the playlist
- Understanding the playlist display
- Customizing the playlist display
- Repeating a region during playlist playback
- Playing from the playlist
- Arranging the playlist
- Replicating a region in the playlist
- Using stop points
- Deleting a region from the playlist
- Creating a new file from the playlist
- Configuring the playlist as a cutlist
- Saving a playlist/cutlist file
- Opening a playlist/cutlist file
- Copying the playlist/cutlist to the clipboard
- Recording, Extracting, and Burning
- Recording audio
- Recording manually
- Recording automatically
- Recording a specific length (punch-in)
- Choosing a recording mode
- Adjusting for DC offset
- Playing back recorded audio
- Using remote recording mode
- Synchronizing with other devices
- Viewing input levels
- Inserting markers while recording
- Configuring gap detection
- Automatically labeling windows and regions
- Changing blinking status
- Extracting audio from CDs
- Burning CDs
- Proper use of software
- Recording audio
- Editing, Repairing, and Synthesizing Audio
- Processing Audio
- Applying Effects
- Adding an effect
- Adding a chain of effects
- Applying effects using the Plug-In Chainer
- Adding plug-ins to a chain
- Selecting the processing mode for audio tail data
- Arranging plug-ins on a chain
- Bypassing effects
- Removing plug-ins from a chain
- Configuring chained plug-ins
- Saving individual plug-in settings as a custom preset
- Saving plug-in chains
- Loading plug-in chains
- Managing effects
- Automating Effect Parameters
- Adjusting envelopes
- Using Acoustic Mirror and Wave Hammer
- Working with MIDI/SMPTE
- Sampling
- Looping
- Working with Video
- Using Spectrum Analysis
- Working in the frequency domain
- Using a spectrum graph
- Displaying a spectrum graph
- Monitoring an input and output source
- Displaying frequency and amplitude values, notes and statistics
- Navigating a spectrum graph
- Changing the graph type
- Changing the zoom level
- Working with stereo files
- Updating a spectrum graph
- Viewing multiple spectrum graphs
- Creating and comparing snapshots of the Spectrum Analysis window
- Printing the graph
- Using a sonogram
- Adjusting Spectrum Analysis settings
- Shortcuts
- Microsoft Audio Compression Manager
- SMPTE Timecode
- Using CSOUND, MTU, IRCAM, BICSF, and EBICSF Files
- Index

194
USING ACOUSTIC MIRROR AND WAVE HAMMER CHP. 12
We have included several short files on the Sound Forge CD-ROM to allow you to experiment with this
technique. After some experimentation, you should begin to notice a few general rules regarding this use of
Acoustic Mirror:
• Impulse files that cover the entire frequency spectrum prevent the output from sounding too filtered.
• Using a frequency sweep as an impulse creates a frequency-dependent delay effect.
• Panning within the impulse causes the stereo image of the output to flutter between channels.
• Using staccato sounds (such as drum hits) creates a variety of echo effects.
Recreating spaces for foley effects and dialog replacement
Frequently, dialogue recorded in the field is rendered unusable by ambient noise. If you are shooting in the
field and realize that overdubbing will be necessary, you should create an impulse in each filming location.
This allows you to overdub dialog during post-production that is indistinguishable from dialog recorded on
location.
If you intend to use Acoustic Mirror as a film/video post-production tool, there are some factors to keep in
mind:
• Distance information is determined by the distance between the source and the microphone when
creating the impulse. Record multiple impulses at various distances for each location to create realistic
dialog effects when matching audio processing to approximate camera positioning.
• The frequency response of the human ear changes as the volume of a sound increases. As a result, impulses
created from a significant distance may sound unusual at high volumes.
• Placing a microphone off center allows you to create directional information in the recovered impulse. For
example, placing a microphone to the left of the speaker produces an impulse that approximates a source
located on the left side of the screen.
Panning with head-related transfer functions
A head-related transfer function (HRTF) contains the frequency and phase response information required to
make a sound seem to originate from a specific direction in a three-dimensional space. The
Acoustic Mirror
Impulse Files\HRTF Impulses
folder on the Sound Forge CD-ROM contains a collection of impulse files that
contain directional cues.
To achieve optimal results using these impulse files, the original file should be mono and playback should be
monitored using headphones. To begin, convert the mono file to stereo by replicating the mono signal in
each channel. After the audio is converted to stereo, choose an impulse file from the
HRTF Impulses folder.
You will notice that the
HRTF Impulses folder is further divided into Left and Right directories. Opening the
desired folder displays the available impulse files, all of which are named based on their elevation (up or
down) and azimuth (left or right) angles in degrees. The following table provides some examples:
Note:
Refer to Readme.doc in the HRTF Impulses folder for
more information.
File Name Impulse positioning
0E000L Straight ahead
0E090L Far left
0E090R Far right
90E000L Directly above your head
0E180L Directly behind you
-20E120L Below, behind, and to your left