
user manual

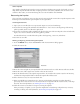
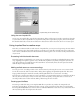
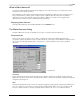
Table Of Contents
- Introduction
- Optimizing for Sound Forge
- Learning the Sound Forge Workspace
- Getting Started
- Navigating, Zooming, and Selecting
- Changing File Attributes and Formats
- Using Markers, Regions, and the Playlist/Cutlist
- Why use markers, regions, and the playlist?
- Using markers
- Using command markers in streaming media files
- Using regions
- Using the Regions List
- Using the playlist
- Displaying the playlist
- Adding regions to the playlist
- Understanding the playlist display
- Customizing the playlist display
- Repeating a region during playlist playback
- Playing from the playlist
- Arranging the playlist
- Replicating a region in the playlist
- Using stop points
- Deleting a region from the playlist
- Creating a new file from the playlist
- Configuring the playlist as a cutlist
- Saving a playlist/cutlist file
- Opening a playlist/cutlist file
- Copying the playlist/cutlist to the clipboard
- Recording, Extracting, and Burning
- Recording audio
- Recording manually
- Recording automatically
- Recording a specific length (punch-in)
- Choosing a recording mode
- Adjusting for DC offset
- Playing back recorded audio
- Using remote recording mode
- Synchronizing with other devices
- Viewing input levels
- Inserting markers while recording
- Configuring gap detection
- Automatically labeling windows and regions
- Changing blinking status
- Extracting audio from CDs
- Burning CDs
- Proper use of software
- Recording audio
- Editing, Repairing, and Synthesizing Audio
- Processing Audio
- Applying Effects
- Adding an effect
- Adding a chain of effects
- Applying effects using the Plug-In Chainer
- Adding plug-ins to a chain
- Selecting the processing mode for audio tail data
- Arranging plug-ins on a chain
- Bypassing effects
- Removing plug-ins from a chain
- Configuring chained plug-ins
- Saving individual plug-in settings as a custom preset
- Saving plug-in chains
- Loading plug-in chains
- Managing effects
- Automating Effect Parameters
- Adjusting envelopes
- Using Acoustic Mirror and Wave Hammer
- Working with MIDI/SMPTE
- Sampling
- Looping
- Working with Video
- Using Spectrum Analysis
- Working in the frequency domain
- Using a spectrum graph
- Displaying a spectrum graph
- Monitoring an input and output source
- Displaying frequency and amplitude values, notes and statistics
- Navigating a spectrum graph
- Changing the graph type
- Changing the zoom level
- Working with stereo files
- Updating a spectrum graph
- Viewing multiple spectrum graphs
- Creating and comparing snapshots of the Spectrum Analysis window
- Printing the graph
- Using a sonogram
- Adjusting Spectrum Analysis settings
- Shortcuts
- Microsoft Audio Compression Manager
- SMPTE Timecode
- Using CSOUND, MTU, IRCAM, BICSF, and EBICSF Files
- Index

CHP. 12 USING ACOUSTIC MIRROR AND WAVE HAMMER
195
Troubleshooting Acoustic Mirror
The following sections describe problems that may be encountered when working with Acoustic Mirror.
Stuttering during real-time previewing
It is not uncommon to experience problems when previewing Acoustic Mirror’s processing in real-time. The
following sections contain several suggestions to remedy the situation.
Lower the Quality/speed setting
Lower the value of the Quality/speed control on the General page. When previewing lengthy impulse
responses, a setting of
1 or 2 may be necessary; however, the quality suffers. This setting should always be
returned to
5 prior to processing to maintain effect quality.
Increase the DirectX buffering size
1.
Open the Acoustic Mirror dialog.
2.
Right-click an empty area of the dialog outside of the four tabs and choose Configuration from the shortcut
menu. The Real-Time Preview Configuration dialog appears.
3.
Reconfigure the Buffers to process per second and Total playback buffers controls. Typically, lowering the
Buffers to process per second value and increasing the Total playback buffers value reduces gapping during
real-time previewing.
Close all memory-intensive applications
Real-time previewing may be limited by any additional applications operating on the desktop. To avoid this
situation, close all memory-intensive applications prior to using Acoustic Mirror.
Add additional RAM to the system
We recommend at least 32 MB of RAM to operate Sound Forge and its related tools.
Add a faster floating point arithmetic processor
Many high-speed processors are still lacking in speed when processing floating point arithmetic. We
recommend using high-speed processors that provide exceptional floating point arithmetic for reliable real-
time previewing.
Impulses do not recover properly
If you experience problems recovering custom impulse recordings, verify each of the following:
• Verify that you have trimmed the recorded test tone based on the mode chosen from the
Impulse recovery
mode
drop-down list. For more information, see Trimming the test tone on page 191.
• Verify that the second spike is present in the recorded test tone if the
Auto-detect timing spikes options is
specified.
• Verify that the file specified in the
Test file used box is the exact test tone used to make to field recording
and that neither its length or data has been changed.
• If the impulse still does not recover properly in
Auto-detect timing spikes mode, use Sound Forge to
normalize the spikes in the recorded test tone file. This should aid the auto-detect algorithm in detecting
the timing spikes and recovering the impulse.