
user manual
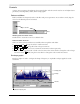
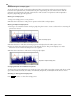
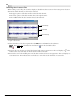
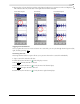
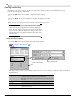
Table Of Contents
- Introduction
- Optimizing for Sound Forge
- Learning the Sound Forge Workspace
- Getting Started
- Navigating, Zooming, and Selecting
- Changing File Attributes and Formats
- Using Markers, Regions, and the Playlist/Cutlist
- Why use markers, regions, and the playlist?
- Using markers
- Using command markers in streaming media files
- Using regions
- Using the Regions List
- Using the playlist
- Displaying the playlist
- Adding regions to the playlist
- Understanding the playlist display
- Customizing the playlist display
- Repeating a region during playlist playback
- Playing from the playlist
- Arranging the playlist
- Replicating a region in the playlist
- Using stop points
- Deleting a region from the playlist
- Creating a new file from the playlist
- Configuring the playlist as a cutlist
- Saving a playlist/cutlist file
- Opening a playlist/cutlist file
- Copying the playlist/cutlist to the clipboard
- Recording, Extracting, and Burning
- Recording audio
- Recording manually
- Recording automatically
- Recording a specific length (punch-in)
- Choosing a recording mode
- Adjusting for DC offset
- Playing back recorded audio
- Using remote recording mode
- Synchronizing with other devices
- Viewing input levels
- Inserting markers while recording
- Configuring gap detection
- Automatically labeling windows and regions
- Changing blinking status
- Extracting audio from CDs
- Burning CDs
- Proper use of software
- Recording audio
- Editing, Repairing, and Synthesizing Audio
- Processing Audio
- Applying Effects
- Adding an effect
- Adding a chain of effects
- Applying effects using the Plug-In Chainer
- Adding plug-ins to a chain
- Selecting the processing mode for audio tail data
- Arranging plug-ins on a chain
- Bypassing effects
- Removing plug-ins from a chain
- Configuring chained plug-ins
- Saving individual plug-in settings as a custom preset
- Saving plug-in chains
- Loading plug-in chains
- Managing effects
- Automating Effect Parameters
- Adjusting envelopes
- Using Acoustic Mirror and Wave Hammer
- Working with MIDI/SMPTE
- Sampling
- Looping
- Working with Video
- Using Spectrum Analysis
- Working in the frequency domain
- Using a spectrum graph
- Displaying a spectrum graph
- Monitoring an input and output source
- Displaying frequency and amplitude values, notes and statistics
- Navigating a spectrum graph
- Changing the graph type
- Changing the zoom level
- Working with stereo files
- Updating a spectrum graph
- Viewing multiple spectrum graphs
- Creating and comparing snapshots of the Spectrum Analysis window
- Printing the graph
- Using a sonogram
- Adjusting Spectrum Analysis settings
- Shortcuts
- Microsoft Audio Compression Manager
- SMPTE Timecode
- Using CSOUND, MTU, IRCAM, BICSF, and EBICSF Files
- Index

44
LEARNING THE SOUND FORGE WORKSPACE CHP. 3
Single-channel editing
Stereo files are held together by the nature of their stereo format. Because of this, you cannot perform certain
editing operations (such as cut or paste) on a single channel of a stereo file.
Channel lengths must remain equal in stereo files. Frequently, this issue can be side-stepped by copying a
single channel of a stereo file to the clipboard. Once this mono selection is located on the clipboard, you can
do any of the following:
• Paste it into a mono file.
• Paste it into both channels of a stereo file.
• Mix it into a single channel of a stereo file.
• Mix it into both channels of a stereo file.
Note:
When mixing mono clipboard data to a stereo file, the
Mono to Stereo dialog prompts you to mix it to the right, left,
or both channels.