4-575-513-11(1) Bluetooth® Audio System The warranty for this product is included in this manual (page 35, 36). La garantie de ce produit est inclus dans le présent manuel (page 40). Owner’s Record The model and serial numbers are located on the bottom of the unit. Record the serial number in the spaces provided below. Refer to these numbers whenever you call upon your Sony dealer regarding this product. Model No. WX-900BT Serial No. To cancel the demonstration (DEMO) display, see page 18.
For safety, be sure to install this unit in the dashboard of the car as the rear side of the unit becomes hot during use. For details, see “Connection/Installation” (page 31). The nameplate indicating operating voltage, etc., is located on the bottom of the chassis. Warning FOR THE CUSTOMERS IN THE USA. NOT APPLICABLE IN CANADA, INCLUDING IN THE PROVINCE OF QUEBEC. POUR LES CLIENTS AUX ÉTATS-UNIS. NON APPLICABLE AU CANADA, Y COMPRIS LA PROVINCE DE QUÉBEC.
Important notice Caution IN NO EVENT SHALL SONY BE LIABLE FOR ANY INCIDENTAL, INDIRECT OR CONSEQUENTIAL DAMAGES OR OTHER DAMAGES INCLUDING, WITHOUT LIMITATION, LOSS OF PROFITS, LOSS OF REVENUE, LOSS OF DATA, LOSS OF USE OF THE PRODUCT OR ANY ASSOCIATED EQUIPMENT, DOWNTIME, AND PURCHASER’S TIME RELATED TO OR ARISING OUT OF THE USE OF THIS PRODUCT, ITS HARDWARE AND/OR ITS SOFTWARE. Dear customer, this product includes a radio transmitter.
Additional Information Table of Contents Warning . . . . . . . . . . . . . . . . . . . . . . . . . . . . . . . . . . . 2 Guide to Parts and Controls . . . . . . . . . . . . . . . . . . . 5 Getting Started Resetting the unit . . . . . . . . . . . . . . . . . . . . . . . . . . . Setting the Clock . . . . . . . . . . . . . . . . . . . . . . . . . . . . Preparing a BLUETOOTH Device. . . . . . . . . . . . . . . . Connecting a USB Device . . . . . . . . . . . . . . . . . . . . .
Guide to Parts and Controls Main unit (browse) (page 11, 13, 14) Enter the browse mode during playback. PTY (program type) Select PTY in RDS. SOURCE Turn on the power. Change the source. OFF Press and hold for 1 second to turn the source off and display the clock. Press and hold for more than 2 seconds to turn off the power and the display. If the unit is turned off and the display disappears, operation by the remote commander is not available. Control dial Rotate to adjust the volume.
MODE (page 10, 11, 12, 14, 16) (back) Return to the previous display. RM-X231 Remote commander SEEK +/– Tune in radio stations automatically. Press and hold to tune manually. / (prev/next) / (fast-reverse/fast-forward) CALL Enter the call menu. Receive/end a call. Press and hold for more than 2 seconds to switch the BLUETOOTH signal. Number buttons (1 to 6) Receive stored radio stations. Press and hold to store stations. Call a stored phone number. Press and hold to store a phone number.
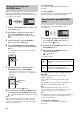
Getting Started Resetting the unit Before operating the unit for the first time, after replacing the car battery, or changing the connections, you must reset the unit. Press the reset button with a ball-point pen, etc. Note Pressing the reset button will erase the clock setting and some stored contents. Setting the Clock 1 Press MENU, rotate the control dial to select [SET GENERAL], then press it. 2 Rotate the control dial to select [SET CLOCK-ADJ], then press it. The hour indication flashes.
Pairing and connecting with a BLUETOOTH device When connecting a BLUETOOTH device for the first time, mutual registration (called “pairing”) is required. Pairing enables this unit and other devices to recognize each other. To start playback For details, see “Playing a BLUETOOTH Device” (page 12). To cancel pairing Perform step 2 to cancel the pairing mode after this unit and the BLUETOOTH device are paired.
Connecting with an iPhone/iPod (BLUETOOTH Auto Pairing) When an iPhone/iPod with iOS5 or later installed is connected to the USB port, the unit is paired and connected with the iPhone/iPod automatically. To enable BLUETOOTH Auto Pairing, make sure [AUTOPAIR] in [BT] is set to [ON] (page 21). 1 Activate the BLUETOOTH function on the iPhone/iPod. 2 Connect an iPhone/iPod to the USB port. Connecting a USB Device 1 2 Turn down the volume on the unit. Connect the USB device to the unit.
Listening to the Radio Listening to the Radio To listen to the radio, press SOURCE to select [TUNER]. Using Radio Data System (RDS) Selecting program types (PTY) 1 2 Storing automatically (BTM) 1 Press MODE to change the band (FM1, FM2, FM3, AM1 or AM2). 2 Press MENU, rotate the control dial to select [SET GENERAL], then press it. 3 Rotate the control dial to select [SET BTM], then press it. The unit stores stations in order of frequency on the number buttons.
number to activate your subscription. Write the number down for reference. In the USA, you can activate online or by calling SiriusXM Listener Care: Online: Visit www.siriusxm.com/activatenow Phone: Call 1-866-635-2349 In Canada, you can activate online or by calling SiriusXM Listener Care: Online: Visit www.siriusxm.ca/activatexm Phone: Call 1-877-438-9677 As part of the activation process, the SiriusXM satellites will send an activation message to your tuner.
To stop playback Press and hold OFF for 1 second. Playback Playing a Disc 1 Insert the disc (label side up). To remove the device Stop playback, then remove the device. Caution for iPhone When you connect an iPhone via USB, phone call volume is controlled by the iPhone, not the unit. Do not inadvertently increase the volume on the unit during a call, as a sudden loud sound may result when the call ends. Operating an iPod directly (Passenger control) 1 Playback starts automatically.
To match the volume level of the BLUETOOTH device to other sources Start playback of the BLUETOOTH audio device at a moderate volume, and set your usual listening volume on the unit. Press MENU, then select [SET SOUND] [SET BTA VOL] (page 21). Searching by skipping items (Jump mode) 1 2 3 4 Repeat play and shuffle play During playback, press (repeat) or (shuffle) repeatedly to select the desired play mode. Playback in the selected play mode may take time to start. (browse). Press SEEK +.
Listening to Pandora® Pandora® is available to stream music through your iPhone and Android smartphone. You can control Pandora® on a BLUETOOTH connected iPhone/ Android smartphone from this unit. Pandora® is only available in certain countries. Please visit http://www.pandora.com/legal for more information. Setting up Pandora® 1 2 Check the compatibility of your mobile device by visiting the support site on the back cover.
From the call history Handsfree Calling (via BLUETOOTH only) 1 Press CALL, rotate the control dial to select [RECENT CALL], then press it. A list of the call history appears. To use a cellular phone, connect it with this unit. For details, see “Preparing a BLUETOOTH Device” (page 7). 2 Rotate the control dial to select a name or phone number from the call history, then press it. The phone call starts. By phone number input 1 Press CALL, rotate the control dial to select [DIAL NUMBER], then press it.
By voice tags You can make a call by saying the voice tag stored in a connected cellular phone that has a voice dialing function. 1 Press CALL, rotate the control dial to select [VOICE DIAL], then press it. Alternatively, press and hold VOICE while the “SongPal” function is off. 2 Say the voice tag stored on the cellular phone. Your voice is recognized, and the call is made. To cancel voice dialing Press VOICE.
Selecting the source or application You can operate to select the desired source or application on iPhone/Android smartphone. To select the source Press SOURCE repeatedly. Alternatively, press SOURCE, rotate the control dial to select the desired source, then press ENTER. To display the source list Activating voice recognition (Android smartphone only) By registering applications, you can control an application by voice command. For details, refer to the help of the application.
Using Siri Eyes Free Siri Eyes Free allows you to use an iPhone handsfree by simply speaking into the microphone. This function requires you to connect an iPhone to the unit via BLUETOOTH. Availability is limited iPhone 4s or later. Make sure that your iPhone is running the latest iOS version. You must complete BLUETOOTH registration and connection configurations for the iPhone with the unit in advance. For details, see “Preparing a BLUETOOTH Device” (page 7).
AUTO OFF Shuts off automatically after a desired time when the unit is turned off: [ON] (30 minutes), [OFF]. PARENTAL Sets the parental lock to [ON], [OFF], and edits the passcode (page 11). (Available only when SiriusXM is selected.) STEERING Registers/resets the setting of the steering wheel remote control. (Available when connected with the connection cable (not supplied).) (Available only while the source is off and the clock is displayed.
POSITION (listening position) F/R POS (front/rear position) Simulates a natural sound field by delaying the sound output from speakers to suit your position: [FRONT L] (front left), [FRONT R] (front right), [FRONT] (center front), [ALL] (center of your car), [CUSTOM] (position set by the advanced car audio settings on SongPal) [OFF] (no position set) ADJ POSITION (adjust position) Fine-tunes the listening position setting: [+3] – [CENTER] – [-3].
BTA VOL (BLUETOOTH audio volume level) Adjusts the volume level for each connected BLUETOOTH device: [+6 dB] – [0 dB] – [-6 dB]. This setting negates the need to adjust the volume level between sources. AUTO SCR (auto scroll) Scrolls long items automatically: [ON], [OFF]. (Not available when the AUX or tuner is selected.) * Does not appear when [F/R POS] is set to [OFF].
Additional Information Updating the Firmware You can update the firmware of this unit from the following support site: http://esupport.sony.com/ To update the firmware, visit the support site, then follow the online instructions. Precautions Cool off the unit beforehand if your car has been parked in direct sunlight. Do not leave the front panel or audio devices brought in inside the car, or it may cause malfunction due to high temperature in direct sunlight.
Compatible Model Bluetooth® USB iPod touch (5th generation) iPod touch (4th generation) iPod touch (3rd generation) iPod touch (2nd generation) iPod classic iPod nano (7th generation) iPod nano (6th generation) iPod nano (5th generation) iPod nano (4th generation) iPod nano (3rd generation) + side up Notes on the lithium battery Keep the lithium battery out of the reach of children. Should the battery be swallowed, immediately consult a doctor.
The maximum number of: (CD-R/CD-RW only) folders (albums): 150 (including root folder) files (tracks) and folders: 300 (may less than 300 if folder/file names contain many characters) displayable characters for a folder/file name: 32 (Joliet)/64 (Romeo) Corresponding codec: MP3 (.mp3), WMA (.wma) and AAC (.m4a) USB Player section Interface: USB (High-speed) Maximum current: 1 A The maximum number of recognizable tracks: 10,000 Corresponding codec: MP3 (.
The N-Mark is a trademark or registered trademark of NFC Forum, Inc. in the United States and in other countries. Windows Media is either a registered trademark or trademark of Microsoft Corporation in the United States and/or other countries. This product is protected by certain intellectual property rights of Microsoft Corporation. Use or distribution of such technology outside of this product is prohibited without a license from Microsoft or an authorized Microsoft subsidiary.
The display disappears from/does not appear in the display window. The dimmer is set to [DIM-ON] (page 21). The display disappears if you press and hold OFF. Press OFF on the unit until the display appears. The display/illumination flashes. The power supply is not sufficient. Check that the car battery supplies enough power to the unit. (The power requirement is 12 V DC.) The operation buttons do not function. The disc will not eject. The connection is not correct.
Connection is not possible. The connection is controlled from one side (this unit or BLUETOOTH device), but not both. Connect to this unit from a BLUETOOTH device or vice versa. The name of the detected device does not appear. Depending on the status of the other device, it may not be possible to obtain the name. No ringtone. Adjust the volume by rotating the control dial while receiving a call. Depending on the connecting device, the ringtone may not be sent properly.
While running the “SongPal” application via BLUETOOTH, the display automatically switches to [BT AUDIO]. The “SongPal” application or BLUETOOTH function has failed. Run the application again. The “SongPal” application is automatically disconnected when the display switches to [IPD]. The “SongPal” application on iPhone/iPod does not support iPod playback. Change the source of the unit to other than [IPD], then establish the “SongPal” connection (page 16).
APP NO DEV: The device with the application installed is not connected or recognized. Make the BLUETOOTH connection and establish the “SongPal” connection again (page 16). APP SOUND: A sound setting display of the application is open. Exit the sound setting display of the application to enable button operation. OPEN APP: The “SongPal” application is not running. Launch the application. PAN RESTRICT: Pandora® is not available outside your country.
CHECK TUNER The radio is having difficulty communicating with the SiriusXM Connect Vehicle Tuner. The tuner may be disconnected or damaged. Verify that the SiriusXM Connect Vehicle Tuner cable is securely connected to the radio. MEM FAILURE This unit failed to store the channel in the preset dial. Make sure that the channel you intend to store is correct. NO SIGNAL SiriusXM Connect Vehicle Tuner is having difficulty receiving the SiriusXM satellite signal.
Connection/Installation Parts List for Installation Run all ground (earth) leads to a common ground (earth) point. Do not get the leads trapped under a screw, or caught in moving parts (e.g., seat railing). Before making connections, turn the car ignition off to avoid short circuits. Connect the yellow and red power supply leads only after all other leads have been connected. Be sure to insulate any loose unconnected leads with electrical tape for safety. 5 × max. 8 mm (7/32 × max.
Connection Subwoofer*1 *3 *3 *3 Power amplifier*1 from a wired remote control (not supplied)*4 Satellite radio tuner (SiriusXM)*1 White White/black striped Gray Front speaker*1*2 Gray/black striped Green Green/black striped Purple Rear speaker*1*2 Purple/black striped Black Yellow Red Blue/white striped For details, see “Making connections” (page 33).
Speaker connection Making connections To a common ground (earth) point First connect the black ground (earth) lead, then connect the yellow and red power supply leads. To the +12 V power terminal which is energized at all times Be sure to first connect the black ground (earth) lead to a common ground (earth) point.
Notes on installing the connection cable RC-SR1 (not supplied) Refer to the support sites on the back cover for details, then connect each lead properly to the appropriate leads. Making an improper connection may damage the unit. Depending on the type of car, be sure to insulate the unused leads with electrical tape for safety. Do not connect this cable when the steering wheel remote control is not used. Consulting the dealer or an experienced technician for help is recommended.
This warranty is valid only in the United States. SON~ LIMITED WARRANTY
This warranty is valid only in canada. SONY. Consumer Warranty {canada onlvl Sony of Cllncdc LJd. (hereinafler referred 1o as ·Sony") hereby 'Mlrrnnfs, subject to the terms end oond~icns herein set forth, this product ogolnst ~ In mc1e~ol end wor1cmonshlp during lhe specified 'Mlrranty period. In the Ml11 of a defec1 of mcderial or 'Mllkmanship during lhe specified warranty period.Sonywill.
Support site Site d’assistance If you have any questions or for the latest support information on this product, please visit the web site below: Si vous avez des questions ou si vous souhaitez consulter les toutes dernières informations techniques sur ce produit, rendez-vous sur le site Web suivant : http://esupport.sony.com/ If you have any questions/problems regarding this product, try the following: 1 Read Troubleshooting in these Operating Instructions. 2 Please contact (U.S.A.