
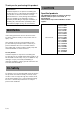
Installation Guide - Wall-Mount Bracket


7 (GB)
4
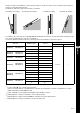
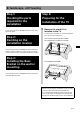
Adjust the angle of the
Mounting Hook with the
supplied hex key.
Perform following and . Make sure that
screw firmly secures the arm base of the
Mounting Hook (both left and right).
Remove the 2 screws from the arm base
of the Mounting Hook (both left and right)
and determine the screw holes for the angle
(20°) you plan to change to.
Fit screw holes of the upper arm and
lower arm in an adequate angle, put
screws removed in step into the holes,
then secure both arms.
Notes
• Make sure that the adjusted angle of both arms are
the same.
• Make sure that both arms are screwed in securely.
CAUTION
• Be careful not to get your fingers caught while
adjusting the angle.
Hex key
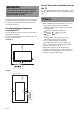
Step 5:
Installing the TV on the
wall
WARNING
Be sure to complete the installation before
connecting the AC power cord to the wall outlet. If
you allow the AC power cord to be pinched under
or between pieces of equipment, this may result
in a short circuit or an electric shock.
Be careful not to stumble over the AC power cord
or the TV, as you may hurt yourself.
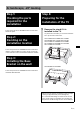
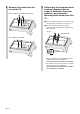
1
Connect the AC power cord and
the connecting cable(s) supplied
with the TV to the TV.
Connect the AC power cord and the connecting
cable(s) to the connectors on the rear of the TV.
For details on connecting the AC power cord
and the connecting cable(s), refer to the
instruction manual of the TV.
Notes
• You cannot connect the cables to the TV after
installing it on the Base Bracket.
• Subcontract the cable routing in the wall to a
licensed contractor.