4-748-596-11(2) Television Téléviseur Reference Guide US Manuel de référence FR Sony Customer Support U.S.A.: http://www.sony.com/tvsupport Canada: http://www.sony.ca/support United States 1.800.222.SONY Canada 1.877.899.SONY Please Do Not Return the Product to the Store Service à la clientèle Sony Canada : http://www.sony.ca/support États-Unis : http://www.sony.com/tvsupport Canada 1.877.899.SONY États-Unis 1.800.222.
To attach the TableTop Stand, refer to the Setup Guide. Introduction Thank you for choosing this Sony product. Before operating the TV, please read this manual thoroughly and retain it for future reference. Note • Images and illustrations used in the Setup Guide and this manual are for reference only and may differ from the actual product. The 65” class has a 64.5 inch (163.9 cm) viewable image size and the 55” class has a 54.6 inch (138.8 cm) viewable image size (measured diagonally).
Safety Information WARNING Stability Hazard Supplier’s Declaration of Conformity Trade Name: SONY Model: XBR-65A8G/XBR-55A8G Responsible Party: Sony Electronics Inc. Address: 16535 Via Esprillo, San Diego, CA 92127 U.S.A. Telephone Number: 858-942-2230 FCC Related Information This equipment has been tested and found to comply with the limits for a Class B digital device, pursuant to Part 15 of the FCC Rules.
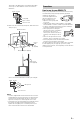
• When handling or mounting the TV set, do not lay down the TV. Recommended Measures to Secure the TV Consider the following measures when securing your TV to a Stand (not supplied). 1 • Ensure your TV has adequate ventilation, see page 18. • For best picture quality, do not expose the screen to direct illumination or sunlight. • Avoid installing the TV in a room with reflective wall and floor materials. • Avoid moving the TV from a cold area to a warm area.
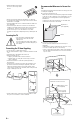
The length of the M6 machine screw differs depending on the rope or chain diameter. Please refer to below illustration. Precautions How to care for your BRAVIA TV 8 mm - 12 mm Safety is very important. Please read and follow the safety documentation (Safety Booklet) separately provided. Screw (M6) Rope or chain TV’s rear cover 3 Anchor the TV to the wall by using bolts, wall anchor and chain (or rope).
The BRAVIA® 4K TV Experience Thank you for choosing Sony! Your new BRAVIA® TV opens the door to the “4K TV Experience”. This document will help you get the most out of your TV. Please take a moment to register your TV at: U.S.A.: http://productregistration.sony.com Canada: http://www.sony.ca/registration Four Steps to a 4K TV Experience Set, Source, Sound, and Setup.
Protecting the TV Screen (OLED TV) Precautions to Protect the Screen from Damage Image retention OLED TV‘s are susceptible to image retention (burn-in) due to the characteristics of the materials used. Image retention may occur if images are displayed in the same location on the screen repeatedly or over extended periods of time. This is not a malfunction of the TV. Avoid displaying images that may cause image retention.
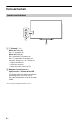
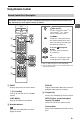
Parts and Controls Controls and Indicators ȩ ̕ (Power) / + / – When the TV is off, Press to power on. When the TV is on, Press and hold to power off. Press repeatedly to change the function, then press + or – button to: • Adjust the volume. • Select the channel. • Select the input source of TV. Remote Control sensor* / Light sensor* / Illumination LED The illumination LED lights up or blinks according to the status of the TV. For more information, refer to the Help Guide.
Using Remote Control Remote Control Parts Description The remote control shape, location, availability and function of remote control buttons may vary depending on your region/country/TV model. MIC ȩ Ȫ ȫ Ȭ ȭ US (The Google Assistant) / (Microphone) Use the Google Assistant*1*2 or voice search*2. (e.g., Search various content by voice.) STB MENU Display the connected Set Top Box (cable/satellite box) menu after connecting and setting up the IR Blaster (page 12).
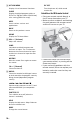
ACTION MENU Display a list of contextual functions. PIC OFF Turn the picture off, while sound remains on. GUIDE Display the digital program guide, or EPG of Set Top Box (cable/satellite box) after setting [IR Blaster setup]. APPS Access various services and applications. Guidelines for IR Remote Control • Point your remote control directly at the IR sensor located on your TV. • Make sure that no objects are blocking the path between the remote control and the IR sensor on your TV.
Connection Diagram For more information on connections, refer to the Help Guide by pressing HELP on the remote control. Note • When connecting the cable to the Cable/Antenna input, finger tighten only, over tightening the connection can damage the TV. US Home Controller VCR/Video game equipment/DVD player/ Camcorder Headphone/Audio System/Subwoofer IR Blaster Digital still camera/ Camcorder/USB storage media HDMI Device Cable/ Antenna Router < 7 mm < 1.
REMOTE RS-232C REMOTE IR IN • These jacks are for receiving the external control signal. Enables extended control of the TV using RS232C via the RS-232C and IR IN jacks. RS-232C: connect to the RS-232C terminal of the home controller. IR IN: connect to the IR out terminal of the home controller. • Take care to not connect to headphones or an external audio system. USB 1/2, USB 3 • Connecting a large USB device may interfere with other connected devices beside it.
Using Sound Bar (not supplied) Recommended (in front of the TV) Place the sound bar (not supplied) in front of the TV's Table-Top Stand. US Recommended sound bar: HT-Z9F* (not supplied) Alternate (on the Table-Top Stand) If there is not enough space to place the sound bar in front of the TV, attach the rubber feet (supplied with the TV) to the bottom of the sound bar (not supplied) and place the sound bar on top of the Table-Top Stand. * Only on limited region/country.
Installing the TV to the Wall Using the optional Wall-Mount Bracket (SU-WL855 only) To Customers: For product protection and safety reasons, Sony strongly recommends that installation of your TV be performed by Sony dealers or licensed contractors. Do not attempt to install it yourself. To Sony Dealers and Contractors: Provide full attention to safety during the installation, periodic maintenance and examination of this product.
Remove the screws from the rear of the TV.
Using the optional Wall-Mount Bracket (Except SU-WL855) This TV’s instruction manual only provides the steps to prepare the TV for Wall-Mount installation before it is installed on the wall. Your TV can be mounted to a wall using a suitable Wall-Mount Bracket (not supplied). If the Table-Top Stand is attached to the TV, the TV may require detaching the Table-Top Stand; see page 17 (Detaching the Table-Top Stand from the TV). Prepare the TV for the Wall-Mount Bracket before making cable connections.
1 Remove the screws from the rear of the TV. US 2 Attach the Wall-Mount Bracket (not supplied) using the screws (not supplied). Wall-Mount Bracket (not supplied) Screw (not supplied) Note • If using an electric screwdriver, set the torque at approximately 1.5 N·m {15 kgf·cm}. Detaching the Table-Top Stand from the TV To detach the Table-Top Stand from the TV, remove the screws . Note • Do not remove the Table-Top Stand for any reason other than to install corresponding accessories on the TV.
Installing the TV against a wall or enclosed area Ventilation • Never cover the ventilation holes or insert anything into the cabinet. • Leave space around the TV set as shown below. Installed with stand 11 7/8 inches (30 cm) 2 3/8 inches (6 cm) 4 inches (10 cm) 4 inches (10 cm) Leave at least this much space around the set. Installed on the wall 11 7/8 inches (30 cm) 4 inches 4 inches (10 cm) (10 cm) Leave at least this much space around the set.
Troubleshooting General troubleshooting for issues like: black screen, no sound, frozen picture, TV does not respond, or network is lost, do the following steps. 1 Restart your TV by pressing the power button on the remote control until a message appears. The TV will restart. If the TV does not recover, try unplugging the AC power cord. Then press the power button on the TV and wait for two minutes, and plug in the AC power cord. 2 Refer to the Help menu by pressing HELP on the remote control.
The STB MENU button on the remote control does not work. Check the connection and set up of the IR Blaster (page 12). The parental lock password has been forgotten. Enter 4357 for the PIN and enter the new PIN. The restricted profile password has been forgotten. Perform the force factory data reset. Refer to “How to reset the TV to factory settings” (page 19). The TV and its surroundings become warm.
LAN Specifications System Television system NTSC: American TV Standard ATSC (8VSB Terrestrial): ATSC compliant 8VSB QAM on cable: ANSI/SCTE 07 2000 (Does not include CableCARD functionality) Channel coverage Analog terrestrial: 2 - 69 / Digital terrestrial: 2 - 69 Analog Cable: 1 - 135 / Digital Cable: 1 - 135 Panel system OLED (Organic Light Emitting Diode) Panel 10 W + 10 W + 10 W + 10 W RS-232C mini jack, IR IN mini jack These jacks are for receiving the external control signal.
without stand XBR-65A8G: 1,450 × 834 × 51 mm / 57 1/8 × 32 7/8 × 2 1/8 inches XBR-55A8G: 1,229 × 710 × 51 mm / 48 1/2 × 28 × 2 1/8 inches wall-mount hole pattern 300 × 300 mm wall-mount screw size (mm) M6 (length: refer to diagram on page 14.) Mass (Approx.) with stand XBR-65A8G: 22.5 kg / 49.6 lb. XBR-55A8G: 19.8 kg / 43.7 lb. without stand XBR-65A8G: 20.3 kg / 44.8 lb. XBR-55A8G: 17.6 kg / 38.8 lb.
US 23US
Pour fixer le support de table, reportezvous au Manuel de configuration. Introduction Merci d’avoir choisi ce produit Sony. Avant de faire fonctionner le téléviseur, lisez attentivement ce manuel et conservez-le pour toute référence ultérieure. Remarque • Les images et illustrations utilisées dans le Manuel de configuration et ce manuel sont fournies uniquement à titre de référence et peuvent différer de l’aspect réel du produit.
Consignes de sécurité Cet appareil et sa ou ses antennes ne doivent pas être placés à proximité d’autres antennes ou émetteurs ni fonctionner avec eux, sauf autorisation spéciale. Déclaration de conformité du fournisseur Les radars de haute puissance sont désignés utilisateurs principaux (c.-à-d., qu’ils ont la priorité) pour les bandes 5 250-5 350 MHz et 5 650-5 850 MHz, et ces radars pourraient causer du brouillage et/ou des dommages aux dispositifs LAN-EL.
Avant d’installer votre téléviseur Prévenir le basculement du téléviseur Avec certains modèles de téléviseur, le support de table n’est pas fixé afin de vous permettre de monter directement le téléviseur au mur. Reportez-vous à la page 16 (Fixer le téléviseur au mur) si vous souhaitez installer ce téléviseur au mur. Si vous ne comptez pas installer le téléviseur au mur, vous devez installer le support de table.
2 Fixer solidement le téléviseur à la base. Utiliser la quincaillerie optionnelle mentionnée (non fournie) : • Vis à métal M6 (vissée dans la couvercle arrière du téléviseur). • Une vis ou l’équivalent (la fixer à la base). • Une corde ou une chaîne (assez solide pour supporter le poids du téléviseur). Vous assurer qu’il n’y a pas de mou excessif dans la corde ou la chaîne. La longueur des vis à métal M6 diffère selon le diamètre de la corde ou de la chaîne. Reportez-vous à l’illustration ci-dessous.
Précautions Entretien de votre téléviseur BRAVIA La sécurité étant de première importance, veuillez lire la documentation de sécurité (Feuillet de consignes de sécurité) fournie séparément et vous y conformer. Débranchez le téléviseur et les appareils raccordés de la prise de courant avant de nettoyer le téléviseur. • Essuyez l’écran délicatement à l’aide d’un chiffon doux. • Les taches tenaces peuvent être enlevées à l’aide d’un chiffon légèrement imbibé d’une solution de savon doux et d’eau tiède.
Fonctionnalités de l’expérience télévision BRAVIAMD en 4K Nous vous remercions d’avoir choisi Sony! Votre nouveau téléviseur BRAVIAMD est la clé d’une « expérience télévision en 4K ». Le présent document vous aidera à préparer votre nouveau téléviseur pour l’utilisation. Prenez quelques instants pour compléter l’enregistrement de votre téléviseur à l’adresse suivante : Canada : http://www.sony.ca/fr/registration États-Unis : http://productregistration.sony.
Protection de l’écran du téléviseur (Téléviseur DELO) Précautions pour protéger l’écran contre les dommages Persistance d’image Les téléviseurs DELO sont susceptibles de présenter de la persistance d’image (rémanente) en raison des caractéristiques des matériaux utilisés. La persistance d’image peut se produire si des images sont affichées au même endroit sur l’écran à plusieurs reprises ou pendant des durées prolongées. Il ne s’agit pas d’un problème de fonctionnement du téléviseur.
Pièces et commandes Commandes et indicateurs FR ȩ ̕ (Alimentation) / + / – Lorsque le téléviseur est éteint, Appuyez sur pour l’allumer. Lorsque le téléviseur est allumé, Appuyez longtemps sur pour mettre le système hors tension. Appuyez sur de façon répétitive pour changer la fonction, puis appuyez sur la touche + ou – pour : • Régler le volume. • Sélectionner le canal. • Sélectionner la source d’entrée du téléviseur.
Utilisation de la télécommande Description des pièces de la télécommande La forme de la télécommande, l’emplacement, la disponibilité et la fonction des touches de la télécommande peuvent varier selon votre région ou pays ou le modèle de téléviseur. MIC ȩ Ȫ ȫ Ȭ ȭ Ȯ INPUT (L’Assistant Google) / (Micro) Utilisez l’Assistant Google*1*2 ou la recherche vocale*2. (p. ex., recherche de divers contenus à l’aide de la voix.
Google Play Permet d’accéder au service « Google Play » en ligne. NETFLIX (Uniquement pour certaines régions/pays/modèles de téléviseurs limités) ////// Permet de faire fonctionner les contenus média sur le téléviseur et l’appareil compatible BRAVIA Sync raccordé. SUBTITLE/CC Permet d’accéder au service « NETFLIX » en ligne. Active ou désactive les sous-titres (lorsque la fonction est disponible). Touches de couleur HELP Permet d’exécuter la fonction correspondante à ce moment.
Schéma de connexion Pour plus d’informations sur les raccordements, reportez-vous au Manuel d’aide en appuyant sur la touche HELP de la télécommande. Remarque • Lorsque vous branchez le câble au Câble / Antenne, serrez-le à la main uniquement, car le serrage excessif de la connexion peut endommager le téléviseur.
REMOTE RS-232C REMOTE IR IN IR BLASTER • Utilisez votre télécommande Sony pour contrôler votre décodeur (câble/ décodeur satellite). Raccordez le câble IR Blaster (fourni) au port IR Blaster de votre téléviseur. Placez une ou les deux autres extrémités comme indiqué ci-dessous. • Ces prises permettent de recevoir le signal de commande externe. Elles permettent le contrôle étendu du téléviseur à l’aide d’une liaison RS-232C via les prises RS-232C et IR IN.
• HDMI IN 3 ARC (Audio Return Channel) Raccordez votre système audio au HDMI IN 3 pour acheminer l’audio TV vers votre système audio. Un système audio qui prend en charge le HDMI ARC peut envoyer la vidéo au téléviseur, et recevoir l’audio depuis le téléviseur via le même câble HDMI. Si votre système audio ne prend pas en charge le HDMI ARC, un raccordement supplémentaire avec DIGITAL AUDIO OUT (OPTICAL) est nécessaire.
Utilisation de la barre de son (non fournie) Recommandée (devant le téléviseur) Placez la barre de son (non fournie) devant le support de table du téléviseur.
Fixer le téléviseur au mur Utilisation du support de fixation murale en option (SU-WL855 uniquement) À l’attention des clients : Pour des raisons de sécurité et de protection du produit, Sony recommande vivement de faire installer votre téléviseur par des détaillants Sony ou des installateurs agréés. N’essayez pas de l’installer vous-même.
Retirez les vis à l’arrière du téléviseur.
Utilisation du support de fixation murale en option (Sauf SU-WL855) Le mode d’emploi de ce téléviseur montre uniquement les étapes permettant de préparer le téléviseur pour une fixation murale avant son installation au mur. Votre téléviseur peut être installé sur un mur avec un support de fixation murale adapté (non fourni).
1 Retirez les vis à l’arrière du téléviseur. 2 Fixez le support de fixation murale (non fourni) à l’aide des vis (non fournies). FR Support de fixation murale (non fournie) Vis (non fournie) Remarque • Si vous utilisez une visseuse électrique, réglez le couple à environ 1,5 N·m {15 kgf·cm}. Démonter le support de table du téléviseur Démonter le support de table du téléviseur en retirant d’abord les vis .
Installation du téléviseur contre un mur ou dans un endroit fermé Ventilation • Ne couvrez jamais les orifices de ventilation, ni insérez aucun objet à l’intérieur de la carcasse du téléviseur. • Laissez un espace suffisant autour du téléviseur comme indiqué ci-dessous. Installation sur support 30 cm (11 7/8 pouces) 6 cm (2 3/8 pouces) 10 cm (4 pouces) 10 cm (4 pouces) Laissez au moins cet espace autour du téléviseur.
Dépannage Updating... En cas de problèmes tels que : écran noir, aucun son, image figée, aucune réponse du téléviseur ou réseau perdu, suivez les étapes suivantes du dépannage général. 1 Redémarrez votre téléviseur en appuyant sur la touche de marche de la télécommande jusqu’à ce qu’un message s’affiche. Le téléviseur redémarrera. Si le problème persiste, débranchez le cordon d’alimentation CA.
Problèmes et solutions La DEL d’éclairage clignote en rouge. Comptez le nombre de clignotements (un intervalle de trois secondes entre les clignotements). Redémarrez le téléviseur en débranchant le cordon d’alimentation CA du téléviseur jusqu’à ce que la DEL d’éclairage arrête de clignoter en rouge, puis allumez le téléviseur.
Si la fonction Actualisation panneau a démarré automatiquement, elle redémarre lorsque vous éteignez le téléviseur avec la télécommande. Si la fonction Actualisation panneau est initiée manuellement, vous devez la sélectionner de nouveau.
1, 2, 3 Les ports USB 1 et 2 prennent en charge la connectivité USB haute vitesse (USB 2.0) Le port USB 3 prend en charge la connectivité USB super vitesse (USB 3.1 Gen 1) LAN Connecteur 10BASE-T/100BASE-TX (Selon l’environnement de fonctionnement du réseau, la vitesse de connexion peut varier. Le débit et la qualité de communication ne sont pas garantis.) Reportez-vous au Manuel d’aide pour connaître les fichiers et formats pris en charge dans le réseau domestique.
Information de licence • Les termes HDMI et HDMI HighDefinition Multimedia Interface, de même que le logo HDMI sont des marques commerciales ou des marques déposées de HDMI Licensing Administrator, Inc. aux États-Unis et dans d’autres pays. • Dolby, Dolby Vision, Dolby Audio et le symbole double-D sont des marques de commerce de Dolby Laboratories. Fabriqué sous licence de Dolby Laboratories. Documents confidentiels non publiés. Droit d’auteur © 19922015 Dolby Laboratories. Tous droits réservés.
26FR
For Your Convenience Online Registration: Be sure to register your TV. United States http://productregistration.sony.com Canada http://www.sony.ca/registration Your TV is capable of receiving software updates. For the latest information about software updates for your TV, visit: Software Updates: United States http://www.sony.com/tvsupport Canada http://www.sony.