SONY 3-856-153-11 (1) ® Digital Equalizer Amplifier Operating Instructions Owner‘s Record “The mode] and serial numbers are located on the bottom of the unit.
Warning This equipment has been tested and found 0 comply with the limits for a Class B digital device, pursuant to Part 15 of the FCC Rules. These limits are designed to provide reasonable protection against harmful interference in a residential installation. This equipment generates, uses, and can radiate radio frequency energy and, if nat installed and used in accordance with the instructions, may cause harmful! interference to radio communications.
Getting Started DSP Operating this unit You can control this unit by a Sony Master unit. Some master units have (37 {volume} buttons, and some have a dial. This st ructions saws as follow. Rotate/press (5 or (= Note There may be a difference between the display tensity of this manual and fhe master wit. Note in operation » The unit has 2 digital volume control system.
Welcome ! Thank you for purchasing the Sony Digital Equalizer Amplifier. This unit is compatible with the Sony BUS system This unit provides flexible equalization using 18-band (front) and 3-band (rear) equalizer with independent control of level and frequency. The characteristics, installation position, and sound field of the speakers make it possible to arrange the frequency response and reproduce the sound quality of the original performance.
appears e Tuning 1 MEMORY! 4 Rotate/press select an equalizer curve. 5 Adjust the equalizer curve. © Press 1o select the desired frequency. F30 — Fa5 — o+ F16K e R90 —» R840 -~ R7.5k MEMORY] ., F 33@1;\ 1£ you press (T) the frequency appear in the reverse order. © Rotate/press adjust the revel. Note 1 you adjust (e Level too fig, the sown be conses distorted. fn Iris ens, lower the feel willing the son end becomes normal. @ Repeat steps € and 6 10 adjust the equalizer curve.
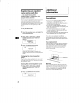
Selecting the listening position ~ Sound Contort Mode You can set the time for the sound o reach the listeners from the speakers. The unit can simulate a natural sound field so that you can feel as if you are in the center of the sound field wherever you sit in the car. Display | Canter of window sound field Normal setting Al g DrD+@® Frost part FRONT @ é) 4 press Rotate/press adjust the center of the sound field to the lefter right. Then set the center of the sound field.
Adjusting the cut-off frequency ~ crossover Network {CNW) ~ Sound Tuning Mode To mach the characteristics of the connected speakers or subprofessional, you can cut the unwarranted high, middle and low frequency signals entering the speakers or subprofessional. By setting the cut-off frequency (see the diagram below), the speakers will output only the most suitable frequency signals so that you can get u clearer sound image.
R Registering an equalizer curve onto each disc -— Dis¢ Sound Memory (D5M) changer or DIMMED player with program memory function) Once you have registered the desired equalizer curve and the sound characteristics (bass, treble and sub woofer level) onto the discs, you can enjoy the same equalizer curve every time you play them. You can register up to 200 discs. 1 play the desired disc. 2 Select the equalizer curve, and adjust the sound characteristics.
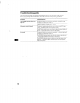
Troubleshooting guide The following check help you remedy most problems that you may encumber with you unit, Before going through the checklist below, check the connection and operating procedures. Problem Cause/Solution The POWER indicator does not light up. The ground deaf is not securely connected. Ground the lead securely o a metal part of the car Check e beery volition (05 = 157 Alternator noise is heard. ‘The power connecting leads are run to close to the RCA pin cards.