User guide Xperia™ Z5 Compact E5803/E5823
Contents Getting started............................................................................... 7 About this User guide........................................................................ 7 Overview............................................................................................ 7 Assembly........................................................................................... 8 Starting your device for the first time.................................................
Basic settings...............................................................................40 Accessing settings........................................................................... 40 Sound, ringtone and volume ...........................................................40 SIM card protection ........................................................................ 42 Screen settings................................................................................ 43 Daydream...........................
Backing up contacts........................................................................ 73 Messaging and chat.....................................................................75 Reading and sending messages......................................................75 Organising your messages.............................................................. 76 Calling from a message................................................................... 77 Messaging settings........................................
Videos........................................................................................ 109 Watching videos in the Video application......................................109 Transferring video content to your device .................................... 110 Managing video content................................................................ 110 Movie Creator................................................................................ 111 PS Video service...........................................
Finding the identification number of your device...........................136 Memory and storage......................................................................137 Managing files using a computer...................................................138 Backing up and restoring content................................................. 138 Running diagnostic tests on your device.......................................141 Resetting your applications...........................................................
Getting started About this User guide This is the Xperia™ Z5 Compact User guide for the Android™ 5.1 software version. If you're not sure which software version your device is running, you can check it via the Settings menu. For more information about software updates, see Updating your device on page 134 . 1 2 To check the current software version of your device From your Home screen, tap . Find and tap Settings > About phone > Android™ version.
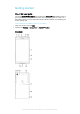
1. Front camera lens 11. Charger/USB cable port 2. Headset jack 12. Main loudspeaker 3. Ear speaker/Second loudspeaker 13. Wi-Fi/Bluetooth antenna area 4. Second microphone 14. Main camera lens 5. Proximity/Light sensor 15. Main camera light 6. Charging/Notification light 16. GPS antenna area 7. Power key/Fingerprint sensor* 17. NFC™ detection area 8. Volume/Zoom key 18. Nano SIM/Memory card slot cover 9. Camera key 19. Strap hole 10.
1 2 3 4 Open the cover for the nano SIM card and memory card slots. Using a fingernail or other similar object, drag out the nano SIM card holder. Remove the nano SIM card, then re-insert the holder. Close the cover. To remove the memory card 1 2 3 4 Turn off the device and open the cover for the nano SIM card and memory card slots. Press the memory card inwards and then release it quickly. Drag out the memory card fully and remove it. Close the cover.
Play Store™ application, which gives you access to the Google Play™ online store for downloading Android™ applications. To get the most out of these services, you need a Google™ account. For example, a Google™ account is mandatory if you want to: • • • • Download and install applications from Google Play™. Synchronise email, contacts and the calendar. Chat with friends using the Hangouts™ application. Synchronise your browsing history and bookmarks.
1 2 3 4 Using a micro-fibre cloth, wipe away any excess moisture from your device. With the device held firmly and the USB port facing downwards, shake the device vigorously at least 15 times. If moisture is still visible in the USB port, shake the device again several times. Use a micro-fibre cloth to wipe away any remaining moisture from the USB port. To charge your device 11 This is an Internet version of this publication. © Print only for private use.
1 2 3 4 Plug the charger into a power outlet. Plug one end of the USB cable into the charger (or into the USB port of a computer). Plug the other end of the cable into the micro USB port on your device, with the USB symbol facing up. The notification light illuminates when charging begins. When the device is fully charged, disconnect the cable from your device by pulling it straight outwards. Make sure not to bend the connector.
Learning the basics Using the touchscreen Tapping • • • Open or select an item. Mark or unmark a checkbox or option. Enter text using the on-screen keyboard. Touching and holding • • • Move an item. Activate an item-specific menu. Activate selection mode, for example, to select several items from a list. 13 This is an Internet version of this publication. © Print only for private use.
Pinching and spreading • Zoom in or out on web pages, photos and maps, and when you’re taking photos or shooting videos. Swiping • • Scroll up or down a list. Scroll left or right, for example, between Home screen panes. 14 This is an Internet version of this publication. © Print only for private use.
Flicking • Scroll quickly, for example, in a list or on a web page. You can stop the scrolling movement by tapping the screen. Locking and unlocking the screen When your device is on and left idle for a set period of time, the screen darkens to save battery power and locks automatically. This lock prevents unwanted actions on the touchscreen when you are not using it. When you buy your device, a basic screen swipe lock is already set. This means that you have to swipe upwards on the screen to unlock it.
• 1 Introduction to Xperia™ widget — Tap to open the widget and select a task such as copying content from your old device or setting up Xperia™ services 2 Dots — Represents the number of Home screen panes To go to the Home screen Press . To browse the Home screen Home screen panes You can add new panes to your Home screen (up to a maximum of seven panes) and delete panes. 1 2 To add a pane to your Home screen Touch and hold any area on your Home screen until the device vibrates.
1 2 To delete a pane from your Home screen Touch and hold any area on your Home screen until the device vibrates. Flick left or right to browse to the pane that you want to delete, then tap the top right corner of the pane. on Home screen settings 1 2 To adjust the size of icons on your Home screen Touch and hold any area on your Home screen until the device vibrates, then tap . Tap Icon size, then select an option.
1 2 3 To move an application on the Application screen When the Application screen is open, tap . Make sure that Own order is selected under Sort apps. Touch and hold the application until it becomes selected, then drag it to the new location. 1 2 3 To uninstall an application from the Application screen When the Application screen is open, tap . Make sure that Own order is selected under Sort apps. Touch and hold any area on the Application screen until the device vibrates.
Small apps Small apps are miniature apps that run on top of other applications on the same screen, to enable multi-tasking. For example, you can have a webpage open showing details of currency exchange rates and then open the Calculator small app on top of it and perform calculations. You can access your small apps via the favourites bar. To download more small apps, go to Google Play™. 1 2 To open a small app To make the favourites bar appear, press Tap the small app that you want to open. .
1 2 1 2 3 To add a widget to the Home screen Touch and hold an empty area on your Home screen until the device vibrates, then tap Widgets. Find and tap the widget that you want to add. To resize a widget Touch and hold a widget until it magnifies and the device vibrates, then release the widget. If the widget can be resized, for example, the Calendar widget, then a highlighted frame and resizing dots appear. Drag the dots inward or outward to shrink or expand the widget.
1 2 3 1 Access an application using a shortcut 2 Access a folder containing applications To add an application shortcut to your Home screen Touch and hold an empty area on your Home screen until the device vibrates and the customisation menu appears. In the customisation menu, tap Apps. Scroll through the list of applications and select an application. The selected application gets added to the Home screen.
1 2 3 To set a theme Touch and hold an empty area on your Home screen until the device vibrates. Tap Themes. Select an option and follow the instructions in your device. When you change a theme, the background also changes in some applications. Battery and power management Your device has an embedded battery. You can keep track of your battery consumption and see which applications are using the most power.
STAMINA mode feature overview STAMINA mode has several features that allow you to optimise your battery performance: Extended standby Prevents applications from using data traffic by disabling Wi-Fi® and mobile data when the screen is off. You can exclude some applications and services from being paused when this feature is active. STAMINA clock Keeps network connections paused in situations where you frequently press the power key to check the time.
1 2 3 4 1 2 3 4 1 Minimise/Resume the record screen window 2 Record your screen 3 Record your screen when the front camera is activated 4 Access the screen recording settings 5 Close the screen recording window To record your screen Press and hold down the power key until a prompt window appears. Tap . After the screen recording window opens, tap . The record screen function starts and a timer button is displayed. To stop the recording, tap the timer button, then tap .
To open or close the Notification panel 1 2 To open the Notification panel, drag the status bar downwards. To close the Notification panel, drag the panel upwards. • To take action on a notification in the Notification panel Tap the notification. • To dismiss a notification from the Notification panel Place your finger on a notification and flick left or right. • To expand a notification on the Notification panel Drag the notification downwards. Not all notifications are expandable.
Notification display options on the lock screen Show all notification content Get all notifications on the lock screen. When you have this setting turned on, keep in mind that all content (including the content of incoming emails and chats) will be visible on your lock screen unless you designate the relevant apps as Sensitive in the App notifications settings menu.
No signal Roaming Sending and downloading LTE data Sending and downloading GPRS data Sending and downloading EDGE data Sending and downloading 3G data Sending and downloading mobile data A Wi-Fi® connection is enabled and data is being transmitted Battery status The battery is charging STAMINA mode is activated Low battery mode is activated Airplane mode is activated The Bluetooth® function is activated The microphone is muted The speakerphone is on Do not disturb mode Allow exceptions in Do not disturb mod
New voicemail message New email message Downloading data Uploading data Mobile data is disabled Perform a basic setup of your device A software update is available System updates are available Downloading system updates Tap to install the downloaded system updates Ultra STAMINA mode is activated Noise cancelling is on Screenshot captured A new Hangouts™ chat message has arrived Video chat with friends using the Hangouts™ application Upcoming calendar event A small app is running Smart Connect is activateded
Use the camera to take photos and record video clips. Use the Contacts application to manage phone numbers, email addresses and other information related to your contacts. Access your downloaded applications, documents and pictures. Use the Email application to send and receive emails through both private and corporate accounts. Use the Facebook™ application to engage in social networking with friends, family members and colleagues around the world. Browse and listen to FM radio stations.
Downloading applications Downloading applications from Google Play™ Google Play™ is the official online Google store for downloading applications, games, music, movies and books. It includes both free and paid applications. Before you start downloading from Google Play™, make sure that you have a working Internet connection, preferably over Wi-Fi® to limit data traffic charges. To use Google Play™, you need to have a Google™ account. Google Play™ may not be available in all countries or regions.
Internet and networks Browsing the web The Google Chrome™ web browser for Android™ devices comes pre-installed in most markets. Go to http://support.google.com/chrome and click the "Chrome for Mobile" link to get more detailed information about how to use this web browser. 1 2 3 4 To browse with Google Chrome™ From your Home screen, tap . Find and tap . If you are using Google Chrome™ for the first time, select to either sign in to a Google™ account or browse with Google Chrome™ anonymously.
7 To add Internet and MMS settings manually From your Home screen, tap . Find and tap Settings > More > Mobile networks. Tap Access Point Names > . Tap Name and enter a name as desired. Tap APN and enter the access point name. Enter all other information as required. If you don’t know what information is required, contact your network operator for more details. When you're done, tap , then tap SAVE. 1 2 3 4 To view the downloaded Internet and MMS settings From your Home screen, tap .
1 2 3 4 5 6 7 8 To add a Wi-Fi® network manually From your Home screen, tap . Find and tap Settings > Wi-Fi. Tap > Add network. Enter the Network name (SSID) information. To select a security type, tap the Security field. If required, enter a password. To edit some advanced options such as proxy and IP settings, mark the Advanced options checkbox and then edit as desired. Tap Save. Contact your Wi-Fi® network administrator to get the network SSID and password.
1 2 3 4 To add a Wi-Fi® sleep policy From the Home screen, tap . Find and tap Settings > Wi-Fi. Tap , then tap Advanced > Keep Wi-Fi on during sleep. Select an option. WPS WPS (Wi-Fi® Protected Setup) is a wireless networking standard that helps you establish secure wireless network connections. If you have little background knowledge of wireless security, WPS makes it easy for you to set up Wi-Fi Protected Access (WPA) encryption to secure your network.
1 2 3 4 5 6 To share your mobile data connection with another Bluetooth® device Make sure that your device and the Bluetooth® device are paired with each other and that mobile data traffic is activated on your device. Your device: From your Home screen, tap . Find and tap Settings > More > Tethering & portable hotspot and then drag the slider beside Bluetooth tethering to the right. Bluetooth® device: Set up the device so that it obtains its network connection using Bluetooth®.
your mobile data connection, you can also set data usage warnings and limits to avoid additional charges. Adjusting data usage settings can help you keep greater control over data usage but cannot guarantee the prevention of additional charges. 1 2 3 To turn data traffic on or off From your Home screen, tap . Find and tap Settings > Data usage. Drag the slider beside Mobile data to turn data traffic on or off.
1 2 3 To select a network mode From your Home screen, tap . Find and tap Settings > More > Mobile networks. Tap Preferred network type, then select a network mode. 1 2 3 4 To select another network manually From your Home screen, tap . Find and tap Settings > More > Mobile networks > Network operators. Tap Search mode, then select Manual. Select a network. If you select a network manually, your device will not search for other networks, even if you move out of range of the manually selected network.
Synchronising data on your device Synchronising with online accounts Synchronise your device with contacts, email, calendar events and other information from online accounts, for example, email accounts such as Gmail™ and Exchange ActiveSync, Facebook™, Flickr™ and Twitter™. You can synchronise data automatically for such accounts by activating the auto-sync function. Or you can synchronise each account manually.
1 2 3 1 2 3 4 1 2 3 4 To change the settings of an EAS account From your Home screen, tap . Tap Email, then tap . Tap Settings and select an EAS account, then change the settings of the EAS account as desired. To set a synchronisation interval for an EAS account From your Home screen, tap . Tap Email, then tap . Tap Settings and select an EAS account. Tap Check frequency > Check frequency and select an interval option. To remove an EAS account From your Home screen, tap > Settings > Accounts.
Basic settings Accessing settings View and change settings for your device from the Settings menu. The Settings menu is accessible from both the Application screen and the Quick settings panel. 1 2 To open the device settings menu from the Application screen From your Home screen, tap . Tap Settings. 1 2 To view information about your device From your Home screen, tap . Find and tap Settings > About phone.
Do not disturb mode setting options No end time Keep the device silent until you manually turn the sound back on. For one hour Keep the device silent for one hour. You can tap the minus and plus icons to adjust the duration. 1 2 3 4 5 To schedule Do not disturb mode time intervals Press the volume key down until appears. Tap . Find and tap Days and mark the checkboxes for the relevant days, then tap Done. To adjust the start time, tap Start time and select a value, then tap OK.
1 2 3 1 2 3 4 1 2 3 4 To set your device to vibrate for incoming calls From your Home screen, tap . Find and tap Settings > Sound & notification. Drag the slider beside Also vibrate for calls to the right. To set a ringtone From your Home screen, tap . Find and tap Settings > Sound & notification > Phone ringtone. Select an option from the list or tap and select a music file that is saved to your device. To confirm, tap Done. To select the notification sound From your Home screen, tap .
1 2 3 To unlock a blocked SIM card using the PUK code Enter the PUK code and tap . Enter a new PIN code and tap . Re-enter the new PIN code and tap . If you enter an incorrect PUK code too many times, you need to contact your network operator to get a new SIM card. Screen settings 1 2 3 To adjust the screen brightness From your Home screen, tap . Find and tap Settings > Display > Brightness level. Drag the slider to adjust the brightness. Lowering the brightness level increases battery performance.
1 2 3 4 To activate screen pinning From your Home screen, tap . Find and tap Settings > Security > Screen pinning. Drag the slider to the right. If you have not set up a pattern, PIN or password screen lock on your device, drag the slider beside Lock device when unpinning to the right and then select an option. If you already have a screen lock enabled, then drag the slider to activate the relevant security option after you activate screen pinning.
• Fingerprint – place your registered finger on the power key to unlock your device It is very important that you remember your screen unlock pattern, PIN or password. If you forget this information, it may not be possible to restore important data such as contacts and messages. If you have set up a Microsoft® Exchange ActiveSync® (EAS) account on your Xperia™ device, the EAS security settings may limit the lock screen type to only a PIN or password.
1 2 3 4 • To enable or disable Fingerprint unlock From your Home screen, tap . Find and tap Settings > Security > Fingerprint Manager. If needed, follow the instructions in your device to verify your PIN or password. Drag the slider beside Unlock device to the right or left. To unlock the device using your fingerprint With the lock screen active, place your finger on the power key so that the device can scan your fingerprint and unlock the screen.
example, when it’s connected to a Bluetooth® device or when you’re carrying it with you. • • • • To prepare your device to unlock automatically, you first need to perform the following steps in the order given: Make sure you have an active Internet connection, preferably a Wi-Fi® connection to limit data traffic charges. Make sure that all your apps are updated using the Play Store™ application in order to ensure that the Google Play™ services app is updated.
1 2 3 4 5 1 2 3 4 To add a trusted Bluetooth® device Make sure your device is paired and connected to the Bluetooth® device that you want to add as a trusted device. In the Smart Lock menu, tap Trusted devices. Tap Add trusted device > Bluetooth. Tap a device name to select it from the list of connected devices. Only paired devices appear in this list. Depending on the security of your connection, you may need to manually unlock your device before the trusted device can keep it unlocked.
1 2 3 4 5 6 To edit your home location Make sure location mode is turned on and that you are using either the High accuracy or Battery saving setting. From your Home screen, tap . Find and tap Settings > Security > Smart Lock > Trusted places. Select your home location. Tap Edit. In the search bar, enter the location that you want to use as your home location. If your home has multiple buildings at the same address, the trusted place that you want to add might be different from the actual address.
Keeping your device unlocked while you’re carrying it Using the On-body detection feature, you can have your device stay unlocked when you have it on you, for example, if you're carrying it in your hand, pocket or bag. The accelerometer in your device keeps your device unlocked when it senses that it's being carried. The device locks when the accelerometer detects that the device has been put down. The On-body detection feature can't distinguish whose body is connected.
1 2 3 4 5 6 To set the date manually From the Home screen, tap . Find and tap Settings > Date & time. Drag the slider beside Automatic date & time to the left. Tap Set date. Scroll up and down to select the desired date. Tap OK. 1 2 3 4 5 6 To set the time manually From your Home screen, tap . Find and tap Settings > Date & time. Drag the slider beside Automatic date & time to the left. Tap Set time. Select the relevant values for the hour and minute. Tap OK.
1 2 3 4 5 To adjust the sound settings manually From the Home screen, tap . Find and tap Settings > Sound & notification > Audio settings. Drag the slider beside ClearAudio+ to the left. Tap Sound effects > Equalizer. Adjust the sound settings by dragging the frequency band buttons up or down. The manual adjustment of sound output settings has no effect on voice communication applications. For example, there is no change in the voice call sound quality.
• • Regular User: This account type is suitable for someone who regularly uses your device. Guest User: Enable the guest account option for someone who just wants to use your device temporarily. Some features are only available to the owner. For example, only the owner can allow downloads from sources other than Google Play™. About the Regular User account By adding Regular User accounts, you can allow different users to have different home screens, wallpapers and general settings.
1 2 3 To activate the guest user account Make sure you are logged in as the owner, that is, the user who set up the device for the first time. From your Home screen, tap . Find and tap Settings > Users > Guest. You can also activate the guest user account from the status bar on any screen. Just drag the status bar downwards using two fingers and tap the user icon, then tap Add guest. 1 2 3 4 To allow the guest user to make phone calls Make sure you are logged in as the owner. From your Home screen, tap .
Typing text On-screen keyboard You can enter text with the on-screen QWERTY keyboard by tapping each letter individually, or you can use the Gesture input feature and slide your finger from letter to letter to form words. If you prefer to use a smaller version of the on-screen keyboard and input text using only one hand, you can activate the one-handed keyboard instead. You can select up to three languages for text input.
1 2 3 To enter text using the Gesture input function When the on-screen keyboard is displayed, slide your finger from letter to letter to trace the word that you want to write. After you finish entering a word, lift up your finger. A word suggestion appears based on the letters that you have traced. to see other options and If the word that you want does not appear, tap select accordingly.
• • • 1 2 To enter text using the Phonepad When appears in the Phonepad, tap each character key only once, even if the letter you want is not the first letter on the key. Tap and hold the candidates row to view more word suggestions and select a word from the list. When appears in the Phonepad, tap the on-screen key for the character you want to enter. Keep tapping this button until the desired character is selected. Then do the same for the next character you want to enter, and so on.
1 2 1 2 • To select text Enter some text, then double-tap the text. The word you tap gets highlighted by tabs on both sides. Drag the tabs left or right to select more text. To edit text Enter some text, then double-tap the entered text to make the application bar appear. Select the text that you want to edit, then use the tools in the application bar to make your desired changes.
To change the Smart language detection settings Smart language detection is only available for Latin languages. 1 2 3 When the on-screen keyboard is displayed, tap . Tap , then tap Keyboard settings . To activate or deactivate the Smart language detection function, drag the slider beside Smart language detection to the on or off position. To select a keyboard layout variant Layout variants for the on-screen keyboard may not be available for all writing languages.
Calling Making calls You can make a call by manually dialling a phone number, by tapping a number saved in your contacts list, or by tapping the phone number in your call log view. You can also use the smart dial function to quickly find numbers from your contacts list and call logs by entering part of a contact number or name and selecting from the suggestions that appear. To make a video call, you can use the Hangouts™ instant messaging and video chat application on your device.
1 2 3 4 To add a direct dial number to your Home screen Touch and hold an empty area on your Home screen until the device vibrates and the customisation menu appears. In the customisation menu, tap Apps > Shortcuts. Scroll through the list of applications and select Direct dial. Select the contact and the number that you want to use as the direct dial number. Showing or hiding your phone number You can select to show or hide your phone number on call recipients' devices when you call them.
1 2 3 To record a greeting message for the answering machine From your Home screen, tap . Find and tap Settings > Call > Xperia™ Answering Machine > Greetings. Tap Record new greeting and follow the on-screen instructions. 1 2 3 To enable automatic answering From your Home screen, tap . Find and tap Settings > Call > Xperia™ Answering Machine. Drag the slider beside Answering Machine to the right. If you don't set a time delay for the automatic answering of calls, the default value is used.
Smart call handling • • • You can handle incoming calls without touching the screen by turning on the Smart call handling function. Once activated, you can handle calls in the following way: Answer: bring the device to your ear. Reject: shake the device. Ringer off: place the device face down. 1 2 3 4 To turn on Smart call handling From your Home screen, tap . Find and tap Settings > Call. Tap Smart call handling. Under Smart call handling, drag the slider to the right.
2 To view your missed calls When you have missed a call, downwards. Tap Missed call. • To call a number from your call log Tap the number. 1 appears in the status bar. Drag the status bar To edit the number before calling, touch and hold the number in the call log, then tap Edit number before call. 3 To add a number from the call log to your contacts Touch and hold a number displayed in the call log, then tap Add to Contacts.
1 2 3 4 To enable or disable fixed dialling From your Home screen, tap . Find and tap Settings > Call > Fixed dialling numbers. Tap Activate fixed dialling or Deactivate fixed dialling. Enter your PIN2 and tap OK. 1 2 To access the list of accepted call recipients From your Home screen, tap . Find and tap Settings > Call > Fixed dialling numbers > Fixed dialling numbers. 1 2 3 4 5 6 To change the SIM card PIN2 From the Home screen, tap . Find and tap Settings > Call.
Conference calls With a conference or multiparty call, you can have a joint conversation with two or more persons. For details about the number of participants that you can add to a conference call, contact your network operator. 1 2 3 4 5 To make a conference call During an ongoing call, tap . The call log appears. To display the dialpad, tap . Dial the number of the second participant and tap . The first participant is put on hold temporarily.
1 2 To make an emergency call Open the dialpad. Enter the emergency number, then tap . You can make emergency calls even when no SIM card is inserted or when all outgoing calls are blocked. 1 2 1 2 3 To make an emergency call while the SIM card is locked Tap Emergency call. Enter the emergency number and tap . To make an emergency call while the screen is locked From the lock screen, drag the phone icon to the right.
Contacts Transferring contacts There are several ways to transfer contacts to your new device. You can sync contacts from an online account or import contacts directly from another device. Transferring contacts using a computer Xperia™ Transfer is an application that helps you to collect contacts from your old device and transfer them to your new device.
To import contacts using Bluetooth® technology 1 2 3 4 5 Make sure you have the Bluetooth® function turned on and that your device is set to visible. When you are notified of an incoming file to your device, drag the status bar downwards and tap the notification to accept the file transfer. Tap Accept to start the file transfer. Drag the status bar downwards. When the transfer is complete, tap the notification. Tap the received file.
1 2 3 To select which contacts to display in the Contacts application From your Home screen, tap , then tap . Press , then tap Filter. In the list that appears, mark or unmark the desired options. If you have synchronised your contacts with a synchronisation account, that account appears in the list. To further expand the list of options, tap the account. Adding and editing contacts 1 2 3 4 5 To add a contact From your Home screen, tap , then tap . Tap .
1 2 3 4 To edit contact information about yourself From your Home screen, tap , then tap . Tap Myself, then tap . Enter the new information or make the changes you want. When you are finished, tap SAVE. 1 2 3 4 To create a new contact from a text message From your Home screen, tap , then find and tap . Tap the icon next to the phone number, then tap Save. Select an existing contact, or tap Create new contact. Edit the contact information and tap SAVE.
1 2 3 4 5 To add a new ICE contact From your Home screen, tap , then tap . Tap ICE – In Case of Emergency, then tap . If you have synchronised your contacts with one or more accounts and you are adding a contact for the first time, you must select the account to which you want to add this contact. Alternatively, tap No backup if you only want to use and save this contact on your device. Enter or select the desired information for the contact. When you are finished, tap SAVE.
1 2 3 4 To assign a contact to a group In the Contacts application, tap the contact that you want to assign to a group. Tap , then tap the bar directly under Groups. Mark the checkboxes for the groups to which you want to add the contact. Tap SAVE. Sending contact information 1 2 3 4 To send your business card From your Home screen, tap , then tap . Tap Myself. Tap , then tap Share. Select an available transfer method and follow the on-screen instructions.
To export contacts to a SIM card When you export contacts to a SIM card, not all information may get exported. This is due to memory limitations on SIM cards. 1 2 3 4 5 From your Home screen, tap , then tap . Press , then tap Export contacts > SIM card. Mark the contacts you want to export, or tap Mark all if you want to export all your contacts. Tap Export.
Messaging and chat Reading and sending messages The Messaging application shows your messages as conversations, which means that all messages to and from a particular person are grouped together. To send multimedia messages, you need the correct MMS settings on your device. See Internet and MMS settings on page 31 . The number of characters that you can send in a single message varies depending on the operator and the language you use.
1 2 3 To read a received message From your Home screen, tap , then find and tap . Tap the desired conversation. If the message is not yet downloaded, tap the message. All received messages are saved by default to the device memory. 1 2 3 To reply to a message From your Home screen, tap , then find and tap Tap the conversation containing the message. Enter your reply and tap . . 5 To forward a message From your Home screen, tap , then find and tap .
Calling from a message 1 2 To call a message sender From your Home screen, tap , then find and tap Tap a conversation and tap , then tap . 1 2 3 4 To save a sender's number as a contact From your Home screen, tap , then find and tap . Tap the icon next to the phone number, then tap Save. Select an existing contact, or tap Create new contact. Edit the contact information and tap Save. . Messaging settings 4 5 To change your message notification settings From your Home screen, tap , then find and tap .
Email Setting up email Use the email application in your device to send and receive email messages through your email accounts. You can have one or several email accounts at the same time, including corporate Microsoft Exchange ActiveSync accounts. 1 2 3 To set up an email account From your Home screen, tap . Find and tap Email. Follow the instructions that appear on the screen to complete the setup.
1 2 3 4 1 2 3 4 1 2 1 2 3 To read your email messages From your Home screen, tap . Find and tap Email. If you are using several email accounts, drag the left edge of the screen to the right and select the account that you want to check. If you want to check all your email accounts at once, drag the left edge of the screen to the right, then tap Combined inbox. In the email inbox, scroll up or down and tap the email message that you want to read.
1 2 3 4 5 To search for emails From your Home screen, tap , then find and tap Email. If you are using several email accounts, drag the left edge of the screen to the right and select the account that you want to search. If you want to search all your email accounts at once, drag the left edge of the screen to the right, then tap Combined inbox. Tap . Enter your search text, then tap on the keyboard. The search result appears in a list sorted by date. Tap the email message that you want to open.
• 1 View a list of all Gmail accounts and folders 2 Search for email messages 3 List of email messages 4 Write an email message To learn more about Gmail™ When the Gmail application is open, drag the left edge of the screen to the right, then find and tap Help. 81 This is an Internet version of this publication. © Print only for private use.
Music Transferring music to your device • • • There are different ways to transfer music from a computer to your device: Connect the device and computer using a USB cable and then drag and drop the music files directly into the file manager application on the computer. See Managing files using a computer on page 138 . If the computer is a PC, you can use the Media Go™ application from Sony and organise your music files, create playlists, subscribe to podcasts, and more.
Music home screen 1 2 3 4 1 Drag the left edge of the screen to the right to open the Music home screen menu 2 Scroll up or down to view content 3 Play a song using the Music application 4 Return to the music player screen To play a song using the Music application From your Home screen, tap , then find and tap Drag the left edge of the screen to the right. Select a music category. Tap a song to play it. . You might not be able to play copyright-protected items.
Music home screen menu The Music home screen menu gives you an overview of all the songs on your device. From here you can manage your albums and playlists, and you can organise your music by mood and tempo using SensMe™ channels.
Playlists On the Music home screen, you can create your own playlists from the music that is saved on your device. 1 2 3 To create your own playlists From the Music home screen, touch and hold the name of the album or song that you want to add to a playlist. In the menu that opens, tap Add to playlist > Create new playlist. Enter a name for the playlist and tap OK. You can also tap the album art and then tap Add to playlist to create a new playlist.
1 2 To turn on the Surround sound feature Open the Music home screen menu, then tap Settings > Audio settings > Sound effects > Surround sound (VPT). Flick left or right to select a setting, then tap OK to confirm. Recognising music with TrackID™ Use the TrackID™ music recognition service to identify a song you hear playing in your surroundings. Just record a short sample of the song and you’ll get artist, title and album info within seconds.
FM radio Listening to the radio The FM radio in your device works like any FM radio. For example, you can browse and listen to FM radio stations and save them as favourites. You must connect a wired headset or headphones to your device before you can use the radio. This is because the headset or headphones act as an antenna. After one of these devices is connected, you can then switch the audio to the speaker, if desired.
1 2 To switch the radio sound to the speaker When the radio is open, press . Tap Play in speaker. To switch the sound back to the wired headset or headphones, press and tap Play in headphones. 1 2 3 To identify a song on the FM radio using TrackID™ While the song is playing on your device's FM radio, tap , then select TrackID™. A progress indicator appears while the TrackID™ application samples the song. If identification is successful, you are presented with a result or a list of possible results.
Camera Taking photos and recording videos 1 Front camera lens 2 Zoom in or out 3 Main camera screen 4 Camera key – Activate the camera/Take photos/Record videos 5 View photos and videos 6 Take photos or record video clips 7 Go back a step or exit the camera 8 Capturing mode settings icon 9 Camera settings icon and shortcut icons To take a photo from the lock screen 1 2 3 To activate the screen, briefly press the power key . To activate the camera, touch and hold the camera icon left.
To use the zoom function • • When the camera is open, press the volume key up or down. When the camera is open, pinch in or pinch out on the camera screen. 1 2 3 4 5 To record a video using the camera key Activate the camera. Tap , and select . If the video camera is not selected, tap . To start recording a video, press the camera key. To stop recording, press the camera key again. 1 2 3 4 5 To record a video Activate the camera. Point the camera towards the subject. To start recording, tap .
1 2 3 1 2 3 To turn on Smile Shutter™ Activate the camera. Tap , then tap Tap Smile Shutter and select a smile level. To take a photo using Smile Shutter™ When the camera is open and Smile Shutter™ is turned on, point the camera at your subject. The camera selects which face to focus on. The face selected appears inside a coloured frame and the photo is taken automatically. If no smile is detected, press the camera key to take the photo manually.
Sweep Panorama Take wide-angle and panoramic photos. Sticker creator Create unique stickers from your favourite photos or from your camera viewfinder. To learn more about how to take better photos, go to support.sonymobile.com. Superior auto Superior auto mode detects the conditions in which you are shooting and automatically adjusts the settings to ensure that you take the best photo possible. Manual mode Use Manual mode when you want to manually adjust your camera settings for taking photos and videos.
You can set up Multi camera mode using NFC, which launches the pairing of the two devices using Wi-Fi Direct™ technology. 1 2 3 4 5 6 7 8 9 To use Multi camera mode Turn on the NFC functions on both devices that you want to connect. Activate the camera on your device. Tap , then select . On the screens of both devices, tap . Touch the NFC detection areas of each device to each other. Both devices should now connect using Wi-Fi Direct™ technology.
1 2 3 To download camera applications Open the camera application. Tap , then tap DOWNLOADABLE . Select the application that you want to download, and follow the instructions to complete the installation. Quick launch Use Quick launch settings to launch the camera when the screen is locked. Launch only When this setting is activated, you can launch the camera when the screen is locked by pressing and holding down the camera key.
Incandescent Adjusts the colour balance for warm lighting conditions, such as under light bulbs. Fluorescent Adjusts the colour balance for fluorescent lighting. Daylight Adjusts the colour balance for sunny outdoor conditions. Cloudy Adjusts the colour balance for a cloudy sky. Still camera settings 1 2 3 To adjust the still camera settings Activate the camera. To display all settings, tap . Select the setting that you want to adjust, then edit as desired.
Set a half-second delay from when you tap the camera screen until the photo is taken. Off The photo is taken as soon as you tap the camera screen. Smile Shutter™ Use the Smile Shutter™ function to determine what kind of smile the camera reacts to before taking a photo. Focus mode The focus function controls which part of a photo should be sharp. When continuous autofocus is on, the camera keeps adjusting focus so that the area within the focus frame stays sharp.
Sets the ISO sensitivity to 800. 1600 Sets the ISO sensitivity to 1600. 3200 Sets the ISO sensitivity to 3200. This setting is only available in Manual capturing mode. Metering This function automatically determines a well-balanced exposure by measuring the amount of light striking the image you want to capture. Center Measures the centre of the image, and determines the exposure based on the brightness of the subject there.
Auto The camera automatically determines if the lighting conditions require the use of a flash. Fill flash Use this setting when the background is brighter than the subject. This setting removes unwanted dark shadows. Red-eye reduction Reduces the red colour of eyes when taking a photo. Off The flash is turned off. Sometimes photo quality can be better without the flash, even if lighting conditions are poor. Taking a good photo without using the flash requires a steady hand.
Document Use for photos of text or drawings. Gives the photo increased, sharper contrast. Fireworks Use for taking photos of fireworks in all their splendour. This setting is only available in Manual capturing mode. Video camera settings 1 2 3 4 5 To adjust the video camera settings Activate the camera. Tap , then select . If the video camera is not selected, tap . To display all settings, tap . Select the setting that you want to adjust, then make your changes.
Focus mode The focus setting controls which part of a video should be sharp. When continuous autofocus is on, the camera keeps adjusting focus so that the area within the white focus frame stays sharp. Single autofocus The camera automatically focuses on the selected subject. Continuous autofocus is on. Face detection The camera automatically detects up to five human faces, indicated by frames on the screen. The camera automatically focuses on the nearest face.
Off The video is saved after you shoot it, and no preview appears. Flashlight Use the flash light to record videos when lighting conditions are poor or when there is a backlight. The video flash icon is only available on the video camera screen. Note that the video quality can sometimes be better without a light even if lighting conditions are poor. On Off Scene selection The Scene selection feature helps you to quickly set up the camera for common situations using pre-programmed video scenes.
Photos and videos in Album Viewing photos and videos Use the Album application to view photos and play videos that you’ve taken with your camera, or to view similar content that you've saved to your device. All photos and videos are displayed in a chronologically ordered grid.
1 2 3 To play a video In Album, find and tap the video that you want to play. Tap , then tap Video > JUST ONCE. If the playback controls are not displayed, tap the screen to display them. To hide the controls, tap the screen again. 1 2 To pause a video When a video is playing, tap the screen to display the controls. Tap . 1 2 To fast forward and rewind a video When a video is playing, tap the screen to display the controls. Drag the progress bar marker left to rewind, or right to fast forward.
1 2 3 To work with batches of photos or videos in Album When viewing thumbnails of photos and videos in Album, touch and hold an item until it is highlighted. Tap other items that you want to work with to select them. If you want to select all items, tap , then tap Select all. Use the tools in the toolbar to work with your selected items. Analysing photos with faces in Album You can analyse any photos on your device that feature people's faces.
1 2 3 4 1 2 3 4 1 2 3 4 1 2 3 4 To apply special effects to a photo When you are viewing a photo, tap the screen to display the toolbars, then tap . If prompted, select Photo editor. Tap , then select an option. Edit the photo as desired, then tap Save. To improve a photo using advanced settings When you are viewing a photo, tap the screen to display the toolbars, then tap . If prompted, select Photo editor. Tap , then select an option. To save a copy of the edited photo, tap Save.
1 2 3 1 2 3 4 To view your hidden photos and videos In Album, drag the left edge of the Album home screen to the right, then tap Hidden. Tap a photo or video to view it. Flick left to view the next photo or video. Flick right to view the previous photo or video. To unhide a photo or video In Album, drag the left edge of the Album home screen to the right, then tap Hidden. Tap a photo or video that you want to unhide. Tap the screen to display the toolbars, then tap . Tap Don't hide.
1 2 3 4 5 To view photos from online services in Album From your Home screen, tap . Find and tap Album, then drag the left edge of the Album home screen to the right. Tap the desired online service, then follow the on-screen instructions to get started with it. All available online albums that you have uploaded to the service are displayed. Tap any album to view its content, then tap a photo in the album. Flick left to view the next photo or video. Flick right to view the previous photo or video.
1 2 3 4 To view geotagged photos on a map From your Home screen, tap . Find and tap Album. Drag the left edge of the Album home screen to the right, then tap Places. Tap the photo that you want to view on a map. 1 2 3 4 To view geotagged photos on a globe From your Home screen, tap . Find and tap Album. Drag the left edge of the Album home screen to the right, then tap Places > Tap the photo that you want to view on a globe. 1 2 .
Videos Watching videos in the Video application Use the Video application to play movies and other video content that you’ve saved or downloaded to your device. The Video application also helps you get poster art, plot summaries, genre info and director details for each movie. You can also play your movies on other devices that are connected to the same network. Some video files may not be playable in the Video application.
1 2 3 1 2 To change the sound settings while a video is playing While a video is playing, tap the screen to display the controls. Tap > Audio settings, then change the settings as desired. When you're finished, tap OK. To share a video When a video is playing, tap , then tap Share. Tap the application that you want to use to share the selected video, then follow the relevant steps to send it.
Movie Creator The Xperia™ Movie Creator automatically creates short videos of around 30 seconds in length using existing photos and videos. The application automatically determines the timeline to create its movie. For example, it could take a selection of photos and videos from a Saturday afternoon outing or from a random seven-day period and create a movie for you. When this highlight-style movie is ready, you get notified. You can then edit it as desired.
Connectivity Mirroring the screen of your device on a TV using a cable You can connect your device to a compatible TV set using an MHL cable and mirror the screen of your device on the TV screen. MHL and HDMI™ cables and adaptors are sold separately. Sony does not guarantee that all types of MHL and HDMI™ cables and adaptors are supported by your device. 1 2 To view content from your device on a TV which supports MHL input Connect your device to the TV using an MHL cable.
1 2 3 4 5 To mirror the screen of your device on a TV screen TV: Follow the instructions in the User guide of your TV to turn on the screen mirroring function. Your device: From your Home screen, tap . Find and tap Settings > Xperia™ Connectivity > Screen mirroring. Tap Start. Tap OK and select a device. When using screen mirroring, do not cover the Wi-Fi antenna area of your device. Your TV must support screen mirroring based on Wi-Fi CERTIFIED Miracast™ for the functionality described above to work.
1 2 3 4 5 To view a shared photo on your device Make sure the devices that you want to share files with are connected to the same Wi-Fi® network as your device. From your Home screen, tap , then find and tap Album. Drag the left edge of the Album home screen to the right, and tap Devices. Select a device from the list of connected devices. Browse the folders of the connected device and select a photo to view it.
1 2 3 To get help about sharing content with other DLNA Certified™ devices From your Home screen, tap . Find and tap Settings > Xperia™ Connectivity > Media server. Tap and then tap Help. Displaying files on another device using Throw Using DLNA™ technology, you can push or “Throw” media content from your device to another device connected to the same Wi-Fi® network. The receiving device must be able to function as a Digital Media Renderer (DMR) device and play content received from your device.
1 2 3 To connect a USB accessory using a USB host adapter Attach the USB Host adapter to your device, then connect the adapter to the USB accessory. From your Home screen , tap . Find and tap Settings > Xperia™ Connectivity > USB Connectivity > Detect USB device. Additional steps or software may be required to set up game controllers, USB audio and USB Ethernet accessories. Sony does not guarantee that all USB accessories are supported by your device.
NFC is a wireless technology with a maximum range of one centimetre, so the devices sharing data must be held close to each other. Before you can use NFC, you must first turn on the NFC function, and the screen of your device must be active. NFC may not be available in all countries and/or regions. 1 2 3 1 2 3 4 5 6 1 2 3 4 5 6 7 1 2 3 4 5 6 1 2 3 4 5 6 7 To turn on the NFC function From your Home screen, tap . Find and tap Settings > More. Tap the on-off switch beside NFC.
Scanning NFC tags Your device can scan various kinds of NFC tags. For example, it can scan embedded tags on a poster, on a billboard advertisement, or beside a product in a retail store. You can receive additional information, such as a web address. 1 2 To scan an NFC tag Make sure that your device has the NFC function turned on and that the screen is active. Place your device over the tag so that the NFC detection area touches it. Your device scans the tag and displays the content collected.
Once you pair your device with another Bluetooth® device, your device remembers this pairing. When pairing your device with a Bluetooth® device, you may need to enter a passcode. Your device will automatically try the generic passcode 0000. If this does not work, refer to the user guide for your Bluetooth® device to get the device passcode. You do not need to re-enter the passcode the next time you connect to a previously paired Bluetooth® device.
To receive items using Bluetooth® 1 2 3 4 5 6 7 1 2 3 Make sure that the Bluetooth® function is on and is visible to other Bluetooth® devices. The sending device now starts sending data to your device. If prompted, enter the same passcode on both devices, or confirm the suggested passcode. When you are notified of an incoming file to your device, drag the status bar downwards and tap the notification to accept the file transfer. Tap Accept to start the file transfer.
Smart apps and features that save you time Controlling accessories and settings with Smart Connect™ Use the Smart Connect™ application to set what happens in your device when you connect or disconnect an accessory. For example, you can decide to always start the FM radio application when you connect a headset. You can also set Smart Connect™ to read out incoming text messages. Or you can use the application to set a specific action or a group of actions to launch on your device at certain times of the day.
1 2 3 4 5 6 7 8 9 To create a Smart Connect™ event From your Home screen, tap , then find and tap Tools > . If you are opening Smart Connect™ for the first time, tap OK to close the introduction screen. On the Events tab, tap . If you are creating an event for the first time, tap OK again to close the introduction screen. Add conditions under which you want to trigger the event. A condition could be the connection with an accessory, or a specific time interval, or both. to continue.
1 2 3 4 To adjust the settings for a connected accessory Pair and connect the accessory with your device. Start the Smart Connect™ application. Tap Accessories, then tap the name of the connected accessory. Adjust the desired settings. Using your device as a fitness hub with ANT+™ You can use your device with health and fitness products that also support ANT+™ technology.
Travel and maps Using location services Location services allow applications such as Maps and the camera to use information from mobile and Wi-Fi® networks as well as Global Positioning System (GPS) information to determine your approximate location. If you're not within a clear line of sight to GPS satellites, your device can determine your location using the Wi-Fi® function. And if you're not within range of a Wi-Fi® network, your device can determine your location using your mobile network.
You may incur additional charges when you activate data roaming. It is recommended to check the relevant data transmission charges in advance. If you are using a device with multiple users, you may need to log in as the owner, that is, the primary user, to activate or deactivate data roaming. 1 2 3 To activate data roaming From your Home screen, tap . Find and tap Settings > More > Mobile networks. Drag the slider beside Data roaming to the right.
1 2 3 To turn on Airplane mode From your Home screen, tap . Find and tap Settings> More. Drag the slider beside Airplane mode to the right. 126 This is an Internet version of this publication. © Print only for private use.
Calendar and alarm clock Calendar Use the Calendar application to manage your time schedule. If you have signed into and sychronised your device with one or several online accounts that include calendars, for example, your Google™ account or Xperia™ with Facebook account, then calendar events from these accounts will also appear in the Calendar application. You can select which calendars you want to integrate into the combined Calendar view.
• To zoom the calendar view When the Week or the Day view is selected, pinch the screen to zoom in. 1 2 3 4 To display national holidays in the Calendar application From your Home screen, tap , then tap Calendar. Tap , then tap Settings. Tap National holidays. Select an option, or a combination of options, then tap OK. 1 2 3 To display birthdays in the Calendar application From your Home screen, tap , then tap Calendar. Tap , then tap Settings > Birthdays. Drag the slider beside Birthdays to the right.
6 Open date and time settings for the clock 7 Turn an alarm on or off 8 Add a new alarm 1 2 3 4 5 6 7 To set a new alarm From your Home screen, tap . Find and tap Alarm & clock. Tap . Tap Time and select the desired value. Tap OK. If desired, edit other alarm settings. Tap Save. • To snooze an alarm when it sounds Tap Snooze. • To turn off an alarm when it sounds Drag to the right. To turn off a snoozed alarm, you can drag down the status bar to open the Notification panel and then tap .
1 2 3 To set the side keys behaviour Open the Alarm & clock application, then select the alarm that you want to edit. Tap Side keys behavior, then select the desired behaviour of side keys when they are pressed during the alarm. Tap Save. 130 This is an Internet version of this publication. © Print only for private use.
Accessibility Magnification gestures Magnification gestures allow you to zoom in to parts of the screen by tapping an area of the touchscreen three times in succession. 1 2 3 To enable or disable Magnification gestures From your Home screen, tap . Find and tap Settings > Accessibility > Magnification gestures. Tap the on-off switch. 1 2 To magnify an area and pan across the screen Make sure that Magnification gestures is enabled.
1 2 3 To enable TalkBack From your Home screen, tap . Find and tap Settings > Accessibility > TalkBack. Tap the on-off switch and then tap OK. To change speech, feedback and touch preferences for TalkBack, tap Settings. TalkBack launches a tutorial immediately after you enable the feature. To exit the tutorial, tap the Exit button twice. 1 2 3 To disable TalkBack From your Home screen, double-tap . Find and double-tap Settings > Accessibility > TalkBack.
Support and maintenance Support for your device Use the Support application in your device to search a User guide, read troubleshooting guides, and find information about software updates and other product-related information. 1 2 To access the Support application From your Home screen, tap . Find and tap , then select the required support item. For best support available, we recommend connecting to the Internet when using the Support application.
Media Go™ for Microsoft® Windows® The Media Go™ application for Windows® computers helps you transfer photos, videos and music between your device and a computer. You can install and access Media Go™ from within the PC Companion application. To read more about how to use the Media Go™ application, go to http://mediago.sony.com/enu/features. To use the Media Go™ application, you need one of these operating systems: • • • • Microsoft® Windows® 10 Microsoft® Windows® 8 / 8.
1 2 3 4 5 1 2 3 4 To download and install a system update If you are using a device with multiple users, make sure you are logged in as the owner. From your Home screen, tap . Find and tap Settings > About phone > Software update. If a system update is available, tap Download to download it to your device. When the download is finished, tap Install and follow the on-screen instructions to complete the installation.
• Remotely clear the internal and external memory of the device as a last resort. The “Protection by my Xperia” service may not be available in all countries or regions. If you’ve cleared the internal memory of the device using the “Protection by my Xperia” web service, you must sign in to a Google™ account that was previously synced on this device the next time you turn on the device. 1 2 3 4 5 6 To activate the Protection by my Xperia service on your device Make sure you have an active data connection.
Memory and storage Your device has different types of memory and storage options. • • • The eMMC (embedded Multi-Media Controller) memory, which consists of the system memory and the internal storage, is about 32 GB. The system memory is used for the Android™ operating system and for most pre-installed applications. The internal storage is used to store downloaded or transferred content along with personal settings and data.
1 2 3 4 5 To move apps to the memory card Make sure that you have a memory card inserted in your device. From your Home screen, tap . Find and tap Settings > Apps . Swipe across to the On SD card tab. A list appears showing the apps that can be moved. Select the app that you want to move, then tap MOVE TO SD CARD. After the app is moved, a marked checkbox appears beside the app. 1 2 3 To stop applications and services from running From your Home screen, tap . Find and tap Settings > Apps > Running.
Backing up data to a computer Use the PC Companion application or the Sony Bridge for Mac application to back up data from your device to a PC or an Apple® Mac® computer.
1 2 3 4 5 6 7 1 2 3 4 5 6 7 1 2 3 4 5 6 7 1 2 3 4 5 6 7 To back up content to an online account From your Home screen, tap . Find and tap Settings > Backup & reset. To enable the automatic backup function, drag the slider beside Automatic backup to the right. To enable the manual backup function, tap More > Manual backup. Under Where to store files, tap Online account. If prompted, tap I agree, then follow the on-screen instructions to sign in to your Google™ account.
1 2 3 4 5 6 To restore backed up content If you are restoring content from a USB storage device, make sure the storage device is connected to your device using the USB Host adapter. If you are restoring content from an SD card, make sure the SD card is properly inserted in your device. If you are restoring content from an online account, make sure you have signed in to your Google™ account. From your Home screen, tap . Find and tap Settings > Backup & reset.
1 2 3 To run all diagnostic tests From your Home screen , tap . Find and tap Settings > About phone > Diagnostics > Test > Run all. Follow the instructions and tap Yes or No to confirm if a feature works. 1 2 To view details about your device From your Home screen , tap . Find and tap Settings > About phone > Diagnostics > Facts. Resetting your applications You can reset an application or clear application data if your application stops responding or causes issues with your device.
If your device fails to power on or you want to reset your device’s software, you can use PC Companion or Bridge for Mac to repair your device. For more information on using PC Companion or Bridge for Mac, see Computer tools. Your device may fail to restart if the battery level is low. Connect your device to a charger and try restarting again. If you are using a device with multiple users, you may need to log in as the owner, that is, the primary user, to reset your device to its original factory settings.
1 2 3 4 To reinstall the device software using the Sony Bridge for Mac application Make sure that Sony Bridge for Mac is installed on the Mac computer. Open the Sony Bridge for Mac application and using the micro USB cable that came with your device, connect the device to your Mac computer. Click Xperia™ > Repair Xperia™ device > Continue. Follow the instructions that appear on the screen to reinstall the software and complete the repair.
current information, or improvements to programs and/or equipment, may be made by Sony Mobile Communications Inc. at any time and without notice. Such changes will, however, be incorporated into new editions of this User guide. All illustrations are for illustration purposes only and may not accurately depict the actual device. All product and company names mentioned herein are the trademarks or registered trademarks of their respective owners. All other trademarks are property of their respective owners.