3-254-962-21 (2) Overhead Monitor Operating Instructions GB Manual de instrucciones ES CT XVM-R70 2003 Sony Corporation
Table of contents Welcome! .............................................................................................................................. 4 Precautions ........................................................................................................................... 5 Location of controls ............................................................................................................ 7 Operation Opening the display monitor ...............................................
Welcome! Thank you for purchasing the Sony Overhead Monitor. • Reversible picture • PAL or NTSC colour system compatible • Full, Zoom, and Widezoom screen modes available, in addition to the normal screen mode • The low reflection liquid crystal panel reduces the glare from outside lighting sources. • Adjustable brightness control, according to lighting conditions • Backlight dimmer control produces sharp contrast image, free from reversed or blurred colours.
Precautions To avoid the risk of serious injury or accident, read the following precautions before installing and operating the unit. On safety Comply with your local traffic rules and regulations. • While driving - The driver must not watch or operate the monitor. It may lead to distraction and cause an accident. - The driver must not use the headphones. It may lead to distraction and cause an accident. Park the car in a safe place when the driver watch and operate the monitor, or use headphones.
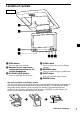
Where to install Before installing this unit, please check your local traffic rules and regulations. Follow the diagram below to install this unit in a suitable position in your car. Approximately 150 mm Approximately 300 mm Do not install this unit where: - It will obstruct the driver’s view when the monitor is in either the open or closed position. - It will obstruct the operation of the airbag system.
Location of controls Monitor 1 OPEN button Press to open the monitor. 2 Receptor for the card remote commander/Transmitter for the cordless headphones 3 UP/DOWN (M/m) buttons Press to select the desired item. 4 MENU button Press to adjust the various display settings. 5 REVERSE button* Press to switch images upside down. 6 INPUT button Press to select the input source.
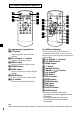
Card remote commander RM-X122 ATT POWER INPUT ATT VOL MODE TOP MENU ALBUM+ LIST MENU SETUP POWER INPUT MENU MENU VOL MODE TOP MENU ALBUM+ LIST SETUP MENU ENTER ENTER DISPLAY DISPLAY ALBUM– ALBUM– OFF OFF AUDIO SUBTITLE For the monitor operations: 1 ATT button Press to quickly attenuate the volume. 2 VOL (volume) +/– buttons Press to adjust the volume. 3 INPUT button Press to select the input source. 4 POWER button 5 MENU button Press to adjust the various display settings.
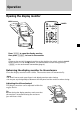
Operation Opening the display monitor OPEN ATT POWER INPUT MENU VOL POWER MODE TOP MENU ALBUM+ LIST MENU SETUP ENTER DISPLAY ALBUM– OFF AUDIO SUBTITLE POWER Press (OPEN) to open the display monitor, then press (POWER) to turn on the monitor. Tip If your car has no ACC (accessory) position on the ignition key switch, and the POWER SELECT switch is set to the B position, the monitor does not turn on by pressing (POWER) on the card remote commander (page 6).
Selecting the input source You can select the input source and colour system. ATT POWER POWER INPUT MENU VOL MODE INPUT TOP MENU ALBUM+ LIST MENU SETUP ENTER DISPLAY ALBUM– OFF AUDIO INPUT 1 SUBTITLE POWER Press (POWER). The power is turned on. Tip If your car has no ACC (accessory) position on the ignition key switch, and the POWER SELECT switch is set to the B position, the monitor does not turn on by pressing (POWER) on the card remote commander (page 6).
Setting the screen mode In addition to the normal mode, full, zoom, and widezoom modes are also available. ATT POWER INPUT MENU VOL MODE MODE TOP MENU ALBUM+ LIST MENU SETUP ENTER DISPLAY ALBUM– OFF AUDIO SUBTITLE Press (MODE) repeatedly. The current mode is displayed on the screen first. Each time the button is pressed, the screen mode switches in the following sequence: Normal Full Normal (regular) An image with an aspect ratio of 4 to 3 (regular image).
Changing the display settings You can adjust the display settings manually if the display is hard to see from the position where you are seated. ATT POWER INPUT MENU MENU VOL MODE TOP MENU ALBUM+ LIST MENU SETUP ENTER DISPLAY ALBUM– OFF AUDIO SUBTITLE MENU 1 Press (MENU). The “Picture” screen appears. Picture 32 Press Vv, or MENU. The setting value of the item selected appears in this area.
When “Color” is selected Color 32 Press Vv, or MENU. Press v for less colour intensity n Press V for more colour intensity When “Dimmer” is selected Dimmer; On Press Vv, or MENU. When “Hue” is selected*1 Hue CTR *2 Press Vv, or MENU. Press v to Press V to decrease the n increase the saturation saturation When “Video Adjust” is selected Video Adjust; Reset Press Vv, or MENU. When this function is set to on, the brightness of the screen will be adjusted automatically.
Adjusting the volume You can adjust the volume of the wired headphones and the connected equipment with the supplied card remote commander. ATT POWER ATT INPUT VOL+/– MENU VOL MODE TOP MENU ALBUM+ LIST MENU SETUP ENTER DISPLAY ALBUM– OFF AUDIO SUBTITLE Press (VOL)(+) or (VOL)(–) on the card remote commander. Quickly attenuating the sound Press (ATT) on the card remote commander. ATT On To restore the previous volume level Press (ATT) again.
Connections Installation diagram Refer to the installation diagram and ask a qualified technician for the installation of the unit. Overhead Monitor Front Left speaker Tweeter Left Head unit Tweeter Right Front Right speaker Sony mobile DVD player DVX-11A Rear Left speaker Subwoofer Rear Right speaker Be sure to securely fasten all equipment to the car chassis, etc., to prevent them moving while your car is in motion.
Connection diagram Refer to the connection diagram for the proper connections. You can make connections shown in A area. Please ask a qualified technician for the other connections. Overhead Monitor XVM-R70 (7-inch wide colour LCD Monitor) Connection box XA-113 (optional) Headrest Monitor XVM-H65 (optional) Monitor cable (5 m) (optional) Connection box XA-115 Headphone jacks (stereo mini) Audio L/R/ Video Input 2 7.
Black GND (1 m) Black Monitor cable (5 m) Yellow To a metal surface of the car chassis GND (1 m) Back-up (5 m) To car battery (12 V) Fuse (8 A) Filter box Red RCA pin cord (optional) ACC (5 m) Fuse (1 A) Blue/White striped POWER REM (5 m) Max. supply current 0.3 A To ignition switch (ACC position) To a power amplifier 4 Pin Power connector Precautions on PS one™ • Be sure to fasten PS one™ in a safe place securely. • For your safety, do not use PS one™ while driving your car.
Additional Information Maintenance Fuse replacement When replacing the fuse, be sure to use one matching the amperage rating stated on the original fuse. If the fuse blows, check the power connection and replace the fuse. If the fuse blows again after replacement, there may be an internal malfunction. In such a case, consult your nearest Sony dealer. 1 2 c Warning Never use a fuse with an amperage rating exceeding the one supplied with the unit as this could damage the unit.
About the liquid crystal display (LCD) panel Do not press on the LCD panel on the unit as doing so can distort the picture or cause a malfunction. The picture may become unclear, or the LCD panel may be damaged. Notes on cleaning — Clean the LCD panel with a slightly damp soft cloth. — Do not use solvents such as benzine, thinner, commercially available cleaners or antistatic spray. • Do not use the unit in temperatures under 5 °C or over 45 °C.
Specifications Monitor System Display Drive system Liquid crystal colour display Manual flipdown panel TFT-LCD active matrix system Picture size 7 inches wide screen (16:9) 154 × 87 mm, 176 mm (w/h, d) Picture segment 336,960 (w 1440 × h 234) dots Power requirements 12 V DC car battery (negative ground) Current drain Approx. 800 mA Dimensions 230 × 57 × 270 mm (w/h/d) Operating temperature 5 °C – 45 °C Mass Approx. 1.
Troubleshooting The following checklist will help you solve problems you may encounter with your unit. Before going through the checklist below, check the connection and operating procedures. General No picture, no sound •The power cord or battery has been disconnected. •The fuse has blown. Good picture, but no sound Press the (VOL)(+) or (ATT) on the card remote commander. Dotted lines or stripes This may be caused by local interference such as a car engine or motorcycle.
2
Índice Bienvenido ........................................................................................................................... 4 Precauciones ........................................................................................................................ 5 Ubicación de los controles ................................................................................................. 7 Funcionamiento Apertura de la pantalla .................................................................
Bienvenido Gracias por adquirir el monitor portátil de Sony. • Imagen reversible • Compatible con el sistema de color PAL o NTSC • Además del modo de pantalla normal, puede usar los modos de pantalla completa, pantalla en zoom y pantalla en zoom panorámico. • El panel de cristal líquido de baja reflectividad reduce el resplandor procedente de otras fuentes de iluminación.
Precauciones Para evitar el riesgo de lesiones graves o accidentes, lea las siguientes advertencias antes de instalar la unidad y ponerla en funcionamiento. Seguridad Cumpla con las leyes de tránsito de su país. • Mientras conduce - El conductor no debe ver ni utilizar el monitor. Esto puede causar distracciones y provocar un accidente de tránsito. - El conductor no debe usar los auriculares. Esto puede causar distracciones y provocar un accidente.
Lugar de instalación Antes de instalar esta unidad, consulte las leyes locales de tránsito. Siga el diagrama que aparece abajo para instalar la unidad en su auto en la posición correcta. Aproximadamente 150 mm Aproximadamente 300 mm No instale esta unidad en un lugar donde: - Pueda obstaculizar la visión del conductor cuando el monitor esté abierto o cerrado. - Obstaculice el funcionamiento del sistema de bolsas de aire.
Ubicación de los controles Monitor 1 Botón OPEN Presiónelo para abrir el monitor. 2 Receptor del control remoto de tarjeta/Transmisor para auriculares inalámbricos 3 Botones UP/DOWN (M/m) Presiónelos para seleccionar el elemento deseado. 4 Botón MENU Presiónelo para ajustar los distintos valores de la pantalla. 5 Botón REVERSE* Presiónelo para invertir las imágenes. 6 Botón INPUT Presiónelo para seleccionar la fuente de entrada.
Control remoto de tarjeta RM-X122 ATT POWER INPUT ATT VOL MODE TOP MENU ALBUM+ LIST MENU SETUP POWER INPUT MENU MENU VOL MODE TOP MENU ALBUM+ LIST SETUP MENU ENTER ENTER DISPLAY DISPLAY ALBUM– ALBUM– OFF OFF AUDIO SUBTITLE Para las operaciones del monitor: 1 Botón ATT Presiónelo para atenuar rápidamente el sonido. 2 Botones VOL (volume) +/– Presiónelos para ajustar el volumen. 3 Botón INPUT Presiónelo para seleccionar la fuente de entrada.
Funcionamiento Apertura de la pantalla OPEN ATT POWER INPUT MENU VOL POWER MODE TOP MENU ALBUM+ LIST MENU SETUP ENTER DISPLAY ALBUM– OFF AUDIO SUBTITLE POWER Presione (OPEN) para abrir la pantalla del monitor y, a continuación, presione (POWER) para encender el monitor.
Selección de la fuente de entrada Puede seleccionar la fuente de entrada y el sistema de color. ATT POWER POWER INPUT MENU VOL MODE INPUT TOP MENU ALBUM+ LIST MENU SETUP ENTER DISPLAY ALBUM– OFF AUDIO INPUT 1 SUBTITLE POWER Presione (POWER). La alimentación se activa.
Ajuste del modo de pantalla Además del modo de pantalla normal, puede usar los modos de pantalla completa, pantalla en zoom y pantalla en zoom panorámico. ATT POWER INPUT MENU VOL MODE MODE TOP MENU ALBUM+ LIST MENU SETUP ENTER DISPLAY ALBUM– OFF AUDIO SUBTITLE Presione (MODE) varias veces. El modo actual se muestra primero en la pantalla.
Cambio de los ajustes de la pantalla Si le resulta difícil ver la pantalla desde el lugar donde está sentado, puede ajustar manualmente los valores de la pantalla. ATT POWER INPUT MENU MENU VOL MODE TOP MENU ALBUM+ LIST MENU SETUP ENTER DISPLAY ALBUM– OFF AUDIO SUBTITLE MENU 1 Presione (MENU). Aparecerá la pantalla “Picture”. Picture 32 Press Vv, or MENU. El valor del ajuste del elemento seleccionado aparece en esta área.
Cuando “Color” está seleccionado Color 32 Hue Press Vv, or MENU. V v Cuando “Hue” está seleccionado*1 CTR Press Vv, or MENU. v n V Presione para Presione para disminuir n aumentar la la intensidad intensidad del color del color Presione para disminuir la saturación Cuando “Dimmer” está seleccionado Cuando “Video Adjust” está seleccionado Dimmer; On Press Vv, or MENU. *2 Presione para aumentar la saturación Video Adjust; Reset Press Vv, or MENU.
Ajuste del volumen Puede ajustar el volumen de los auriculares con cable y el equipo conectado a la unidad con el control remoto de tarjeta suministrado. ATT POWER ATT INPUT VOL+/– MENU VOL MODE TOP MENU ALBUM+ LIST MENU SETUP ENTER DISPLAY ALBUM– OFF AUDIO SUBTITLE Presione (VOL)(+) o (VOL)(–) en el control remoto de tarjeta. Atenuación rápida del sonido Presione (ATT) en el control remoto de tarjeta. ATT On Para recuperar el nivel anterior de volumen Presione (ATT) nuevamente.
Conexiones Diagrama de instalación Consulte el diagrama de instalación y acuda a un técnico calificado para instalar la unidad. Altavoz frontal izquierdo Monitor portátil Altavoz de agudos izquierdo Unidad principal Altavoz de agudos derecho Altavoz frontal derecho Reproductor de DVD portátil DVX-11A de Sony Altavoz posterior izquierdo Altavoz potenciador de graves Altavoz posterior derecho Fije el equipo con firmeza en el chasis del vehículo, etc.
Diagrama de las conexiones Consulte el diagrama de las conexiones para hacerlas correctamente. Puede realizar las conexiones que se muestran en el área A. Pida que las demás conexiones las haga un técnico calificado.
Negro Negro Cable del monitor (5 m) A una superficie metálica del chasis del auto GND (1 m) GND (1 m) Amarillo Respaldo (5 m) A la batería del auto (12 V) Fusible de 8 A Caja de filtros Rojo Extensión con conectores RCA (opcional) A la llave de encendido (posición ACC) ACC (5 m) Fusible de 1 A Con rayas azules y blancas POWER REM (5 m) Corriente máxima de 0,3 A Conector de alimentación de 4 pines A un amplificador de potencia Precauciones sobre la PS one™ • Asegúrese de fijar firmemente la PS
Información adicional Mantenimiento Cambio del fusible Cuando cambie el fusible, asegúrese de usar uno cuyo amperaje sea idéntico al especificado en el original. Si el fusible se funde, revise las conexiones de energía eléctrica y reemplace el fusible. Si el fusible se funde de nuevo después de sustituirlo, es posible que exista algún problema de funcionamiento interno. En tal caso, consulte a su distribuidor Sony más cercano.
Acerca del panel de pantalla de cristal líquido (LCD) No haga presión sobre el panel LCD de la unidad del monitor, ya que ello puede distorsionar la imagen o causar un problema en su funcionamiento. La imagen puede aparecer menos nítida o el panel LCD puede dañarse. Notas sobre la limpieza — Limpie el panel LCD con un paño suave ligeramente humedecido. — No use disolventes como benzina, diluyentes, limpiadores comerciales ni aerosoles antiestáticos.
Especificaciones Monitor Sistema Pantalla de color de cristal líquido Pantalla Panel de movimiento manual Sistema de controladores Sistema de matriz activa TFT-LCD Tamaño de imagen pantalla de 7 pulgadas de ancho (16:9) 154 × 87, 176 mm (an/al, prf) Segmento de la imagen 336 960 (1 440 an. × 234 alt.) puntos Requisitos de alimentación Batería de auto de cc 12 V (tierra negativa) Gasto de corriente 800 mA aprox.
Solución de problemas La siguiente lista de verificación le ayudará a solucionar los problemas que puedan producirse con la unidad. Antes de consultar la siguiente lista, revise los procedimientos de conexión y de funcionamiento. Generales No hay imagen, no hay sonido •Se desconectó el cable de alimentación o la batería. •El fusible se fundió. Buena imagen, pero sin sonido Presione (VOL)(+) o (ATT) en el control remoto de tarjeta.
2
目錄 鳴謝惠顧! ............................................................. 4 使用前注意事項 ......................................................... 5 控制器位置 ............................................................. 7 操作 翻開顯示監視器 ......................................................... 9 選擇輸入訊源 .......................................................... 10 設定螢幕模式 .......................................................... 11 改變顯示設定 .......................................................... 12 調節音量 .................
鳴謝惠顧! 感謝您購買 Sony Overhead Monitor。 • 可翻轉影像 • 與 PAL 或 NTSC 彩色系統相容 • 除普通螢幕模式之外,也可以使用全屏、縮放和寬縮放螢幕模式。 • 低反射液晶顯示板可減少外來光源的眩目。 • 根據照明條件,可調節亮度控制 • 背光調光控制可產生明晰的對比影像,以消除色彩的逆轉或模糊。 • 提供 3 個音頻 視頻輸入接口和 1 個音頻 視頻輸出接口,用於連接視頻播放機、 視頻遊戲機和另外的監視器。 • 提供 7.5V 直流輸出接口,用於連接 PS oneTM。 • 內建無線耳機(選購件)紅外線發射器。 • 2 個連接有線耳機(選購件)的耳機插孔。 * “PS one”是 Sony Computer Entertainment Inc.
使用前注意事項 為避免發生嚴重傷害或事故,在安裝和操作本裝置前請閱讀以下注意事項。 關於安全 請遵守當地的交通規則和法規。 • 駕駛途中 - 司機不能觀看或操作監視器,否則將可能導致注意力分散並造成交通事故。 - 司機不能使用耳機,否則將可能導致注意力分散並造成交通事故。 當司機要觀看和操作監視器,或使用耳機時,應將汽車停在安全的地方。 • 安裝之後 - 切勿吊住監視器。 - 切勿將手、手指或外物嵌入裝置內。否則可能造成傷害或損壞裝置。 - 當從後座起身時,請當心頭不要撞到本裝置。 - 請特別當心,切勿讓耳機線纏住頭頸,以免在汽車突然運動時造成傷害或窒息。 - 請將小物品放在兒童不可及之處。 關於安裝 • 安裝本裝置需要技術專家。 本裝置應該由有資格的技術專家或維修人員安裝。 • 若試圖自行安裝本裝置,應參照本使用說明書中的安 裝和接線圖正確操作。錯誤安裝會引起火災或觸電。 • 安裝前,必須將點火鑰匙轉到 OFF 位置,或拔 出鑰匙。在引擎開啟時安裝本裝置會造成電池漏 電或短路。 • 安裝本裝置時切勿傷及任何管路、管線、燃料箱 或電器線路,否則會引起火災。如果在汽車面板 內鑽孔,應確保不會損壞任何隱蔽的汽
安裝位置 安裝本裝置前,請查看本地的交通規則和法規。 按照下列圖示將本裝置安裝在您汽車內的適當位置。 約 150 mm 約 300 mm 切勿將本裝置安裝在下列位置: -當監視器處於打開或關閉位置時將妨礙司機的視線。 - 該位置將妨礙安全氣囊的操作。 - 該位置將妨礙汽車的操作,尤其是方向盤、換檔 桿或煞車踏板。 - 在司機或乘客上下車時可能撞到受傷的位置。 如果您有任何有關本裝置的問題或困難,而本說明書內未能涵蓋,請與距您最近的 Sony 銷售商聯繫。 安裝之前 確信 POWER SELECT 開關設定在正確位置。 A* : 如果您的汽車在點火開關上有輔助位置。 B : 如果您的汽車在點火開關上沒有輔助位置。 * A 是出廠預置位置。 當 POWER SELECT 開關設定在 B 按監視器上的 (POWER) 打開監視器。 按卡片式遙控器上的 (POWER) 不能打開監視器。 註 開始駕駛汽車時務必關閉監視器。 若要關閉監視器,請如下操作: - 按監視器上的 (POWER)。 - 按卡片式遙控器上 (POWER)。 - 合攏顯示監視器直至發出喀嗒聲*。 電源開著將造成電池消耗。 * 如果顯示監視器
控制器位置 監視器 1 OPEN 按鈕 按下以翻開監視器。 2 卡片式遙控器接收器/無線耳機發射 器 3 UP/DOWN(M/m)按鈕 按下以選擇所要的項目。 4 MENU 按鈕 按下以調節各種顯示設定。 5 REVERSE 按鈕* 按下以倒轉切換影像。 6 INPUT 按鈕 按下以選擇輸入訊源。 7 POWER 按鈕 * 監視器反轉顯示位置 您可以在轉動 180 度後使液晶屏表面朝外合攏監視器,並且按下監視器上的 (REVERSE) 後螢幕 上圖像會倒轉顯示。合攏顯示監視器之前,要確認監視器已轉動且面朝機殼(您會聽到喀嗒一 聲)。每按一次監視器上的 (REVERSE),反轉螢幕模式就在開和關之間轉換。 180˚ c c REVERSE 續下頁 t 7
卡片式遙控器 RM-X122 ATT ATT POWER INPUT VOL MODE TOP MENU ALBUM+ LIST MENU MENU VOL MODE TOP MENU ALBUM+ POWER INPUT MENU LIST SETUP MENU SETUP ENTER ENTER DISPLAY DISPLAY ALBUM– ALBUM– OFF OFF AUDIO AUDIO SUBTITLE 關於監視器操作: 1 ATT 按鈕 按下以快速降低音量。 2 VOL(音量)+/- 按鈕 按下以調節音量。 3 INPUT 按鈕 按下以選擇輸入訊源。 4 POWER 按鈕 5 MENU 按鈕 按下以調節各種顯示設定。 6 MODE 按鈕 按下以改變螢幕模式。 7 V/v 按鈕 按下以選擇所要的項目。 SUBTITLE 關於 DVD 操作: 當將 Sony 移動式 DVD 播放機連接至本裝 置時,您可以用卡片式遙控器控制其基 本功能。 8 V/v(ALBUM +/-)按鈕 9 TOP MENU 按鈕 0 MENU 按鈕 qa O 按鈕
操作 翻開顯示監視器 OPEN ATT POWER INPUT MENU VOL POWER MODE TOP MENU ALBUM+ LIST MENU SETUP ENTER DISPLAY ALBUM– OFF AUDIO SUBTITLE POWER 按 (OPEN) 以翻開顯示監視器, 然後按 (POWER) 以打開監視器電源。 提示 如果您汽車的點火鑰匙開關上沒有 ACC(附件)位置,且 POWER SELECT 開關設定在 B 位 置,按卡片式遙控器上的 (POWER) 不能打開監視器(第 6 頁)。 將顯示監視器轉回其外框 合起顯示監視器直到發出喀嗒聲。監視器電源將自動關閉。 註 • 合起時當心不要將手指夾在顯示監視器內。 • 合起時不要在液晶顯示板和外框之間放置任何異物。 調整傾斜度和旋轉度 本顯示監視器可按下圖所示的角度內進行調整。 提示 合攏顯示監視器之前,要確認監視器已轉動且面朝 機殼(您會聽到喀嗒一聲)。 120˚ 180˚ 30˚ 9
選擇輸入訊源 您可以選擇輸入訊源和彩色系統。 ATT POWER POWER INPUT MENU VOL MODE INPUT TOP MENU ALBUM+ LIST MENU SETUP ENTER DISPLAY ALBUM– OFF AUDIO INPUT 1 SUBTITLE POWER 按 (POWER) 。 打開電源。 提示 如果您汽車的點火鑰匙開關上沒有 ACC(附件)位置,且 POWER SELECT 開關設定在 B 位 置,按卡片式遙控器上的 (POWER) 不能打開監視器(第 6 頁)。 2 按 (INPUT) 以選擇所要的輸入訊源。 每按一次 (INPUT),指示按以下順序改變: B VIDEO 1 3 B VIDEO 2 按 V 或 v 選擇 PAL 或 NTSC 彩色系統。 當顯示訊源指示(例如:“VIDEO 1”)時,按其中任一按鈕。 選擇 NTSC 視頻時 VIDEO1 NTSC 10 B VIDEO 3 選擇 PAL 視頻時 VIDEO1 PAL
設定螢幕模式 除普通模式之外,也可使用全屏、縮放和寬縮放模式。 ATT POWER INPUT MENU VOL MODE MODE TOP MENU ALBUM+ LIST MENU SETUP ENTER DISPLAY ALBUM– OFF AUDIO SUBTITLE 反覆按 (MODE)。 螢幕上首先顯示當前模式。 每按一次此按鈕,螢幕模式按下列順序切換: Normal Full Normal(普通(常規)) 4 比 3 縱橫比的影像(普通影 像) Full(全屏) 被放大至螢幕左右邊緣的 4 比 3 縱橫比影像。 Wide Wide(寬縮放) 4:3 縱橫比例的影像,僅影像的 左邊和右邊被放大以充滿螢幕。 Zoom Zoom(縮放) 被放大至螢幕左右邊緣的 4 比 3 縱橫比影像,超出部分(頂部和 底部)被切除以充滿螢幕。 5 秒鐘內未按 (MODE),螢幕模式即被設定。 提示 當以縮放模式觀看時,影像會出現紋理粗糙。 11
改變顯示設定 如果從您所坐的位置觀看顯示很困難,您可以手動調節顯示設定。 ATT POWER INPUT MENU MENU VOL MODE TOP MENU ALBUM+ LIST MENU SETUP ENTER DISPLAY ALBUM– OFF AUDIO SUBTITLE MENU 1 按 (MENU)。 出現“Picture”畫面。 Picture 32 Press Vv, or MENU.
選擇“Hue”時*1 選擇“Color”時 Color 32 Press Vv, or MENU. 按 v 降低 色彩濃度 按 V 增加 色彩濃度 n 選擇“Dimmer”時 Dimmer; On Press Vv, or MENU. CTR Hue *2 Press Vv, or MENU. 按 v 降低 飽和度 n 按 V 增加 飽和度 選擇“Video Adjust”時 Video Adjust; Reset Press Vv, or MENU. 當打開該功能時,螢幕的亮度將自動 調節。 “Picture”,“Brightness”, “Color”,“Hue”和“Dimmer”設 定將被重新設定至出廠預設等級。 選擇“Mode”時 當選擇“Blue Back”時 Mode; Zoom Press Vv, or MENU. “Normal”,“ Full”,“ Zoom” 或“Widezoom”將被設置為螢幕模 式。詳細情況,請參閱第 11 頁。 Blue Back; On Press Vv, or MENU.
調節音量 您可以用提供的卡片式遙控器調節有線耳機和所連接裝置的音量。 ATT POWER ATT INPUT VOL+/– MENU VOL MODE TOP MENU ALBUM+ LIST MENU SETUP ENTER DISPLAY ALBUM– OFF AUDIO SUBTITLE 按卡片式遙控器上的 (VOL)(+)或 (VOL)(-)。 快速衰減聲音 按卡片式遙控器上的 (ATT)。 ATT On 若要恢復先前的音量電平 再按一次 (ATT)。 連接耳機 接線盒上有兩個有線耳機輸出插孔(小型音頻插頭)。用卡片式遙控器上的 (VOL)(+) 或 (VOL)(-)調節音量。 使用無線耳機 您可以在本裝置上使用紅外線無線耳機(選購件)。 請參閱紅外線無線耳機的使用說明。 註 • 提供的卡片式遙控器不能調節無線耳機的音量。請使用無線耳機上的音量控制器進行調節。 • 安全起見,開車時不要使用耳機。 • 不要將耳機放置於太陽直射或高溫處。 • 如果無線耳機在太陽直射下使用時,紅外線接收器的靈敏度可能會降低,且可能會有雜音。 14
線路連接 安裝圖 本裝置的安裝請參照安裝圖並詢問有資格的技術人員。 前左揚聲器 車頂式監視器 左高音揚聲器 主機 右高音揚聲器 前右揚聲器 Sony 移動式 DVD 播放機 DVX-11A 後左揚聲器 超重低音揚聲器 後右揚聲器 確保所有裝置均安全固定在汽車框架上, 以防止它們在汽車行進中發生移動。 註 除一個車頂式監視器和一個接線盒以外的所有 裝置均為選購件。 關於 PS oneTM 的位置 切勿將 PS oneTM 設置在下列位置: - 儀表面板上,或受陽光直射位置。 - 磁鐵、揚聲器和電視機 監視器等磁源附 近。 - 不平穩或不平的表面上。 - 過度震動處。 - 有過多灰塵或髒物處。 - 通風不良或潮濕處。 - 溫度極高或極低處( 5℃ 以下或 35℃ 以 上)。 請參閱隨 PS oneTM 附送的使用說明。 15
線路連接圖 請參照線路連接圖進行正確連接。 您可以進行 A 區域中的連接。要進行其他線路連接請詢問有資格的技術人員。 車頂式監視器 XVM-R70 (7 英吋寬螢幕彩色液晶監視器) 接線盒 XA-113 (選購件) 頭靠式監視器 XVM-H65(選購件) 監視器電纜線 (5 m) (選購件) 接線盒 XA-115 耳机插孔 (立體聲小型) 7.
黑色 GND(1 m) 黑色 GND(1 m) 黃色 監視器電纜線 (5 m) 至汽車車身的金屬 表面 備用線 (5 m) 至汽車電池(12 V) 保險絲 (8 A) 濾波器盒 紅色 ACC (5 m) 保險絲( 1 A) 藍/白條紋 POWER REM(5 m) RCA 針型導線 (選購件) 最大電流 0.3 A 至點火鑰匙 (ACC 位置) 至功率放大器 4 針電源連接器 關於 PS oneTM 的注意事項 • 務必將 PS oneTM 牢固地固定在安全處。 • 為了您的安全,請勿在駕車時使用 PS oneTM。 • 確保 PS oneTM 的工作電壓為 7.5V。 接線盒 XA-115 其它電壓會引起故障或損壞 PS oneTM。 A 至遙控信號 (IR)輸出 遙控器信號接收器 導線 (5 m) (立體聲小型插孔) 至音頻 L/R/視頻輸入 至 7.
附加資訊 維護 更換保險絲 當更換保險絲時,必須使用符合原保險絲上所規定安培額定值的保險絲。如果保險絲 燒斷,請檢查電源線路連接並更換保險絲。如果更換後保險絲再次燒斷,則可能是內 部故障。此時,請與距您最近的 Sony 銷售商聯繫。 1 2 c 警告 所使用的保險絲安培額定值決不能超過本裝置所附帶的保險絲,否則會損壞機器。 更換鋰電池 在正常情況下,電池可持續使用約 1 年。(視使用狀況而定,使用期限可能變短。) 當電池變弱時,卡片式遙控器的控制範圍變短。請換上新的 CR2025 鋰電池。使用任 何其它電池可能存在起火或爆炸的危險。 + 面朝上 c 鋰電池注意事項 • 將鋰電池置於兒童無法觸及之處。一旦誤吞電池,請立即就診。 • 用乾布擦拭電池,以保証接觸良好。 • 安裝電池時,必須遵照正確極性。 • 切勿用金屬鑷子夾取電池,否則會引起短路。 警告 電池處理不善會引起爆炸。 切勿充電、拆卸或丟棄在火中。 18
關於液晶顯示(LCD)板 切勿按本裝置上的 LCD 板,否則會使影像變形或造成故障。影像變得不清晰,或可能 損壞 LCD 板。 關於清潔注意事項 — 用有點濕的軟布清潔 LCD 板。 — 切勿使用諸如汽油、稀釋劑、商用清潔劑或抗靜電噴霧劑等清潔劑。 • 切勿在 5 ℃以下或 45 ℃以上使用本裝置。 • 如果您的汽車停泊在寒冷或炎熱的地方,影像可能不清晰。監視器並未損壞。車內溫 度正常後影像將變得清晰。 監視器上可能會出現一些穩定的藍色或紅色點。 這些點稱為亮點,任何 LCD 均會發生。 LCD 板是高度精密,面板中所使用的超過 99.99% 的部分是完美的。然而,可能有小 於 0.
規格 卡片式遙控器 RM-X122 監視器 系統 顯示幕 驅動系統 影像尺寸 影像部分 電源要求 電流 尺寸 操作溫度 質量 液晶彩色顯示 手動下翻面板 TFT-LCD 有源矩陣系統 7 英吋寬螢幕(16:9) 154 × 87 mm, 176 mm (寬/高,深) 336,960 (寬 1440 × 高 234) 點 12 V DC 汽車電池 (負極接地) 約 800 mA 230 × 57 × 270 mm (寬/高/深) 5 ℃ – 45 ℃ 約 1.5 kg 接線盒 XA-115 A/V 輸出 輸出阻抗: 輸出電平: 視頻: A/V 輸入 ×3 輸入阻抗: 輸入電平: 視頻: DC 輸出 尺寸 質量 20 小於 220 Ω 小於 100 pF 0 dBs ±0.3 dB (0.775 V rms) (最大音量) 75 Ω 1 Vp-p 大於 10 K Ω 小於 1000 pF ±1.3 dBs +0/–0.3 dB (0.775 V rms) 75 Ω 1 Vp-p 7.
故障排除 以下檢查表將有助於您在使用本裝置時解決所遇到的問題。 在仔細查看以下檢查表之前,請先檢查線路連接和操作步驟。 常規 無影像,無聲音 •電源線或電池連接已斷。 •保險絲燒斷。 影像良好,但無聲音 按卡片式遙控器上的 (VOL)(+)或 (ATT)。 虛線或條紋 此現象可能是由局部干擾所引起,如汽車引擎或摩托車。 調節天線使干擾降至最小。 當連接了選購裝置時無影像,或 無聲音 當點火鑰匙處於 ON、ACC 或 OFF 位置時產生噪音。 導線已斷。牢固連接導線。 按卡片式遙控器上的按鈕沒有反 應 電池可能耗盡。 21
Sony Corporation Printed in Korea