
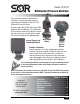
Owner's manual


4/12
Form 506 (01.13) ©SOR Inc.
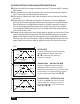
Coarse Calibration Procedure:
Connect variable pressure source to test gauge and HI side pressure port.
Connect test light or ohmmeter across C – Common and NO – Normally Open switching
element contacts.
Raise pressure and note test gauge reading when circuit closes.
Slowly drop pressure and note test gauge reading when circuit opens.
Turn set point adjustment clockwise to increase set point, or counterclockwise to
decrease set point.
Repeat Steps
,
and
until contacts change at desired increasing or decreasing
differential pressure set point.
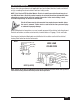
Precise Calibration Procedure: The precise calibration procedure references system
(static) pressure. Set point accuracy is enhanced by calibrating the differential pressure
switch under simulated service pressure conditions.
The following test apparatus is recommended:
Determine whether the critical set point occurs on increasing or decreasing differential
pressure, and calibrate using the appropriate procedure:
For B-Series Housings: The electrical compartment cover must remain
sealed and the Allen locking screw tightened at all times to prevent
removal of the cover while the pressure switch is in service. Removal of the
cover while the pressure switch is in service in a hazardous location could
result in severe personal injury or substantial property damage.
Differential pressure gauge
Variable pressure source
Block/bleed and equalizer valves
Test light or ohmmeter
Calibration
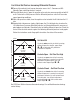
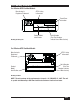
Mini-Hermet models: Remove the weathertight cap. Use a 1/8” hex Allen wrench to turn
the adjusting screw to the desired set point. Turn the adjusting screw clockwise (in) to
increase the set point and counterclockwise (out) to decrease the set point. Use either the
coarse or the precise set point calibration procedure.
All Other Models: Use a 3/4-inch open-end wrench to turn hex adjusting nut clockwise to
increase set point, and counterclockwise to decrease set point. An approximate set point
can be obtained by sighting across top of adjusting nut to the calibration scale on the
interior wall of the housing. If coarse or precise set point calibration is required, calibrate
according to the appropriate procedure.
Do not unthread the adjusting sccrew more than two threads below the
ush point of housing as calibration could be adversely affected.