
Instructions / Assembly

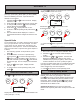
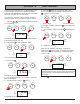

Changing the CAL Factor
• Hold button 3 until the
display only shows CAL
and number.
• Press 3 repeatedly until
you reach the desired
number. Note – number
will increment up to 19,
then back to zero.
• Press 2 to return to
normal operating mode.
Batteries
NOTE: Low battery icon will ash when batteries begin
to lose power. Meter still functions properly for several
days after the icon begins to ash. Neither calibration,
current total or totalizer quantities will be lost when you
replace batteries.
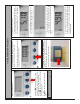
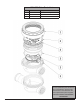
To Replace Batteries (refer to exploded view).
1. Unscrew meter cap (item 1). Use a strap type oil
lter wrench or large 5" jaw pipe wrench if needed.
2. Insert a at-head screw driver into the top slot (see
Figure 4) and gently pry up electronics module.
CAUTION: Be careful not to get uid or dirt in electronics
area.
Figure 4
3. Remove old batteries and insert new batteries,
making sure battery polarity is correct, or meter damage
could occur.
4. As noted in Figure 5, reinstall o-ring on electronics
module Align sensor receptacle in proper location. Press
module gently down into meter cover.
Figure 5
5. Thread on meter cap until hand tight. To check
tightness, there should be approximately 1/16" gap
between cap and ridge on outlet port. (See Figure 6).
Figure 6
Repair
If any meter components are damaged, they should be
replaced. See meter drawing and parts list for correct
replacement part number before ordering.
Maintenance
CAUTION
Follow uid manufacturer's recommended procedures for
handling and disposing of metered uids.
Meter should be ushed between uses with water to
prevent chemicals from drying and plugging meter.
Thorough Cleaning (refer to exploded view)
If meter is plugged due to hardened chemical or debris, do
the following:
1. Drain all uid from meter.
2. Unscrew meter cap (item 1). Use a strap type oil lter
wrench or large 5" jaw pipe wrench if necessary.
3. Insert a at-head screwdriver in the lower slot (see
Figure 7) and turn to pry up meter cover (item 6).
4. The meter chamber (item 8) can now be removed.
5. Rinse all meter components with ushing uid. Do NOT
submerge display assembly. Be careful not to get any uid
or dirt in the electronics module.
6. Reassemble meter.
CALIBRATION NOTE: Over time, the chamber inside the
meter will wear, requiring the meter to be recalibrated with
water. When this should be done depends on the amount
and type of uid dispensed. In most crop protection uid
uses (less than 1000 gallons of a clean uid per year), the
meter will remain accurate for many years without recalibra-
tion. On the other hand, dispensing an abrasive uid may
require more frequent recalibration.
The 825 / 850 meter is designed to be calibrated with clean
water for safe handling. See "Water Calibration" section in
Appendix - B.
Storage
Store in a cool, dry place. Drain out all uid that could
freeze in the meter.
1/16" Gap
6