
Owner's manual


5
Installation (cont’d)
Pressure Relief Procedure
WARNING! PRESSURIZED EQUIPMENT IS HAZARDOUS! Your Sotera AOD pump and the system it is installed in remain
pressurized until the pressure is relieved manually. This creates the risk of serious injury from pressurized fluid, accidental spray, or splashing fluid if
proper precautions are not followed when opening or operating the system. To minimize the risk, the following procedure should be followed any time
you need to:
Relieve pressure
Stop Pumping
Clean, service, or check any part of the system or pump
Install or clean fluid spray nozzles
To safely relieve the pressure, it is paramount that you:
Shut off the air supply to the pump
Open the dispensing valve (if so equipped)
Open the fluid drain to relieve all the fluid pressure in the system (place a container at the fluid drain to catch all discharged fluids; use caution as
some pressure in the system may force fluid out of the drain rapidly).
Prepping for First Use and Initial Start Up
Your Sotera AOD pump is tested using water during production at the factory. The pump is drained at the end of the test, but residual water may still
exist internally so it is important to flush your pump thoroughly with a compatible solvent prior to first use.
Review all “WARNING” and “CAUTION” information on page 2 prior to start up to be certain the pump is ready for operation. Re-torque all fasteners
and rings prior to start up to ensure good fluid seal. Proper torque is paramount to proper sealing; DO NOT over torque fasteners and rings (torque
specifications are located on page 8). Be sure the system and pump are grounded as necessary (G). Be sure the pump is mounted securely to a
solid surface, and the system is plumbed to absorb shock and vibration (see mounting information on pages 3,4, & 6).
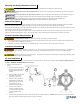
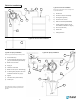
Place the suction hose (F) (if used) into the fluid
container (NOTE: If the inlet fluid pressure is
greater than 25% of the outlet working pressure,
the ball check valves will not close fast enough and
the pump will not work efficiently).
Place the end of the fluid outlet line (B) in an
appropriate container (C) to catch the dispensed
fluid.
Close the fluid drain valve (A).
With the Air Regulator (D) completely closed, open
all bleed type master air valves (E).
If the system uses a fluid dispensing device (B),
hold it open as you slowly open the Air Regulator
(D) until the pump begins to cycle. You should
cycle the pump slowly until all the air is purged from
the fluid lines. The pump is now primed and ready
for use.
NOTE: If you are flushing the pump, be sure to run
the pump long enough to completely flush the
pump, lines, hoses, and dispenser.
A
C
B
D
G
E
Figure 4
F
WARNING! PROPER PUMP SHUTDOWN! Diaphragm and seal life may be reduced if air pressure is applied to the pump motor
during long periods when the pump is not being used. Installing a 3-way solenoid valve that automatically relieves pressure on the air motor when a
metering cycle is complete prevents this from occurring.