Benut z er handbuc h Model l Nr :SB1600
Einleitung Herzlichen Glückwunsch zum Kauf Ihres Sound Blaster® E1! Dieser portable USB-Kopfhörerverstärker mit SBX® Pro Studio™-Technologie schenkt Ihnen ein Audioerlebnis, wie es sein soll: Mit reichlich Leistungsreserven und voluminösem Klang – im Handumdrehen mit Smart-Geräten, PC oder Mac. Der Sound Blaster E1 unterstützt Highend-Kopfhörer, sorgt für reinsten Studioklang und ist mit gleich zwei Kopfhöreranschlüssen ausgerüstet, damit Sie Ihre Klangwelten auch ganz einfach zu zweit erleben können.
Weitere Hilfe Aktuellste Neuigkeiten und weitere Sound Blaster-Produkte finden Sie hier: www.soundblaster.com Auf der Internetseite gibt es auch Informationen zum Kauf, technische Unterstützung und aktuellste Software. Creative Software AutoUpdate verwenden Finden, Herunterladen und Installieren von Aktualisierungen für Ihre Creative-Produkte ist durch das neue, webbasierte Creative Software AutoUpdate-System noch einfacher und schneller geworden.
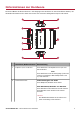
Informationen zur Hardware Der Sound Blaster E1 bietet Ihnen Ein- und Ausgänge zum Anschluss an unterschiedlichste Geräte; mit den Bedienelementen an der Seite steuern Sie Ihre externen Audiogeräte bequem und zentral. 1 10 9 2 3 8 4 5 7 6 Anschluss/Bedienelement Beschreibung 1 Kopfhörer-/Line-out-Buchse Zum Anschluss von Kopfhörern mit 3,5-mmStereostecker. ODER Zum Anschluss an die Fronteingänge (links und rechts) von analogen Aktivlautsprechern mit 3,5-mm-Stecker.
Anschluss/Bedienelement Beschreibung 3 Lautstärkeregler Zum Einstellen der Ausgangslautstärke. 4 Ein-/Austaste Zum Ein- und Ausschalten zur Seite schieben. 5 LED-Statusanzeige Zeigt Energiestand und Zustand des Sound Blaster E1. Weiß: Eingeschaltet/Akku voll Rot: Niedriger Ladezustand Weiß (blinkt): Akku wird geladen Aus: Abgeschaltet 6 USB-Anschluss Zur Verbindung mit den USB-Ports eines PCs/Notebooks, zur Audioausgabe über MicroUSB-Anschluss. 7 Line-in Zum Anschluss an Line-Quellen (z. B.
Audiogeräte anschließen Mit einem Computer verbinden Verbinden Sie Ihr USB-Audiogerät über das mitgelieferte Micro-USB/USB-Adapterkabel mit einem Computer. Schließen Sie Ihre Kopfhörer oder Lautsprecher an das Gerät an, starten Sie die Audiowiedergabe am Computer. Hinweis: Wir empfehlen, den Sound Blaster E1 direkt an einen USB Port am Computer, nicht an einen USB-Hub anzuschließen. Sound Blaster E1 als Standardaudiogerät einstellen Windows 1. Rufen Sie die Systemsteuerung auf, klicken Sie dann auf Sound.
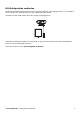
Mit Mobilgeräten verbinden Mit dem Sound Blaster E1 können Sie auch unterwegs kräftigen, vollen Klang genießen – mit tragbaren Smart-Geräten wie Android-Telefonen und -Tablets oder dem iPhone. Schließen Sie das Gerät einfach über das vierpolige Analogkabel an. Schließen Sie dann Ihre Kopfhörer an das Gerät an. Nun können Sie Musik und andere Audiodateien direkt von Ihrem Mobilgerät genießen! Mehr dazu finden Sie unter Ihr Audiogerät im Einsatz.
Software installieren und deinstallieren Damit Sie alle Vorteile Ihres Sound Blaster E1 nutzen können, müssen Sie ein paar Gerätetreiber und Applikationen installieren. Hin und wieder kann es auch nötig sein, die Gerätetreiber und Applikationen ganz oder teilweise zu deinstallieren – beispielsweise, um Probleme zu beheben, Konfigurationen zu ändern oder veraltete Treiber oder Applikationen wieder auf den neusten Stand zu bringen.
Treiber und Applikationen deinstallieren Falls die Software einmal deinstalliert werden muss (beispielsweise bei Aktualisierungen), führen Sie bitte die folgenden Schritte aus. Schließen Sie alle laufenden Audioapplikationen, bevor Sie loslegen. Bei der Deinstallation laufende Applikationen können nicht deinstalliert werden. Windows-Betriebssysteme 1. Klicken Sie in der Systemsteuerung auf Programm deinstallieren. 2. Wählen Sie den Eintrag Ihres Audiogerätes. 3.
Ihr Audiogerät im Einsatz Schritt 1: Sound Blaster E1 aufladen Schließen Sie Ihren Sound Blaster E1 direkt an einen USB-Port Ihres Computers an. Lassen Sie den Sound Blaster E1 etwa 2 – 3 Stunden lang aufladen. Vor dem ersten Einsatz empfehlen wir, das Gerät mindestens 8 Stunden lang aufzuladen. Hinweis: Lithium-Ionen-Akkus verlieren Kapazität, wenn sie komplett entladen oder lange Zeit bei geringer Spannung genutzt werden. Wir empfehlen daher, den Akku immer möglichst voll geladen zu halten.
Schritt 2: Sound Blaster E1 einschalten Schritt 3: Lautstärke einstellen WARNUNG: l l Stellen Sie die Lautstärke immer auf einen minimalen Pegel ein, bevor Sie Kopfhörer oder Lautsprecher anschließen. Hören Sie nicht längere Zeit bei sehr hohen Lautstärken; andernfalls kann es zu irreparablen Gehörschäden kommen. Stellen Sie die Lautstärke mit dem Lautstärkeregler auf eine angenehme Stufe ein.
Schritt 4: Sound Blaster E1 verwenden Audiodateien von einem Mobilgerät wiedergeben 2 3 1 4 Komponente 1 Mobilgerät 2 vierpoliges Analogkabel 3 Kopfhörer 4 Kopfhörer Hinweis: Nachdem eine Verbindung hergestellt wurde, werden die Mikrofonfunktionen Ihres Gerätes auf den Sound Blaster E1 übertragen. Headset-Mikrofone werden nicht unterstützt, wenn der Sound Blaster E1 an ein mobiles Gerät angeschlossen ist. Wenn zwei Kopfhörer angeschlossen sind, können Sie Anrufe mit beiden Kopfhörern abhören.
Audiodateien von einem Computer wiedergeben 2 3 1 BASS TREBLE VOLUME OFF MAX AUX IN 5 6 7 4 Komponente 1 USB-Kabel 2 USB-Port 3 PC/Mac 4 Notebook 5 Kopfhörer 6 Kopfhörer 7 Lautsprecher Mit SBX Pro Studio-Verbesserungen wie Tiefenregelung, Dynamikbereichverbesserung, Bassbetonung, Dialogverstärkung und automatischer Lautstärkeanpassung können Sie die Audiowiedergabe noch weiter optimieren. Siehe Creative Software Suite verwenden – SBX Pro Studio-Einstellungen.
Anrufe annehmen und beenden Ankommende Anrufe genießen Priorität über die Audiowiedergabe – die Wiedergabe wird angehalten, Sie hören den Klingelton. Drücken Sie zum Annehmen des Anrufes die Multifunktionstaste. Zum Beenden drücken Sie die Taste noch einmal. Die Audiowiedergabe wird nach dem Anruf automatisch fortgesetzt. Wenn das Gerät mit einem Computer verbunden ist, können Sie einen Anruf auch annehmen, indem Sie auf die Anruf-annehmen-Schaltfläche auf dem Computerbildschirm klicken.
Ton mit einem Mobilgerät aufzeichnen Über das integrierte Mikrofon Ihres Sound Blaster E1 können Sie Audioaufnahmen mit Ihrem Mobilgerät aufzeichnen. Dazu nutzen Sie eine normale Audioaufnahmeapplikation Ihres Mobilgerätes. 2 1 Komponente 1 Mobilgerät 2 vierpoliges Analogkabel Hinweis: Nachdem eine Verbindung hergestellt wurde, werden die Mikrofonfunktionen Ihres Gerätes auf den Sound Blaster E1 übertragen.
Ton mit einem Computer aufzeichnen Über das integrierte Mikrofon Ihres Sound Blaster E1 können Sie Audioaufnahmen mit Ihrem Computer aufzeichnen. Dazu nutzen Sie eine normale Audioaufnahmeapplikation Ihres Computers. 3 1 2 Komponente 1 USB-Kabel 2 Mikrofon 3 Headset So nutzen Sie ein externes Mikrofon 1. Schließen Sie ein Mikrofon an den Mikrofoneingang an. 2. Kopfhöreranschluss/Mikrofoneingang konfigurieren: Siehe Creative Software Suite verwenden – Erweiterte Funktionen.
„Was Sie hören“ aufnehmen (Windows-Betriebssysteme) Ihr Sound Blaster E1 ist mit einer Was Sie hören-Funktion ausgestattet, mit der Sie aufnehmen können, was gerade läuft. Sie können auch über Instant-Messaging-Anwendungen wie Google Talk oder Skype geführte Gespräche aufnehmen. 1. Rufen Sie die Systemsteuerung auf, klicken Sie dann auf Sound. 2. Klicken Sie auf das Aufnahme-Register, wählen Sie Sound Blaster E1 (Was Sie hören), klicken Sie anschließend auf die Als Standard-Schaltfläche. 3.
Creative Software Suite verwenden Mit dieser Software können Sie sowohl auf grundlegende als auch auf erweiterte Funktionen Ihres Audiogerätes zugreifen. Wir empfehlen Ihnen, sich ein wenig mit den Funktionen vertraut zu machen, damit Sie den ganzen Funktionsumfang Ihres Audiogerätes voll und ganz genießen können.
Sound Blaster E-Series-Systemsteuerung Der Rest dieses Kapitels erläutert, wie Sie die Sound Blaster E-Series-Systemsteuerung zum Anzeigen und Anpassen der verschiedenen Funktionen Ihres Sound Blaster E1 einsetzen. In den folgenden Beispielen und Bildschirmabbildungen nutzen wir die Windows-Version. Bei anderen Betriebssystemen kann die Benutzeroberfläche etwas anders aussehen. Profile verwalten Klicken Sie zum Anzeigen des Profile-Bereiches auf die Schaltfläche .
Hauptlautstärke anpassen Stellen Sie den Hauptlautstärke-Schieber auf die gewünschte Lautstärke ein. Mit einem Klick auf das Lautsprechersymbol können Sie den Ton stumm- und wieder einschalten. Allgemeine Einstellungen konfigurieren Klicken Sie auf das Symbol eine Option aus der Liste: l in der oberen rechten Bildschirmecke, wählen Sie Festlegen, ob die Sound Blaster E-Series-Systemsteuerung beim Windows-Start gleich mitgestartet wird. l Standardeinstellungen wiederherstellen.
SBX Pro Studio-Einstellungen 1. SBX Pro Studio-Erweiterungen Zum Ein- und Ausschalten der einzelnen Erweiterungen. Eine Kurzbeschreibung erscheint, wenn Sie den Mauszeiger auf eine der Erweiterungen setzen. 2. Erweiterungspegel-Schieber Legt die Intensität der Erweiterung fest. 3. Audiotest-Bedienelemente Zum Abspielen, Anhalten und Stoppen des Demovideos.
CrystalVoice-Einstellungen 1. CrystalVoice-Erweiterungen Zum Ein- und Ausschalten der möglichen Erweiterungen. 2. Erweiterungspegel-Schieber Legt die Intensität der Erweiterung fest. 3. Audiotest-Schaltfläche Wenn Sie ausprobieren möchten, wie Ihre Stimme mit CrystalVoice klingt, klicken Sie auf und sprechen in das Mikrofon. Spaß mit CrystalVoice Sie können die Intensität der einzelnen Erweiterungen regeln, indem Sie den zugehörigen Schieber zum Vermindern nach links, zum Erhöhen nach rechts ziehen.
Scout Mode Der Scout Mode sorgt für eine besonders realistische Audiowiedergabe: So können Sie Ihre Gegner schon aus großer Entfernung hören – ein nicht zu unterschätzender taktischer Vorteil. 1. Scout Mode Schaltet den Scout Mode ein und aus. 2. Mit der Schaltfläche können Sie Ihre eigenen Tastenkombinationen zum Einund Ausschalten des Scout Mode festlegen. Hinweis: Wenn der Scout Mode aktiv ist, werden andere Audioeinstellungen deaktiviert.
Tastenkombinationen konfigurieren Tastenkombinationen zum Aktivieren des Scout Mode können Sie auch mitten im Spiel zuweisen. 1. Markieren Sie das Kontrollkästchen Alle Tastenkombinationen aktivieren. 2. Klicken Sie in das Feld, geben Sie dann die gewünschte Tastenkombination über die Tastatur Ihres Computers ein. Sie können auch die Tasten Strg, Alt und die Umschalttaste, gefolgt von einer anderen Taste (nur alphanumerische Tasten) benutzen.
Lautsprecher-/Kopfhörereinstellungen 1. Lautsprecher-/Kopfhörerkonfiguration Wählen Sie Ihre aktuelle Lautsprecher- oder Kopfhörerkonfiguration. 2. Audiowiedergabe testen Klicken Sie zum Abspielen eines aktuellen Audiobeispiels auf Sound Blaster E1 – Creative Software Suite verwenden .
Mixereinstellungen 1. Lautstärkeschieber Zum Anpassen des Wiedergabe- und Aufnahmepegels unterschiedlicher Ein- und Ausgänge. 2. Mixereinstellungen Klicken Sie zum Stummschalten/Wiedereinschalten eines Ein- oder Ausgangs auf Mit einem Klick auf das Symbol anpassen. .
Equalizer-Einstellungen 1. EQ-Voreinstellungen Wählen Sie eine Equalizer-Voreinstellung, die auf die aktuelle Audioausgabe angewendet werden soll. 2. EQ-Schieber Zum Anpassen der Equalizer-Einstellungen. EQ-Einstellungen anpassen Markieren Sie zuerst das EQ-Kontrollkästchen zum Einschalten dieser Funktion. Anschließend klicken Sie auf das EQ-Auswahlmenü und wählen eine Voreinstellung aus der Liste. Bei der Auswahl einer Voreinstellung werden die EQ-Schieber auf die vorgegebenen Werte eingestellt.
Erweiterte Funktionen Die Software bietet zusätzlich erweiterte Möglichkeiten zur Konfiguration des Kopfhörer- und Mikrofonanschlusses. 1. Schließen Sie Ihren Sound Blaster E1 an den Computer an, auf dem die Sound Blaster E-SeriesSystemsteuerung installiert wurde. 2. Klicken Sie zum Aktivieren auf das Kontrollkästchen neben der gewünschten Konfiguration.
Allgemeine technische Daten HD-Audioqualität (unter Windows) l l 24-Bit-Digital-Analog-Wandlung bei Wiedergabe digitaler Quellen mit 24 Bits, bis 44,1 kHz Abtastfrequenz. 16-bit-Digital-Analog-Wandlung analoger Quellen mit 16 Bits bei bis zu 44,1 kHz Abtastfrequenz.
Problemlösung und Kundendienst In diesem Abschnitt finden Sie Lösungen zu Problemen, die im Einzelfall bei der Installation oder im regulären Einsatz auftreten können. Kein Ton über Kopfhörer. Vergewissern Sie sich, dass Folgendes gegeben ist: l Die Kopfhörer sind an den Kopfhöreranschluss angeschlossen. l Der Sound Blaster E1 ist eingeschaltet. l Die Lautstärke am Sound Blaster E1 ist nicht komplett heruntergeregelt. l Die Ton am angeschlossenen Gerät oder Medienplayer ist nicht stummgeschaltet.
Sicherheitsinformationen Lesen Sie die folgenden Hinweise, um Ihr Produkt sicher anzuwenden und die Risiken von elektrischen Schlägen, Kurzschlüssen, Beschädigungen, Bränden, Gehörschäden oder anderen Gefahren zu reduzieren. Unsachgemäße Handhabung kann zum Erlöschen der Gewährleistung Ihres Produktes führen. Weitere Informationen sind in der Garantieerklärung enthalten, die dem Produkt beiliegt. l Nehmen Sie das Gerät nicht auseinander und versuchen Sie nicht, es selbst zu reparieren.
Eingebauter Akku l Versuchen Sie nicht, den eingebauten Akku zu entfernen. Das Produkt muss entsprechend den örtlich geltenden Umweltgesetzen entsorgt werden. Wenn Sie den Akku ersetzen möchten, wenden Sie sich mit dem Produkt an Ihre regionale SupportNiederlassung. Service-Informationen zum Produkt finden Sie unter www.creative.com. l Das Gerät keiner übermäßigen Hitze wie Sonnenstrahlung, Feuer oder Ähnlichem aussetzen. l VORSICHT: Explosionsgefahr beim Ersetzen des Akkus durch falschen Ersatztyp.
Rechtsvorschriften Einhaltung der europäischen Bestimmungen Dieses Produkt erfüllt die folgenden Bestimmungen: EMC-Richtlinie 2004/108/EG. RoHS-richtlinie 2011/65/EU. Netzbetriebene Produkte für den europäischen Markt erfüllen die Niederspannungsverordnung 2006/95/EG und der Commission Regulation(s) Implementing-Verordnung 2009/125/EG. Drahtlose Kommunikationsgeräte/Funksender und -empfänger für den europäischen Markt erfüllen die R&TTE-Richtlinie 1999/5/EG.
Lizenz- und urheberrechtliche Hinweise Die in diesem Dokument enthaltenen Informationen können ohne vorherige Ankündigung geändert werden und stellen keine Verpflichtung seitens Creative Technology Ltd. dar. Ohne schriftliche Erlaubnis von Creative Technology Ltd. darf kein Teil dieses Handbuches für jegliche Zwecke vervielfältigt oder übertragen werden, unabhängig davon, auf welche Art und Weise oder mit welchen Mitteln (elektronisch oder mechanisch) dies geschieht. © 2014 Creative Technology Ltd.