
Owner's manual


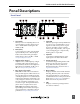


1) USB B Connector
Factory use and keyboard connection
(with adapter).
2) Time code I/O
Time code input and output on 5-pin
LEMO® connector.
3) 10-pin A and C
Each connection includes a pair of
transformer-isolated Outputs and a stereo
unbalanced Return input. Analog Out-
put levels are selected between Line, -10,
and Mic levels in Setup Menu section
OUTPUTS. 10-pin A outputs can be set
to AES Outputs 5,6 and 7,8 in the Setup
Menu section OUTPUTS.
4) Tape Output
Unbalanced stereo, tape level output on
TA3 (Pin 1 = Ground, pin 2 = Left, pin 3 =
Right) and 3.5 mm (Sleeve = Ground, Tip
= Left, Ring = Right) connector.
5) X1 and X2 Outputs
Line, -10, or Mic level selected in the
Setup Menu section OUTPUTS. Pin 1 =
Ground, pin 2 = Hot (+), pin 3 = Cold (-)
float pin 3 to unbalance.
6) TA3 Master Outputs
Line, -10, or Mic level selected in the
Setup Menu section OUTPUTS. Pin 1 =
Ground, pin 2 = Hot (+), pin 3 = Cold (-)
float pin 3 to unbalance.
7) Link I/O
Used to link additional Sound Devices
664, 552, 302, 442, or MixPre mixers.
8) Battery Compartment
Holds five AA (LR6) batteries for backup
powering. NiMH rechargeable cells
advised.
9) DC Input
Accepts DC voltages from 10–18 V for
powering. Pin 1 = Negative (–), pin 4 =
Positive (+). Ext DC is fully isolated (float-
ing) from the rest of the circuitry.
10) XLR-3M Master Outputs
Transformer-balanced analog outputs on
standard 3-pin XLR-3M connectors. Pin
1 = Ground; pin 2 = Hot (+); pin 3 = Cold
(-). Unbalance by grounding pin 3 to pin
1. Can be set to send AES3 digital signals
(1,2 and 3,4 on L and R respectively) in
Setup Menu section OUTPUTS.
11) RTN B Input
Unbalanced stereo 3.5 mm female con-
nector for Return B audio input. Sleeve =
Ground, Tip = Left, Ring = Right.
12) CompactFlash Slot
Accepts approved CompactFlash cards
with the label-side toward the rear of the
664. Compatible with Type I and Type
II cards. High-speed UDMA cards are
recommended for higher track count
recording.
13) SD Card Slot
Accepts SD/SDHC/SDXC cards with
the notched corner oriented toward the
top of the 664. High speed class 10 cards
are recommended. Insert until it clicks
securely in the slot. The card should glide
smoothly into the slot. Press to eject.
Visit www.sounddevices.com/approved for an up-to-date list of tested and approved cards.
664 User Guide and Technical Information
v. 2.02 Features and specifications are subject to change. Visit www.sounddevices.com for the latest documentation.
4
Panel Descriptions