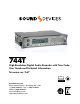
744T High Resolution Digital Audio Recorder with Time Code User Guide and Technical Information firmware rev. 2.67 SATA 2.5" HDD Sound Devices, LLC E7556 State Rd. 23/33 • Reedsburg, WI • USA +1 (608) 524-0625 • fax: +1 (608) 524-0655 Toll-Free: (800) 505-0625 www.sounddevices.com support@sounddevices.
backside - front cover
Table of Contents Quick Start Guide . . . . . . . . . . . . . . . . . . . . . . . . . . . . . . . . . . . 1 Powering the Unit Menu Navigation Basics Connecting Audio Sources Routing Inputs to Tracks Selecting Recording Parameters and File Destination Time Code Setup Recording Playback FireWire File Transfer to Computer Front Panel Descriptions . . . . . . . . . . . . . . . . . . . . . . . . . . . . . 4 Panel Lock LCD Display Descriptions . .
744T User Guide and Technical Information Welcome Thank you for purchasing the 744T. The ultra-compact 744T records and plays back audio to and from its internal hard drive, CompactFlash, or external drives, making field recording simple and fast. It writes and reads uncompressed PCM audio at 16 or 24 bits with sampling rates between 32 kHz and 192 kHz. It also writes and reads data compressed FLAC and audio compressed MP2 and MP3 files.
Copyright Notice and Release All rights reserved. No part of this publication may be reproduced, stored in a retrieval system, or transmitted in any form or by any means, electronic, mechanical, photocopying, recording, or otherwise, without the expressed written permission of SOUND DEVICES, LLC. SOUND DEVICES is not responsible for any use of this information. Microsoft Windows is registered trademarks of Microsoft Corporation. Macintosh is a registered trademark of Apple Computer.
Quick Start Guide The 744T is an extremely powerful and flexible portable audio recorder. Before recording, please familiarize yourself with the product. Several settings should be verified or set based on individual recording needs. Powering the Unit 1. Apply power to the unit by attaching the (included) removable, rechargeable Li-ion (lithium ion) battery to the back panel battery mount. The metal tabs on the mount line up with the electrical contacts on the battery.
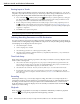
744T User Guide and Technical Information Routing Inputs to Tracks Before recording, inputs must be assigned to tracks. Each of the 744T’s four inputs (1, 2, 3, 4) can be assigned to any of the four tracks (A, B, C, D). These 256 possible routing combinations are shown on the front panel with 16 blue LEDs. Illuminated LEDs indicate input-to-track assignment. 1. Press and hold the STOP key then press the INPUT key to cycle through factory routing presets.
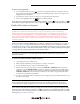
To select a file for playback: 1. Press and hold the File Viewer key to select a drive and folder (directory) for playback. The last file recorded is the default file ready for playback. The default playback source is the storage volume highlighted on the LCD display. 2. Use the Rotary Switch, or the arrow soft-keys, to navigate through the File Viewer. 3. Once a file is highlighted, press the play key to begin playback. When playback has finished, the filename will begin flashing.
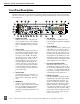
744T User Guide and Technical Information Front Panel Descriptions All 744T settings can be accessed and monitored through the front panel LCD and navigation keys. This allows the unit to be placed in a production bag along with field mixers and wireless transmitters and receivers. 1 2 3 4 5 6 7 8 9 10 11 12 29 744T 28 27 26 25 24 1) 2) 3) 4) 4 v. 2.67 23 22 21 20 19 18 17 Digital Input LEDs Indicates the presence of digital signal on the respective input.
9) 10) 11) 12) 13) 14) 15) Level Meter LEDs Four, 19-segment track level-meters indicate level in dBFS. Metering ballistics are selected in the setup menu. 16) Fast-Forward Key 17) Play Key Power Key Press and hold to power up the 744T. Press and hold to power down. Charge LED Indicates the charge status of the onboard battery charger. LED flashes when external power is connected and the removable battery is charging; illuminates solid when battery is fully charged.
744T User Guide and Technical Information 22) 23) 24) 25) Link LED Indicates that channels 1 and 2 are linked as a stereo pair. In link mode input 1 potentiometer controls gain, input 2 potentiometer controls left-to-right balance. Inputs can be linked as either a stereo L/R pair or as a a Mid-Side (MS) pair.
LCD Display Descriptions 1 2 3 4 5 12 6 11 10 1) Battery Level Indicator 2) File Name Display 3) Shows voltage level of the removable battery or external power sources. External power overrides battery power when present. Graphical bar for relative level and numeric indicator for precise voltage measurement. Shows file name actively being recorded or played back.
744T User Guide and Technical Information 1 2 3 4 5 12 6 11 10 9 8 7 14 13 11) Internal Hard Drive Status (space remaining/record ready) note the white-on-black number option to indicate recording (menu-selectable) 13) Input 1/2 Level 14) Cue Marker Display 15) External Digital Clock Indicator Bar graph indicates amount of record time remaining on the internal hard drive.
Left Panel Connectors and Controls 3 1 4 2 5 8 6 7 1) XLR Input 1/AES3 Input 1&2 5) TA3 Master (L/R) Analog Outputs 2) XLR Input 2/AES3 Input 3&4 6) Headphone Output 3) Mic-Line-AES3 Input Switch 4) Dual function input connection. Input type set with switch above. Active-balanced analog microphone- or line-level input for input 1. Transformer-balanced two-channel AES3 input (1 and 2). Dual function input connection. Input type set with switch above.
744T 744T User Guide and Technical Information Right Panel Connectors and Controls 1 2 9 1) 2) 3) 4) 5) 10 v. 2.67 8 Time Code Multi-Pin Time code input and output on 5-pin LEMO® connector. 3 4 7 6 6) Word Clock Input and Out 7) AES3id Output Bus 2 8) AES3id Master Output Bus AES3id Inputs 1/2 and 3/4 Unbalanced digital input accepts two channel AES3 (or S/PDIF) on BNC connectors. Supports sample rates up to 200 kHz.
Back Panel Descriptions 1 1) 2) 2 Security Slot Compatible with the Kensington® Security Slot specification. Useful for securing the recorder to a fixed object with a compatible computer lock. CompactFlash Slot Accepts CompactFlash medium with the label-side up. Compatible with Type I, Type II, and MicroDrives. 3 3) 4) 4 Battery Mount Accepts Sony® InfoLithium L- or MSeries batteries. Also accepts batteries conforming to this mount. Numerous capacities, from 1500 mAh to 7000 mAh are available.
744T User Guide and Technical Information Input Setup and Control The 744T has four inputs and four record tracks. Inputs can be analog or digital sources. Analog inputs 1 and 2 use XLR connectors; inputs 3 and 4 use TA3 connections. Digital inputs can be either AES3 (balanced at the XLR) or AES3id (on BNC) inputs. One analog pair and one digital pair can be used simultaneously. Input Source Selection Input sources are selected in pairs, 1, 2 and 3, 4.
Shortcut: To toggle phantom power without entering the menus, press and hold the tone key then press the menu key for channel 1. Channel 2 phantom can be toggled by pressing the tone key then pressing the HDD key. If the inputs are in line level mode, phantom power will not activate from the shortcut keys and must be activated from the menus. Phantom power is linked when the inputs are linked.
744T User Guide and Technical Information Input Linking (Stereo or MS Decoding) Analog inputs 1 and 2 can be linked as a stereo pair. When linked, the channel 1 front panel potentiometer controls the signal level of both inputs, and the channel 2 pot controls the left-to-right balance of the pair. When the inputs are linked, their peak limiters are linked, as well.
Digital Inputs – AES3id (S/PDIF) The 744T accepts AES3id and S/PDIF unbalanced digital signals at the BNC connectors. The 744T will auto detect the type of digital signal and adjust accordingly. Input signals are in pairs, signals on BNC 1 appear at inputs 1 and 2, signals on BNC 2 appear at inputs 3 and 4. AES3id inputs override analog signals present at the XLR inputs.
744T User Guide and Technical Information Input-to-Track Routing The 744T uses a flexible routing scheme to assign inputs and tracks for recording. The input matrix allows any input to be routed to any recording track. Multiple inputs can be routed to a single track to create mono-mixed recordings. The 4-by-4 blue LED matrix makes it easy to view the set routing. A solid blue LED indicates an input is assigned to a record track.
6. To remove an input-to-track combination assignment, navigate that combination and press the UNASSIGN soft key or Rotary Switch. 7. Exit and complete the assignment by pressing the check mark soft key. The input routing menu will always exit to the main screen whether entered from the input key or the menu selection. Selective Input Muting When the INPUT key is pressed, individual input muting is available.
744T User Guide and Technical Information Relationship Between Sampling Frequency and Audio Bandwidth The sampling frequency is expressed in samples per second (in hertz) and defines the number of times in a second that the analog audio signal has been measured. Sampling frequency determines the audio bandwidth, or frequency response, that can be represented by the digital signal.
Word Clock A stable word clock source is essential for high quality digital audio. The 744T uses a rock-stable time code crystal to generate its internal word clock frequencies. The 744T can clock external devices from its word clock and accept and lock to external clock sources for recording. The 744T disregards external clock, both AES and word clock, during playback. Clock Master When sending digital audio to several devices, one unit is designated as the word clock master and the others as slaves.
744T User Guide and Technical Information master unit slave unit slave unit To link units: 1. Connect multiple units as shown in the illustration above. 2. Set all linked recorders to the same sampling rate, bit depth, file format, and time code frame rate (if used). This will ensure that all files generated are compatible. 3. If time code is being used, set slave units to External time code mode so that they will follow the master recorder’s time code generator. 4.
Available Output Sources Input 1 Input 2 Input 3 Input 4 Description Inputs are assignable for each channel of the output bus. When inputs are selected as the source for the outputs, the state of recording or playback activity has no effect on the output signal. This allow uninterrupted audio at the outputs. Track A Track B Track C Track D Input 1,2 Input 3,4 Input 1,3 Input 2,4 Input 1,2,3 Input 2,3,4 Input 1,2,3,4 Multiple inputs are summed with these selections.
744T User Guide and Technical Information Digital AES3id Output 2 Output Bus 2 appears solely on the AES3id BNC output connector. There is no analog output connections for Output Bus 2. The unbalanced AES3id output is directly compatible with most S/PDIF inputs. The maximum output level is 0 dBFS and can be attenuated in the setup menu in 1 dB increments by 40 dB. Headphone Output The 744T headphone output is a flexible tool for monitoring audio in the field.
HP Sources Description Input 1, 1 Input 2, 2 Input 3, 3 Input 4, 4 Solo monitoring of selected input. This signal is sent to both sides of the headphones. Track A, A Track B, B Track C, C Track D, D Solo monitoring of selected track. This signal is sent to both sides of the headphones. Upon playback, will play as track monitor. Monitor A, A Monitor B, B Monitor C, C Monitor D, D Solo monitoring of playback (post-record) track. Highlighted media is source of monitor program.
744T User Guide and Technical Information If you press (done) in the first headphone slot, the 744T will select a single option (Tracks A, B) for headphone monitoring. The 10 factory presets will be erased. MS Stereo Monitoring The MS stereo mode decodes discrete Mid-Side stereo signals to a left/right stereo signal for monitoring purposes. This allows for a proper stereo signal to be monitored in the field while discrete M and S signals are recorded for later post production.
Rotary Switch Behavior The action of the Rotary Switch during recording and playback is set from among the three available options: • Disabled: pushing the Rotary Switch has no effect. • Selects Favorite Mode: places the headphone source into the mode selected in the HP Favorite menu. • Headphones to C/D meters: shows the level of the headphone output on the C/D track meters.
744T User Guide and Technical Information Metering and Display The 744T features a 76 LED (4 x 19) output meter. The DSP-controlled output meter provides a selection of ballistics and lighting intensities. In addition, separate peak indicators on input channels show clipping activity. Output Meter 0 dBFS track LEDs are programmable as peak LEDs (0 dBFS to -20 dBFS) The meter uses energy efficient LEDs which are viewable in full sunlight.
Peak/VU The meter can simultaneously display VU and Peak level information. In this mode the perceived loudness (VU) is displayed on a bar graph, and the Peak signal on a dot above the VU. With this combination the user gets the best of both VU and Peak metering by seeing both the “loudness” of the signal and the peaks at the same time. Peak/VU is the factory default. Peak Hold/VU Similar to VU/Peak mode, this mode holds the peak level indication for several seconds before releasing.
744T User Guide and Technical Information signal. Changes to tone oscillator settings made while tone is latched on do not take affect until tone is turned off. To record tone at the head of a take, activate the tone signal then press the REC key. From the factory, subsequent presses of the TONE key are locked out to prevent tone from being inadvertently recorded. Tone can be activated while recording by following these steps. 1. Enter the Setup Menu option FILE: MARKER MODE and set it to disabled. 2.
Time Code The 744T uses time code circuitry developed by Ambient Recording GmbH, a leading developer of stable, portable time code products (visit Ambient on the web at www.ambientaudio.com). Clock stability and continuity are critical aspects of the 744T time code implementation. Its temperaturecontrolled (compensated) crystal oscillator ensures rock solid TC stability and accuracy (< 0.2 ppm when tuned with an Ambient Master Controller).
744T User Guide and Technical Information F Sampling Rate Modes 48.048k and 48.048kF The 48.048kF mode (F stands for fake, faux, Fostex—take your pick) is a specific compatibility mode for use with the Fostex DV40 software (1.74 and previous), Avid, Final Cut Pro, and other post-production environments that do not recognize audio files written at 48.048 kHz. In this mode files are recorded at a 48.048 kHz sampling rate but are stamped at 48 kHz. When played, they will play back 0.1% slower than real time.
Record Run The time code generator runs only when the 744T is recording. Time code in this mode defaults to 00:00:00:00 at power-up. When switching to record run from another mode, the internal generator will stop at the last number generated. A user-defined value can be jammed into the internal generator from the jam menu. Free Run Jam Once The onboard time code generator will re-jam from external time code whenever a valid, running time code signal is connected to the TC input.
744T User Guide and Technical Information To use the Time Code Hold Off feature: 1. Access the Setup Menu option TIMECODE: HOLD OFF. 2. Set a value between 0 and 8 seconds in .1 second increments using the soft Up and Down Arrow (Menu and HDD) keys or the Multi Function Rotary Switch. 2.0 seconds is the factory default. 3. Save the selected value by pressing the soft Check Mark (Tone) key or by pressing in on the Multi Function Rotary Switch. 4.
744T is jammed to the external time code, the external and internal numbers will match and run in sync. no valid time code is received Make certain that the external time code source appears in the time code jam menu. If the 744T does not receive valid time code from the sending source the jam menu displays lines in place of numbers. Identical to the Ambient Recording series of time code products, the 744T time code generator can “cross jam” differing frame rates.
744T User Guide and Technical Information NTSC Standard Def Video Production NTSC video uses a frame rate of 29.97 frames per second. Unfortunately, that leaves 108 frames per hour unaccounted. To keep 29.97 time code in sync with “clock” time, the concept of “drop frame” was devised. Two frames are dropped at the top of each minute not divisible by 10. 54 drops per hour x 2 frames = 108 frames per hour.
Recording integrity is further enhanced through a process of periodic, automatic file directory and header updates written to disk during recording. This ensures file integrity in the unlikely event of a total loss of power. The auto save feature does not apply to MP3 or FLAC recordings. If power is lost while recording to these formats the recordings maybe invalid. While recording, the power, ff, rew, input, tone, and drive keys are disabled. Stop recording by pressing and holding the STOP key.
744T User Guide and Technical Information 1. Access the Setup Menu option REC: Record Pause and select Enabled. The Record Pause feature does not support time code. If the Record Pause Enabled setting is crossed out, time code is active and must be turned off before Record Pause is available. Navigate to the Setup Menu Option TIMECODE: MODE and set it to Off. 2. Press the REC key to begin recording. 3. Pause the recording at any time by pressing the STOP key once.
tories. Navigate to the appropriate directory. Select the file that to play back with the Rotary Switch and press play. If the stop key is pressed while playing files from an alternate directory, the 744T will revert to the current daily directory. AutoPlay The 744T can be set to play back all valid audio files in a directory. Files will play back in their order in the directory.
744T User Guide and Technical Information .FLAC Free Lossless Audio Codec is a lossless data compression algorithm specifically designed for audio. It is a convenient way to extend recording time with no effect on audio quality. It is suitable for recording and archiving. FLAC, in particular, offers data compression rates that range anywhere between 30% and 60%, depending on the audio program. Sound Devices Wave Agent Classic (www. waveagent.
The chart below indicates the limitations of all file types available on the 744T. File Format Bit Depth (bits) Sampling Rate - kHz Maximum Number of Tracks File Extension MultiMedium Recording PCM 16 or 24 FLAC 16 or 24 32 to 192 4 .WAV yes 32 to 48 4 .FLAC no FLAC MP2 (mono) 16 or 24 32 – 96 2 .FLAC no 16 32, 44.1,, 48 (64, 96, 128, 160, 192) 1 .MP2 no MP2 (stereo) 16 32, 44.1, 48 (64, 96, 128, 160, 192, 256, 320, 384) * 2 .MP2 no MP3 (mono) 16 32, 44.
744T User Guide and Technical Information • data rate - calculated from the sampling rate and bit depth for non-compressed audio and by bit rate for data compressed audio. Data rate determines how big the data “container” is for the audio signal (see the calculation below for determining PCM audio). • storage capacity - typically expressed in GB Uncompressed Recording Time in Track-Hours Data Rate (bit depth/sampling rate), one track (1000 MB = 1 GB) Storage in GB 1 16/44.1 (5.05 MB/min) 16/48 (5.
MP3 Compressed Record Time in Hours (1000 MB = 1 GB) Storage in GB MP3 Data Rate (bit depth/sampling rate), stereo track 32 kb/s 64 kb/s 96 kb/s 128 kb/s 160 kb/s 192 kb/s 256 kb/s 320 kb/s (0.2 MB/min) (0.47 MB/min) (0.70 MB/min) (0.94 MB/min) (1.17 MB/min) (1.40 MB/min) (1.86 MB/min) (2.34 MB/min) 1 72.8 36.4 24.2 18.2 14.5 12.1 9.1 7.2 2 145.6 72.8 48.5 36.4 29.1 24.2 18.2 14.5 4 291.2 145.6 97 72.8 58.2 48.5 36.4 29.1 8 582.5 291.2 194.1 145.6 116.
744T User Guide and Technical Information Scene names are made with alphanumeric characters, including “_ ” and “-” and can be any length between zero (0) and nine (9) characters in length. Scene numbers are helpful to match audio with the corresponding scene in a production. Scene names can also be used to identify other items, including recording date, artist name, or any other descriptor as required. Scene names are user-selected from the setup menu and do not change until changed by the user.
• • • • Never – take numbers do not reset When scene is changed – take resets when scene name is changed When daily folder is changed – takes reset on new day Either scene or daily– takes reset on either change Mono Track Name Designators When recording monophonic Broadcast WAV files each track is recorded in a separate data file. To identify each track, each file is identified by an underscore and track number suffix. The file of the first track recorded has “_1” appended to it.
744T User Guide and Technical Information • • • • • • Generating customized PDF and CSV Sound Reports Large time code display Monitor mixer with faders, pans, solos, mutes, and meters Drag-and-drop operation Comprehensive keyboard shortcuts for accelerated operation Mac OS and Windows compatible Wave Agent is available as a no-charge software download for either Mac OS or Windows. http://www.sounddevices.com/download/waveagent.
A hierarchical view of files generated by the 744T is below. 744T 1 1 1 1 The FALSETAKES, SOUNDDEV, and TRASH folders are automatically generated. SOUNDDEV is not viewable from the 744T File Viewer. FALSETAKES SOUNDDEV A TOP-LEVEL folder sits in the root directory. This folder can be negated by choosing in the menu File: Folder Options. TRASH TOP-LEVEL 1 A MID-LEVEL folder can be used as a sub-folder. This folder can be selected to be a folder in the menu File: Folder Options.
744T User Guide and Technical Information File types not recognized do not show up in the file viewer, although all folders are viewable. File detail is shown at the right side of the display. The center divider points to the file selected for information viewing.
medium. There is also a selection of sizes to ensure that files recorded will fit onto common CompactFlash card capacities. Setting/Clearing Flag Bits Pressing the tone key in the File Viewer display opens the “SET OR CLEAR FLAG BIT” screen. The options for setting or clearing flag bits include: set or clear the selected file, set or clear all the files in the current folder, or set or clear all files on the volume. All files created by the 744T have their archive bit set to on.
744T User Guide and Technical Information “trash” folder to temporarily hold files which have been deleted. To send a file to the trash, perform the following: 1. Press the HDD button to enter the File Viewer. 2. Navigate to the file to be deleted. 3. Press the soft key marked OPTIONS. 4. Select DELETE. 5. You will be prompted to verify file deletion. The file has now been moved to the trash folder and will no longer appear in the file listing. It will, however, appear in the trash folder.
Take Number Incrementing To advance to a higher take number hold the STOP button and press FastForward. The file name to be recorded is indicated above the file time. Indicates active take Indicates next upcoming take Take List The take list shows a sequential listing of the last 200 recorded files, without regard to what folder they have been recorded in. The first file in the list, marked with an * indicates the file name of the next recorded take.
744T User Guide and Technical Information To quickly identify the last recorded take as Circled or as No Good, perform the following steps: 1. Press the STOP key to end recording. 2. Press and hold the STOP key down, then press the LCD Backlight key to enter the Take Status Menu. 3. Press the soft Circle (Menu) key to mark the take as Circled or press the soft No Good (HDD) key to mark the take as No Good.
For best operation periodic re-formatting of the 744T hard drive is recommended. Formatting the hard drive rebuilds the FAT (file allocation table) and erases all audio and data files present on the medium. Formatting the drive prevents fragmentation and reduces the likelihood of directory corruption. Be certain that all files on the 744T drive have been backed up to another media before formatting. Once formatted, all data on the drive will be erased.
744T User Guide and Technical Information The hard drive is mounted to the bottom-side of the recorder’s chassis and is screwdriver accessible. The drive is “suspended” in the unit with a shock absorbing foam and is attached to the main circuit board via a “flex board”. Since the unit’s high-density circuitry and tight construction require specific electronics knowledge, Sound Devices strongly recommends drive replacement be performed by a qualified technician using proper ESD precautions.
which will, in turn, stop the hard disk from rotating. Condensation tends to occur when the temperature inside the drive suddenly falls, for example, just after the unit is moved to a new location, or after operation is stopped in a cold environment. Sudden changes in temperature or air pressure can cause disk surface material to evaporate, which can also cause the head to adhere to the disk surface. This can happen when a hard disk drive is left unused for a long period of time.
744T User Guide and Technical Information Few CF cards can sustain write speeds for reliable 192 kHz recording. Sound Devices strongly recommends against recording to CompactFlash if 192 kHz sampling rates are required. Qualified CF Cards Sound Devices does not specifically “qualify” CompactFlash cards for use in the recorder. From our tests of numerous cards—including medium from Lexar Media, SanDisk, and Kingston Technology—cards in capacities from 128 MB and above will successfully operate in the 744T.
After recording to an external drive has stopped, it may take several seconds for the 744T to finish “housekeeping” on drive. This is especially true when recording to DVD-RAM disks, which generally have slower throughput than hard drives. When preparing to disconnect a FireWire drive, always observe the amber activity LED labeled EXT. If it is lit, wait until it is off before disconnecting the drive.
744T User Guide and Technical Information File Transfer Using FireWire FireWire port FireWire cable - 744T to computer The 744T’s FireWire (IEEE-1394) port makes transfering of recorded files to a computer quick and easy. When connected to a computer, the internal hard drive and CompactFlash card of the 744T will mount to a Mac OS X or Windows computer as a local, removable mass storage volume.
To disconnect the 744T from FireWire: 1. Make certain that any software applications that reference the 744T drive are closed and that all file copy functions to and from the 744T have completed. 2. In Mac OS X highlight the drive icon on the desktop and select drag the drive icon to the trash in the dock. 2. In Windows, right-click the drive icon and select “eject.” 3. The cable between the computer and 744T can now be disconnected.
744T User Guide and Technical Information External DC Input Wiring Operation pin-2 to negative (–) pin-3 to positive (+) operates the on-board Li-ion charger when the unit is both turned on and off. Use when plugged into AC power pin-1 to negative (–) pin-4 to positive (+) operates the on-board Li-ion charger only when the unit is turned on—there is no external current draw when powered off.
• Power on unit – unit will turn on and be ready for operation. • Power on and begin recording – unit will power on and begin recording with the settings used when previously powered down. • Power on, power off unit – external DC functions as the on/off switch. • Power on and begin recording, power off – unit will power and begin recording, then turn off when power is removed. These functions are useful when the unit is part of a production kit powered by a single power source.
744T User Guide and Technical Information Firmware Upgrades The 744T uses upgradable EEPROM (electrically erasable programmable read-only memory) to hold the unit’s operating system software, or firmware. Firmware is the source code which controls all aspects of the device, including: menu options, signal routing, signal processing, LED’s, button and switches, and data ports.
Firmware upgrades usually preserve all user menu settings. However, save a snapshot of the settings to a setup file on the hard drive or CF. Once a firmware upgrade is complete, restore settings from this file, if necessary. Some firmware updates may make changes to user setups; verify all user setups after an upgrade.
744T User Guide and Technical Information Page Down Setup User Interface Menu - Moves to the next category or marker Shortcut Edit User Interface Menu – Same as Enter Menu Enters the Setup Menu Home Setup User Interface Menu - Moves to the top of the list. File User Interface – Moves to the top of the list Shortcut Edit User Interface – Goes to first shortcut number or Hot Key String User Interface – Goes to the beginning of the string End Setup User Interface Menu - Moves to the bottom of the list.
1. Enter the External Keyboard Assignment Setup Menu selection. Shortcut number. Up to 50 shortcuts can be programmed 2. Select an unassigned shortcut number for programming. If a duplicate key sequence is selected the lowest shortcut number action takes place. The example below shows the F1 key being reprogrammed. 3. After selecting a key sequence select the desired Setup Menu item or action. The example below shows the reprogramming of the F1 key to change the sampling rate to 48048.
744T User Guide and Technical Information The Logic pins on the CL-1 can be set individually as either a switch-closure input or a switch closure output. The inputs and outputs are “logic low” devices, meaning that to turn “on” an input, it must be connected to ground (zero volts). Likewise, when an output is “on”, it puts out 0 volts and when it is “off”, it puts out +5 volts. Logic Inputs Configured as a switch-closure input, a pin can be connected to a switch that a user has wired to assigned contact.
Factory Preset 744T Presets Film Preset Reporter Preset Music Preset Rec: Track Names Track A: Track A Track B: Track B Track C: Track C Track D: Track D Track A: Track A Track B: Track B Track C: Track C Track D: Track D Track A: Track A Track B: Track B Track C: Track C Track D: Track D Track A: Track A Track B: Track B Track C: Track C Track D: Track D Rec: Take Name/Number T 01 T 01 T 01 T 01 Rec: Take Reset Mode When Scene is changed When Scene is changed When Scene is changed When S
744T User Guide and Technical Information Factory Preset 744T Presets Film Preset Reporter Preset Music Preset Output2 L,R: Attenuation 0 dB 0 dB 0 dB 0 dB Digital Output: Mode Consumer Consumer Consumer Consumer Play: AutoPlay Mode Play All Play All Play All Play All Time/Date: 12/24 Hr 12 Hr 12 Hr 12 Hr 12 Hr Time/Date: Date Format MM/DD/YY MM/DD/YY MM/DD/YY MM/DD/YY LCD: Contrast 50% 50% 50% 50% LCD: Gain Display Bit Depth, SR & Gain Bit Depth, SR & Gain Bit Depth,
Setup Menu The Setup Menu controls a wide range of parameters for the 744T, including all audio routing, recording settings, and time code options. The setup menu is a single, flat architecture with no submenus, easing navigation. Each setup controls a specific parameter with several selections. The chart below shows the setup number, a description of the control, and the menu options available.
4T User Guide and Technical Information # Setup Name Setup Description Setup Options 8 Rec: Track Names Used to identify a track name which shows up in iXML and BWF metadata 9 Rec: Take Name/Number Numeric, auto-incrementing number used for take identification. 10 Rec: Take Reset Mode Defines when take numbers are reset. Reset brings take number to <1>.
# Setup Name Setup Description Setup Options 27 28 Input 1, 2: Source Input 3, 4: Source Forces the inputs to analog or digital mode. Default is auto-select. • Auto-select • Analog • Digital (S/PDIF/AES) • Disabled (Power Save) 29 Input 1,2: Linking, MS Selects whether the input 1 & 2 levels are controlled independently or grouped as a pair with or without mid-side decoding.
744T User Guide and Technical Information # Setup Name 46 Time Code: Frame Rate Setup Description Sets the time code frame rate. All common time code frame rates are available. Setup Options • 23.976 – used with high definition video cameras • 24 – to sync audio to film where no transfer to NTSC video is expected • 25 – to sync sound to PAL video • 29.97 – to sync sound to NTSC video shot in nondrop frame mode • 29.
# 50 Setup Name Time Code: Jam Menu Setup Description Allows the user to jam or edit the internal time code generator and user bits. (Also accessible by pressing HDD and Menu keys simultaneously).
744T User Guide and Technical Information # Setup Name Setup Description Setup Options 64 LCD: Gain Display Sets the Main LCD Display to show the gain values of inputs 1 and 2 always or to show Bit Depth and Sample Rate and Gain of input 1 and 2 only when attenuated. • Bit Depth, SR & Gain • Gain Only 65 LCD: Scrolling Direction Defines the direction in which the Multi-Function Rotary Switch will navigate throughout the 744T.
# Setup Name Setup Description Setup Options 76 Tone: Frequency Allows the user to set the frequency of the reference tone oscillator 100–10,000 Hz in 10 Hz steps 77 Tone: Mode Select the destination of the reference tone or to disables it completely • disabled • to record tracks only • to outputs only • to record tracks and outputs 78 Tone: Record Lock Sets the Tone key to be either available or locked while in Record Mode.
744T User Guide and Technical Information # Setup Name Setup Description 92 Power: Power-up Messages Enables or disables the notifications that appear upon boot up (daily folder prompt, output attenuation notice, and set time and date message). Disabling these messages is useful when using the External Power Functions to power on and start recording.
Front Panel Button Shortcuts To speed navigation the 7-Series has numerous navigation “shortcuts”. For combinations, hold down the first identified key and continue to hold while pressing the next keys. Function Key Sequence Record Tone + Jam Menu Button Lock Menu and HDD Enters the time code jam menu. (702T &744T Only) + Backlight and Tone Press backlight then tone to lock all front panel buttons except for Record, Stop and Play. FF and Rew are available in playback mode.
744T User Guide and Technical Information Connector Pin Assignments Each connector type, electrical characteristics, and pin assignment is shown below. 76 Connector Pin Assignments Notes XLR (Analog Inputs) 1 – ground 2 – signal (+) 3 – signal (-) 7.
Specifications System Sampling Frequency internal: 32, 44.1, 47.952, 48, 48.048, 88.2, 96, 96.096, 176.4, 192 kHz external clocking: 32–192 kHz via word clock input Internal Data Path and Processing 32 bit, 192 dB dynamic range A/D, D/A Converters 24 bit, 192 kHz sampling rate maximum.
744T User Guide and Technical Information Output Analog Line Output Clipping Level +20 dBu minimum, 10k ohm load Attenuation & Resolution 0–40 dB, 1 dB increments Output Topology Line: fully electronically-balanced, RF, ESD, short, and overload protected; pin-2 driven hot, pin-3 driven cold; let pin-3 float for unbalanced connections. Inputs/Outputs – Digital AES3-id 75 ohm, 0.5 V p-p, S/PDIF compatible with RCA adapter Digital Storage Internal hard drive SATA interface 2.
Other LCD Display 202 x 32 pixels, extended temperature, backlit display Tone Oscillator 100 Hz–10 kHz, variable output, assigned to tracks or outputs (menu-selectable) Quick Setups four factory presets, one user setup stored to CF or HD as data file Dimensions and Weight Size 45 mm x 209 mm x 125 mm (H x W x D) 1.8” x 8.2” x 4.9” Mass unpackaged: 1.2 kg, (2.
744T User Guide and Technical Information 80 XL-2 TA3F to XLR-M cable, used to connect analog outputs to third-party devices with XLR-F inputs, 25-inch; package of two. XL-2F XLR-F to TA3F cable, used to connect microphones, mixers, and other devices with XLR-M outputs to the 744T analog inputs 3 and 4, 25-inch; package of two. XL-4 Bag of four (4) TA3-F-type connectors. XL-14 3.5 mm right-angle TRS to 1/4-inch female TRS headphone extension, 12inch.
CE Declaration of Conformity According to ISO/IEC Guide 22 Sound Devices, LLC 300 Wengel Drive Reedsburg, WI 53959 USA declares that the product, 744T Professional Digital Audio Recorder is in conformity with and passes: 89/336/EEC EMC Directive EN55103-1, 1997 EMC-product family standard for audio, video, audiovisual and entertainment lighting control apparatus for professional use.
744T User Guide and Technical Information Software License End-user license agreement for Sound Devices 7-Series Embedded Software / Firmware Important Read carefully: This Sound Devices, LLC end-user license agreement (“EULA”) is a legal agreement between you (either an individual or a single entity) and Sound Devices, LLC for the Sound Devices, LLC software product identified above, which includes computer software, embedded software, and may include associated media, printed materials, and “online” or e
Warranty and Technical Support Warranty & Service Sound Devices, LLC warrants the 744T Recorder against defects in materials and workmanship for a period of TWO (2) years from date of original retail purchase. This is a non-transferable warranty that extends only to the original purchaser. Sound Devices, LLC will repair or replace the product at its discretion at no charge. Warranty claims due to severe service conditions will be addressed on an individual basis.
744T rev. 2.67 - Printed in U.S.A.