970 Rack Mount Production Audio Recorder User Guide Firmware rev. 2.10 E7556 State Rd. 23 and 33, Reedsburg, WI, USA +1 (608) 524-0625 • Toll-Free: (800) 505-0625 • fax: +1 (608) 524-0655 www.sounddevices.com support@sounddevices.
970 User Guide Table of Contents Introduction 1 Manual Conventions . . . . . . . . . . . . . . . . . . . . . . . . . . . . . 1 Panel Descriptions PIX-CADDY 2 and PIX-CADDY CF (Optional). . . . . . . . . . 5 Menu and Navigation Main View. . . . . . . . . . . . . . . . . . . . . . . . . . . . . . . . . . . . . . 6 LCD. . . . . . . . . . . . . . . . . . . . . . . . . . . . . . . . . . . . . . .
970 User Guide Network Grouping 29 Grouped Settings . . . . . . . . . . . . . . . . . . . . . . . . . . . . . . . 29 Pushing Settings to Group. . . . . . . . . . . . . . . . . . . . . . . . 29 Group Auto-Configuration. . . . . . . . . . . . . . . . . . . . . . . 30 Grouped Transport. . . . . . . . . . . . . . . . . . . . . . . . . . . . . . 30 External Control 31 RS422 . . . . . . . . . .
970 User Guide Copyright Notice and Release All rights reserved. No part of this publication may be reproduced, stored in a retrieval system, or transmitted in any form or by any means, electronic, mechanical, photocopying, recording, or otherwise, without the expressed written permission of SOUND DEVICES, LLC. SOUND DEVICES is not responsible for any use of this information. Microsoft Windows is a registered trademark of Microsoft Corporation.
970 User Guide Introduction The Sound Devices 970 is rack-mountable, 64 track audio recorder. The 970 records up to 64 channels of monophonic or polyphonic, 24-bit WAV files from any of its 144 audio inputs. Connections include 64 channels of Ethernet-based Dante, 64 channels of optical and coaxial MADI, eight channels of line-level analog, and eight channels of AES digital. Any input can be assigned to any track. The recorder also supports 32-track recording at 88.2 kHz and 96 kHz.
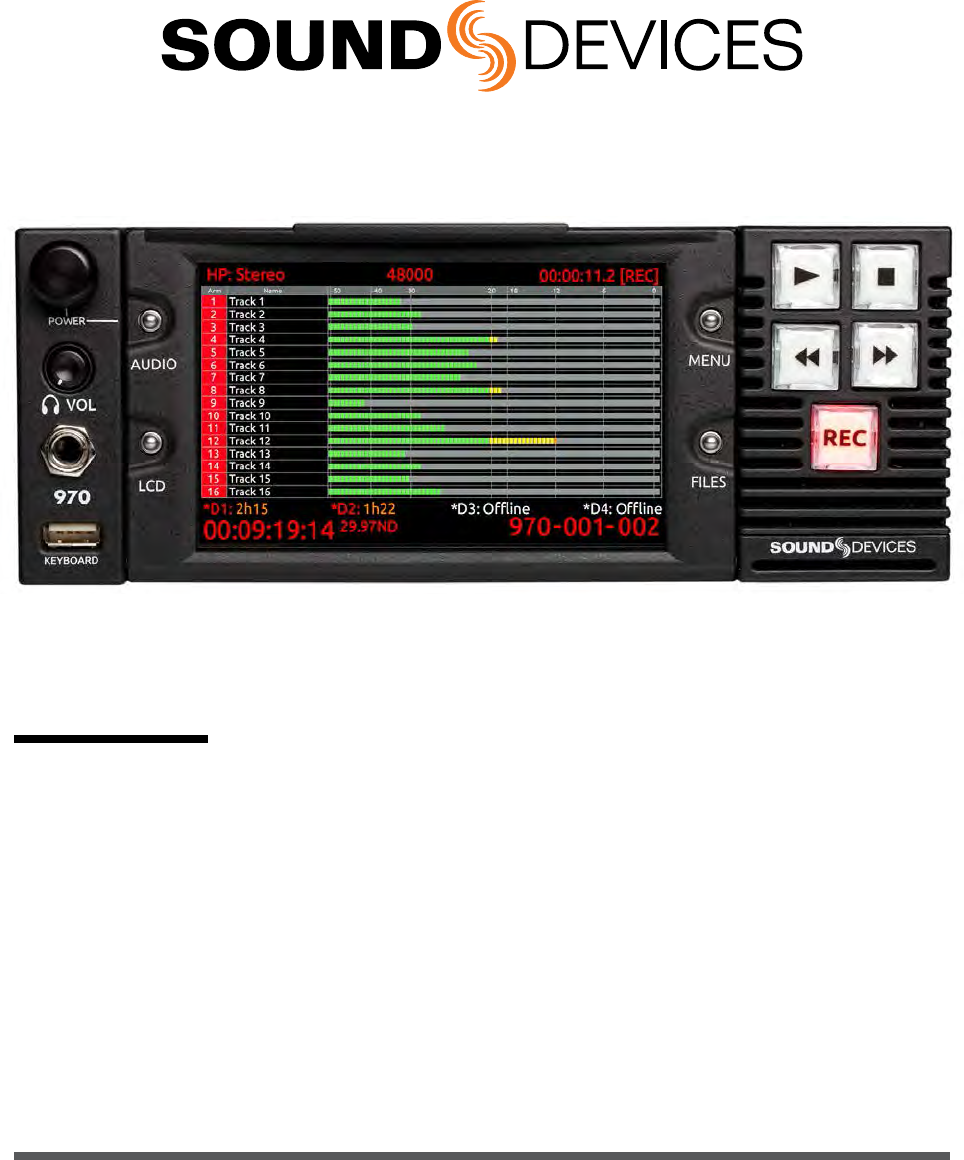
970 User Guide Panel Descriptions Front Panel Panel Descriptions 1 2 15 14 3 4 5 13 1) Control knob The Control knob can be both turned and pressed. Use the Control knob to navigate between menu settings and to select menu items. Pressing during playback or stop will toggle to Shuttle mode. Turning while playback is paused will jog forward or backward by single frames. 2) AUDIO Button When pressed from the Main View, toggles expanded meters.
70 User Guide 10) Fast Forward button When Stopped, press to cue up the next file for Playback. During Playback or Pause, press once to jump to the next Cue Marker or next file, press and hold to increase playback speed. Continue to hold for faster speeds. 13) Headphone Volume Knob Adjusts the overall volume of the headphones. NOTE: the headphone output is capable of ear-damaging levels. Take care when adjusting among signal sources. 14) Headphone Output 1/4” TRS stereo headphone connector.
970 User Guide 4) MADI I/O (BNC) Input (top) accepts MADI (AES10) digital audio. Output (bottom) provides MADI (AES10) digital audio. 64 channels. 5) Timecode I/O (BNC) Input (top) accepts SMPTE timecode. Output (bottom) provides SMPTE timecode. 6) SYNC I/O (BNC) Wordclock input (top) and output (bottom). 7) AES3 I/O (DB-25) 8 channels of AES digital audio input and 8 channels of AES digital output.
970 User Guide PIX-CADDY 2 and PIX-CADDY CF (Optional) The PIX-CADDY 2 is an accessory to connect approved 2.5” drives to the front-panel drive bays. The PIX-CADDY CF is an accessory to connect approved CompactFlash cards to the front-panel drive bays (Supports poly WAV File Format only). When removed from a 970, the PIX-CADDY 2 operates as a high-speed drive interface to Mac OS and Windows computers via the onboard FireWire800, USB 3.0, or the optional PIX-DOCK Thunderbolt interface.
970 User Guide Menu and Navigation Main View The Main View displays all audio input levels and provides configuration of Track Arming, Track Naming, Input Source selection, Input Gain, and Input Delay. The Main View by default displays 16 tracks at a time. This can be changed to 8, 16, or 32 track displays in [Audio - Audio Screen Meters]. Press the LCD Button to quickly switch between banks of meters (8, 16, or 32 depending on the value of [Audio - Audio Screen Meters]).
970 User Guide 4. Press the Control knob to edit the highlighted parameter. 5. Rotate the Control knob to adjust the value or setting. If editing Track Names, use the the onscreen keyboard or attached USB keyboard. 6. Press the Control knob to save the new setting. The highlighter will become blue and once again highlight the entire track. LCD From the Main View, press the LCD Button to quickly switch between banks of meters (8, 16, or 32 depending on the value of [Audio - Audio Screen Meters]).
970 User Guide File List Press FILES (keyboard: F2) to display a list of all of the recorded takes (File List). Takes are arranged chronologically and grouped by Reel. Turn the Control knob to highlight an item. Press the PLAY Button to start playback of the highlighted take. Press the Control knob (Press and hold for multi-file clips) to perform functions based on which item is highlighted. 1 2 3 4 5 Menu & Navigation 6 7 8 1) Next Take Information for the next take.
970 User Guide Menu & Navigation The selected drive is displayed on the top of the screen. To view the contents of other drives, scroll to the top of the list. A box appears with a list of all available drives. Select the desired drive and press the Control knob. While in the File List, press FILES to collapse all Reel folders and mono takes to ease file navigation. It is recommended that files in the same Play List or reel be of the same sample rate.
970 User Guide File functions are also available in the Take Details Screen: Menu & Navigation • Delete: Deletes the take or file (Confirmation dialog). (See “Deleting a File”, page 41) • Notes, Use Phrase, Scene, Take, Track Names, and Circled: Edit iXML / bEXT metadata of audio takes. (See “Metadata”, page 44) (See “Phrase List”, page 12) • Add to Play List: Adds the take to the Play List. (See “Play List”, page 24) • Remove from Play List: Removes the take from the Play List.
970 User Guide To navigate the Metadata screen, do any of the following: Turn the Control knob to scroll vertically. Press the REW or FF buttons to move horizontally. From an attached keyboard, use the Arrow keys to navigate vertically or horizontally. Press the Control knob to make a selection. Menu & Navigation • • • • Scrolling down and beyond the Notes field will display a customizable, predefined phrase list, letting you make quick notes with the most common wording.
970 User Guide Phrase List The phrase list is a feature that lets you predefine a list of up to twenty most commonly used phrases, which can be added to WAV files as part of the Notes metadata. This list, once defined, can be used via the Metadata screen or the Take Details screen. To define the phrase list: 1. Press the MENU button. 2. Select File Storage > Phrase List Manager. The Phrase List appears. 3. Select Add New Phrase. 4. Enter the text for that phrase.
970 User Guide Audio Inputs The 970 can record up to 64 tracks from a variety of input sources: Input Type Count Connector(s) Gain Details Balanced, Line-level. Channels 1-2 on DB-25 connector are summed with respective XLR connectors.
970 User Guide Dante Audio Inputs Dante delivers an easy-to-setup, self-configuring, plug-and-play digital audio network that uses standard Internet Protocols over 100Mb and/or Gigabit Ethernet. Dante reliably distributes multichannel digital audio with sub-millisecond latency and sample-accurate record and playback synchronization over CAT 5 cabling. Up to 64 Dante audio channels can be selected in any combination from any Dante audio device on the same Dante network.
970 User Guide Dante Redundancy When [Network - Dante Redundancy Mode] is set to On, the 970’s Primary and Secondary Ethernet ports both transmit Dante Audio data over separate networks. This provides a fail safe of the Dante system if one of the networks should fail. In Dante Redundancy Mode, two separate networks must be run and they CANNOT be connected to one another. Connect any computer running Dante Controller to the 970’s PRI Ethernet network. See http://www.audinate.
970 User Guide The gain value of each analog input channel is common. Adjusting the input gain of a track with an analog input source will adjust the gain of all inputs that have that analog channel assigned as the input source. Input Gain can be linked in [Audio - Input Gain Linking]. When linked, adjust any channel’s gain value to adjust the gain of all channels. Gain offsets from channel to channel are maintained.
970 User Guide Audio Outputs The 970 features a total of 82 unique output channels. Any of the internal 64 tracks can be routed to each of the 8 analog outputs, 8 AES3 outputs, and 64 MADI outputs. Internal tracks 1 through 64 are permanently routed to Dante outputs 1 through 64 respectively. Analog Audio Outputs The eight analog outputs of the 970 are active-balanced, line-level outputs (+18dBu max). Analog Line Output channels 1 and 2 are available on XLR connectors on the rear panel.
970 User Guide Ethernet The PRI and SEC Ethernet ports on the rear panel of the 970 are used for a variety of functions and features: • Dante (64-Channel Audio I/O over network) (See “Dante Audio Inputs”, page 14) • Network Grouping (See “Network Grouping”, page 29) • File Transfer (Samba) (See “Transferring Files”, page 41) • Web Browser Control (See “Web Interface - PIXNET”, page 31) Up to four 970 units can be daisy-chained using their built-in Ethernet switches.
970 User Guide Recording The 970 records industry standard Broadcast WAV Files (BWF) on up to 4 storage devices. Each drive can be configured independently to be available for recording, available for playback (read-only), shared on the network via Samba, or switched to network sharing after becoming full (Setup Menu option [File Storage - Drive Record/Network Mode]).
970 User Guide Track Arming Up to 64 Tracks of audio can be recorded. Tracks must be armed in the Main View in order for them to be recorded. Armed audio tracks will have a red background in the Arm column. Unarmed audio tracks will have a black background in the Arm column. To arm or disarm Tracks for recording: 1. Press the AUDIO button to access the Main View. 2. Rotate the Control knob to select the desired track. 3.
970 User Guide Sample Rate The 970 supports the following sampling rates: • • • • 44.1 kHz 47.952 kHz 47.952 kHz “F” (files stamped 48 kHz) 48 kHz • • • • 48.048 kHz 48.048 kHz “F” (files stamped 48 kHz) 88.2 kHz 96 kHz When Setup Menu option [Timecode/Sync - Sync Ref] is set to Internal, the sampling rate is set from Setup Menu option [Audio - Sample Rate]. The current Sample Rate is displayed on the topmiddle Main Screen. All digital input signal is sample rate converted to the 970’s sampling rate.
970 User Guide Bit depth defines the digital “word length” used to represent a given sample and correlates to the maximum dynamic range that is represented by the digital signal. Larger bit depths accommodate more dynamic range. Sound Devices recommends 24-bit recording for all critical production. Pre-Roll To prevent missing record cues or up-cutting takes, the 970 has pre-roll buffering available. When active, pre-roll begins recording at a set number of seconds preceding the record command.
970 User Guide Setting Cue Markers During Record, Playback, or Pause mode, press FILES + Fast Forward (>>) to set a Cue Marker. To delete a Cue Marker, press FILES + Rewind (<<). A dialog box appears asking Delete Cue Marker? Cue (number), select OK to delete and Cancel to ignore. Cue Markers added or deleted during record mode are applied to all actively recording drives. Cue Markers added or deleted during playback mode are only applied to the current playback drive.
970 User Guide Play List Files can be added to a Play List to be played back in a specific order. Play List functions are accessed from the File Detail view of any file. By default, the 970 will play files in the order that they are arranged in the File List. To play back files in the order of the Play List, [System - Playback Mode] must be set to one of the Play List modes. To add a file to the Play List: 1. Press FILES to view the File List. 2.
970 User Guide Synchronization and Timecode In a production environment (during recording), offset and drift are both terms to describe a timing problem between the timecode signal from two or more audio or video recorders. In a post-production environment (a non-linear editor application), offset and drift are both terms to describe a timing problem between two or more audio or video files.
970 User Guide Signal Internal Connection None Main View Int By default, the currently referenced synchronization source is always displayed on the top-middle of the Main View directly in front of the sample rate. When valid signal is present at the selected source, the Main View label will be displayed in white text. When no valid signal is present at the selected source, the Main View label will flash.
970 User Guide 24 Hour Run Timecode Mode Generator mode. Timecode runs continuously. When this Timecode Mode is selected or when the time/date is altered, the timecode value is jammed to the value of the time-of-day clock. The value can be set by “jamming value” in the Setup Menu options [TIMECODE/SYNC - Jam Received TC] or [TIMECODE/SYNC - Jam Time Of Day]. The value can also be set manually from Setup Menu option [TIMECODE/SYNC - Set Generator TC].
970 User Guide Powering The 970 features an advanced powering system with 2 redundant DC Inputs (on rear XLR4M connections) and PowerSafe technology. Two power sources can be attached simultaneously. When multiple power sources are connected, the 970 uses only one source at a time. The order of precedence for power sources is: 1. DC Input 1 (Primary power source) 2. DC Input 2 (Secondary power source) 3. PowerSafe circuitry (Shutdown) By default, the 970 operates from the Primary power source.
970 User Guide Network Grouping When multiple rack-mounted PIX video recorders (PIX 250i, PIX 270i, or PIX 260i) or the 970 Audio Recorder are in use on an Ethernet network, they can be grouped together for transport control and linking of most setup options. Setup Menu option [Network - Network Group] assigns the 970 to one of four available groups. In this section, the term “unit” refers to PIX 250i, PIX 270i, or PIX 260i Video Recorders, or the 970 Audio Recorder, unless otherwise specified.
970 User Guide Group Auto-Configuration When changes are made to a Network Group, all units in the group must auto-configure. It is important to allow all units in the group to complete auto-configuration before proceeding with any grouped operations (Transport control, settings changes, etc). While configuring, units will display a dialog message: Configuring Network: Please Wait... Wait 10 seconds after this dialog has cleared before proceeding with grouped operations.
970 User Guide External Control RS422 DNF ST300 JLC-ES450 SONY PDW-HR1 (Player Mode) RECORD Yes Yes n/a Stop RECORDING Yes Yes n/a Play Yes Yes Yes PAUSE Yes Yes Yes Stop Playback Yes No (Pause only) Yes Fast Forward Yes Yes Yes Rewind Yes Yes Yes JOG Yes Yes Yes SHUTTLE Yes Yes Yes Command T-BAR Yes n/a n/a REC and Play TIMECODE Yes Yes Yes GOTO (LOCATE to TIMECODE) Yes Yes n/a VAR n/a n/a Yes PREV n/a Yes Yes NEXT n/a Yes Yes IN ENTRY n/a
970 User Guide with an HTTP connection using a web browser. The interface is designed for use with current versions of Chrome and Safari. PIXNET only supports a single client (browser) connection to a 970 at one time. Accessing PIXNET on a single 970 from multiple clients simultaneously is not supported. Control access to 970 units with Setup Menu option [Network - Authentication]. The 970’s web IP address must be determined before accessing PIXNET: External Control 1.
970 User Guide PIXNET All Units Page When PIXNET is launched the first page displayed is the All Units Page. This is a quick overview of all units connected to the network. Information available is PIX Name, IP Address, File, Video Input details, Format details, and assigned Group number. From this page, a unit can be allotted to a particular group (See “Network Grouping”, page 29). Click on the Name to open the Unit Page for that particular unit.
970 User Guide PIXNET Unit Page The Unit page allows for near full remote control of the 970 via the web browser. 2 3 4 5 6 7 8 9 1 10 11 22 21 12 20 13 19 14 18 17 External Control 1) All Units Page button Click to return to All Units Page. 2) Previous During playback, jumps to the beginning of the file or previous cue marker. In Stopped mode, loads previous file. 3) Rewind Acts as Rewind Button. When selected the clip will reverse at 2x speeds. 4) Play Functions as Play button.
970 User Guide PIXNET Unit Page Metadata View To show the Metadata View, click the Arrow button located on far end of the Metadata bar, which acts as a toggle that expands or contracts the view for the previous, current, and next takes. While metadata is visible, you can still scroll down to see the tabs—Clips, File Storage, Video, etc. From this expanded view, you may edit the metadata—Scene, Take, Circled, and Notes—for the previous, current, and next takes.
970 User Guide Audio Menu The Audio Menu provides quick access to the various 970 audio settings and windows. These are separated by the views Audio Settings, Tracks, and Output Routing. When Audio Settings is selected, the 970 Audio menu options are displayed and can be edited directly from the web browser. Audio Tracks The Audio Tracks screen allows all the same adjustments as the Main View on the 970 itself: 1 2 3 4 7 6 5 External Control 1) Track Name Click to edit.
970 User Guide System Menu The System Menu provides quick access via the web browser to the 970 System menu options. Menu settings are displayed and can be edited directly from the web browser. Triggering Recording from External Timecode 1. Set Setup Menu option [Remote Control - Rec Start/Stop] to Timecode. 2. Make sure that the device that is sending timecode is configured to send stationary timecode while stopped and running timecode while recording.
970 User Guide Pin +5V Function +5V DC Output. Constant source of +5V for triggering logic high connections. GPIO inputs (pins 1, 2, and 3) and GPIO outputs (pins 6, 7, and 8) can be set to “logic high” or “logic low”. Logic high connections will trigger to the presence of +5V (GPIO input) or output +5V when the function is active (GPIO output). Logic low connections will trigger when connected to ground (GPIO input) or become connected to ground when the function is active (GPIO output).
970 User Guide Storage and File Management Storage The 970 records on up to four separate storage devices simultaneously. There are two PIX-CADDY slots on the front panel that are accessed by pulling the LCD Handle forward and tilting the LCD down. Additionally, there are two eSATAp connections on the rear panel. The four drive connections are numbered 1 to 4. Functions on the 970 will refer to the drives using these numbers.
970 User Guide Mac OSX 10.6.4 and below does not support exFAT volumes. Formatting To format a drive: 1. Make sure the drive to be formatted is connected to the recorder and note which drive number it is. 2. Open Setup Menu option [File Storage - Erase/Re-format]. 3. Choose the Erase/Re-format: Drive Number for the drive to be formatted or Erase/Re-format: All Drives option. 4. A confirmation dialog will appear: “All data will be erased. Continue?”. Use the Control knob to select OK. 5.
970 User Guide File Naming Files are named according to the file name format as set with Setup Menu option [File Storage - File Name Format]. The options for file name format include various combinations of Drive Name, CamID, Reel, Clip, Scene/Shot, and Take metadata fields. The file name format can also be prefixed with the Network Name as defined in [Network - This 970's Name]. To prefix the file name with the Network Name, set [File Storage - File Name Prefix] to 970 Name.
970 User Guide Ethernet File Transfer (Samba) Samba is an industry standard networking protocol that enables files to be transferred between the 970 and any device with access to the network (A computer running Mac OSX, Windows, or Linux for example). Ethernet File Transfer can be initiated remotely via PIXNET (web browser interface). Ethernet supports data rates up to a theoretical maximum of 1Gbps. In reality, data transfer speeds over Ethernet are dependent on network traffic and many other factors.
970 User Guide 6. Set the drive’s mode to Record to remove it from the network and make it available for recording and playback on the 970. Allow time for the drives to remount before Recording or Playing back files. The Drive Status Main View field will return to white when the drives are ready. FileSafe Utility and the Sound Devices File Format During recording, the 970 will store data in a temporary file format with the extension .sda.
970 User Guide Metadata 970 Broadcast Wave Files include iXML (revision 1.5) data and bEXT chunk data. For bEXT and iXML-aware software applications this data is available. For applications that don’t recognize bEXT or iXML, this information is ignored. The following chart details the supported metadata parameters.
970 User Guide Originator Reference bEXT M 4 Software Version bEXT M 4 Family UID iXML M: shared by files belonging to the same take 4 Total Files iXML M; number of files representing a take 4 File Set Index iXML M 4 iXML M 4 File Set Information File History Original File Name CamID The CamID field consists of a single alpha character. It is intended to indicate which physical camera shot the content for the take.
970 User Guide Editing Metadata Metadata can be edited from the 970 before, during, or after recording. Metadata edits to a take will ripple to that same take on all drives. Metadata can be edited from the Take Details screen or from the Metadata Screen. Editing Metadata from Take Details 1. Press FILES to access the File List. 2.
970 User Guide The Use Phrase option is also available when viewing take details from the File List, and it may be used to add common phrases into notes for the Previous, Current, or Next Takes. To use the phrase list: 1. Press FILES. 2. Select a file. 3. Select the Use Phrase option. 4. Select the phrase you want to use from the predefined list. Editing Metadata from Metadata Screen (See “Metadata Screen”, page 10) Editing Track Names 1. Press AUDIO to access the Main View. 2.
970 User Guide To create a sound report on a specific Reel folder: 1. Press FILES. 2. Select the Reel folder in which you want to create the sound report. 3. Either press and hold the Control knob to enter the Folder Options menu, or from an attached keyboard, press the Right Arrow key. 4. Select Create Sound Report. The CSV file is created in the specified folder only on that drive. To view a sound report (CSV file): 1. Eject the drive from the unit and attach it to a computer. 2.
5. The Setup Menu will be shown with a colored background. There will be check boxes next to each menu item. Navigate the menu with the Control knob or keyboard arrows, as usual. 6. To change the visibility of an item in the Setup Menu, press the spacebar on the keyboard while the item is highlighted. Checked items will be displayed in the Setup Menu and unchecked items will not be displayed. Setup Management & Firmware Upgrades 970 User Guide Crossed out items will be hidden 7.
970 User Guide The Settings Customization Menu option Reset to Factory Settings will make all Setup Menu items visible and revert default settings to factory defaults. Factory Restore To fully restore the unit to its factory firmware state, hold Fast Forward and Stop while booting the 970 up, until the Main View appears.
970 User Guide Setup Menu Options The Setup Menu controls a wide range of parameters for the 970. The parameters are organized into categories, making the Setup Menu easy to navigate. The following tables show the parameter name, a description, options available, and the factory default setting where applicable. Default settings can be altered.
970 User Guide # 12 13 Parameter Name Phrase List Manager Sound Report Info Description Enter up to 20 commonly used phrases to create a “quick” list for adding notes metadata to files. Create sound reports in a specific folder to a single drive only or in a current folder for all applicable drives. Sound reports are comma-delineated CSV files based on WAV file metadata, but with this parameter, you can customize the headers for such reports. CSV files do not appear in the File List.
970 User Guide Parameter Name Description Options 11 AES Output Sub-menu. Choose output source for AES outputs (1-8) • Track 1 - Track 64 (per output) »» Track 1-8 (per output) 12 MADI Output Sub-menu. Choose output source for MADI output (1-64) • Track 1 - Track 64 (per output) »» Track 1-64 (per output) 13 Signal Generator Enable audio test tone to all outputs and meters. Tone is not recorded.
970 User Guide # Parameter Name Description Options Sets the running mode for the internal timecode generator and/or the method which the 970 receives SMPTE timecode. • Off »» Freerun • Freerun Auto Mute • Record Run • 24h Run • 24h Run Auto Mute • Ext TC (LTC) • Ext TC (LTC Halt) Frame Rate The frame rate of timecode stamped to .wav files. • 23.976 • 24 • 25 »» 29.97 • 29.
970 User Guide # 4 5 Parameter Name Description Options GPIO Inputs Set GPIO inputs (pins 1, 2, and 3 on GPIO connector) »» Active low to active high or active low. Active high: Connecting the pin to +5V will activate the function. Active low: • Active high Connecting the pin to ground will activate the function. GPIO Outputs Set GPIO outputs (pins 6, 7, and 8 on GPIO connector) to active high or active low. Active high: When the • Active low function is true, +5V will appear on the pin.
970 User Guide # Parameter Name Description Options Setup Menu Options 2 HP Warning Bell Level Adjusts the level of the heaphone warning bell sound »» -40dBFS (Off, -60 to -12dBFS) 3 Time Zone Selects the international time zone »» (GMT-06:00) Central Time (US) (All GMT zones) 4 Daylight Saving Toggles daylight saving on or off for the time-of-day clock »» Off • On 5 Time Format Selects between 12 or 24 hour format for the time-ofday clock »» 12h • 24h 6 Date Format Selects between MM
970 User Guide Button Shortcuts Button Combination AUDIO + LCD Change HP source. From the Main View: Solo the highlighted channel in the headphones. AUDIO + MENU Accesses the Metadata screen. AUDIO + FILES Create sound report in current folder for all applicable drives. LCD + Control knob press Stop + Rew Stop + Fast Forward MENU + FILES MENU + Control knob Press Adjust LCD and button brightness. False take. Deletes last take and decrements Take Number. Scene increment.
970 User Guide Connector Pin Assignments Connector Pin Assignments Notes Connector Pin Assignments XLR4M (2) (Primary and Secondary DC Input) 1–ground 2–float 3–float 4–DC+ Pins 2 and 3 unused. When using a single power source, use Primary connector (top).
DB-25 (1) (CH 1-8 LINE IN) 1–Input 8 signal (+) 2–Input 8 Ground 3–Input 7 signal (-) 4–Input 6 signal (+) 5–Input 6 Ground 6–Input 5 signal (-) 7–Input 4 signal (+) 8–Input 4 Ground 9–Input 3 signal (-) 10–Input 2 signal (+) 11–Input 2 Ground 12–Input 1 signal (-) 13–unused 14–Input 8 signal (-) 15–Input 7 signal (+) 16–Input 7 Ground 17–Input 6 signal (-) 18–Input 5 signal (+) 19–Input 5 Ground 20–Input 4 signal (-) 21–Input 3 signal (+) 22–Input 3 Ground 23–Input 2 signal (-) 24–Input 1 signal (+) 25–In
970 User Guide Connector Pin Assignments DB-25 (1) (CH 1-8 AES IN/OUT) 1–Digital Out 4 signal (+) 2–Digital Out 4 Ground 3–Digital Out 3 signal (-) 4–Digital Out 2 signal (+) 5–Digital Out 2 Ground 6–Digital Out 1 signal (-) 7–Digital In 4 signal (+) 8–Digital In 4 Ground 9–Digital In 3 signal (-) 10–Digital In 2 signal (+) 11–Digital In 2 Ground 12–Digital In 1 signal (-) 13–unused 14–Digital Out 4 signal (-) 15–Digital Out 3 signal (+) 16–Digital Out 3 Ground 17–Digital Out 2 signal (-) 18–Digital Out
970 User Guide Specifications Audio Recording Record/Playback • 64 channels record/playback (32 Channels at 88.2 kHz and 96 kHz sample rates) • Simultaneous Analog, AES/EBU, Dante, or MADI. Selectable per channel Inputs • 8 Balanced, line-level inputs on DB-25. • Ch1,2 also on XLR Outputs • 8 Balanced, line-level outputs on DB-25. • Ch1,2 also on XLR Frequency Response 10Hz-20kHz, +/- 0.5dB re 1kHz THD + Noise 0.
970 User Guide Timecode and Sync Modes Supported Freerun, Frerun Auto Mute, 24 Hour run, 24 Hour run Auto Mute, Record run, External timecode, External timecode Halt Frame Rates 23.976, 24, 25, 29.97DF, 29.97ND, 30DF, 30ND Accuracy • +/- 0.2ppm (½ frame per 24hrs) accuracy • Holds accurate timecode for 4 hours after power is removed Timecode Inputs / Outputs • Timecode Input BNC • Timecode Output BNC Sync Input / Output • • • • • Wordclock Square wave 44.1 kHz, 47.952 kHz, 48 kHz, 48.
970 User Guide Declaration of Conformity According to EN ISO/IEC 17050-1:2004 Manufacturer’s Name: Sound Devices, LLC Manufacturer’s Address: E7556 State Rd.
970 User Guide Software License End-user license agreement for Sound Devices 970 Embedded Software / Firmware Important Read carefully: This Sound Devices, LLC end-user license agreement (“EULA”) is a legal agreement between you (either an individual or a single entity) and Sound Devices, LLC for the Sound Devices, LLC software product identified above, which includes computer software, embedded software, and may include associated media, printed materials, and “online” or electronic documentation (“SOFTWA
970 User Guide Warranty and Technical Support Warranty & Service Sound Devices, LLC warrants the 970 Audio Recorder against defects in materials and workmanship for a period of TWO (2) years from date of original retail purchase. This is a non-transferable warranty that extends only to the original purchaser. Sound Devices, LLC will repair or replace the product at its discretion at no charge. Warranty claims due to severe service conditions will be addressed on an individual basis.
970, v 2.10 - Printed in U.S.A.