
Quick Start Guide
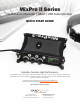

MixPre II Quick Start Guide
V
Quick Setup in Advanced Mode
(MixPre-10 II)
INSERT SD CARD
Find the SD card slot on the back of the MixPre II and insert an SD
Card. Sound Devices highly recommends using an SD card currently
listed in the MixPre II approved media list.
CONNECT YOUR PREFERRED POWER SOURCE
To power the MixPre-10 II, you may use:
• AA Batteries, using the MX-8AA eight AA battery sled. Sound
Devices recommends using NiMH or Energizer Ultimate Lithium
rechargeable AA batteries. Alkaline batteries are not suitable and
short run times are expected.
• L-Mount batteries, using the optional MX-LMount or MX-LM1.
• Hirose, using the included XL-WPH3 from a wall outlet to the
Hirose input.
Use the power switch on the left panel to turn on the MixPre-10 II.
The power status icon on the top right corner of the screen should be
green. If it is orange or red, nd an alternative power source.
FORMAT THE SD CARD
Formatting deletes all les on the SD Card and prepares it for use with
the MixPre-10 II.
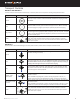
1. Tap the menu icon
.
2. Navigate to the second page by tapping the page icon
.
3. Tap SD Card > Edit > Format.
The status bar indicates remaining record time of the inserted SD
card. Your total recording time will depend on card size, sample rate,
bit depth, and track count.
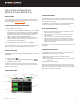
HOME SCREEN LAYOUT
CONNECT HEADPHONES
Plug headphones into the headphone output located on the right
panel. Use the headphone encoder on the right side of the Mix-
Pre-10 II to adjust headphone volume.
The MixPre II can drive headphones to potentially dangerous levels.
Do not listen at high volume levels for long periods of time.
SET UP YOUR MICROPHONE
1. Plug one end of the XLR cable into your microphone and the
other into input 1 of your MixPre-10 II.
2. Press in the channel 1 knob on the front panel to enter the
Channel Screen.
3. If your microphone requires phantom power, tap the page icon
, then tap Phantom.
4. Return to the rst screen by tapping the page icon
.
5. Tap gain and use the up and down arrows or the headphone
encoder to change the amount of gain applied to the micro-
phone.
6. Adjust the level of channel 1 being sent to the LR mix using
the front panel knob. Turn the knob clockwise to increase the
amount of signal sent to the mix. Turn the knob counter-clock-
wise to decrease the amount of signal sent to the mix.
The MixPre II User Guide covers other possible channel sources and
their setup.
UNDERSTANDING MIX LEVELS
The ring LED around each channel knob and the LR meter on the
home screen display the status of your signal.
• Solid Green - the louder the signal, the brighter the LED
• Red - when peaking
• Orange - when limiting, also appears as orange bars to the right of
the meters.
• Blinking Orange - when soloed
We recommend setting your level so the meters on the LCD show a
healthy green signal that only occasionally reaches the yellow. If a
signal is too loud, the limiter will engage. If the limiters are engaging
frequently, turn down the channel gain.
Power Status
Icon
File List Icon
Time Counter
Status Bar
Meter View
Current File
Name
Menu Icon
Cue Marker
Icon