
User Manual


User Guide
50
Naming a Recording
To name a recording:
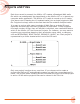
1. Go to the File List by tapping the top left region of the Home screen.
2. Select a le from the list by using the headphone encoder on the right
panel. Rotate to highlight a le then press the encoder (or touch Edit) to
select it for naming or press the Play button to play it.
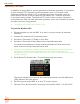
L The File List is in chronological order with most recent recordings at the top of
the list. The row at the very top of the list represents the next le to be recorded.
Selecting this allows you to give a name to the next recording prior to recording
it.
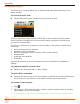
3. Select Name to edit the Name.
4. Select Number to edit the Number.
The Name and Number not only determine the lename of the recording—
they are also embedded as Scene and Take information inside the WAV le.
This is particularly useful in lm and TV production where the data is used
to help log and locate content faster.
In Advanced mode you can also rename a recording.
To rename a recorded le:
X In the File List, select a le by pressing the encoder, and tap Rename.
Track Names and Notes
In Advanced mode, you also have the option to store track names and notes
inside the WAV le. This is ideal for multitrack recording where you want to
identify what or who is recorded on a particular track and for adding descriptive
notes about the recording that might be useful to an editor at a later stage.
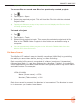
To edit track names and notes:
1. In the File List, select a le and press the encoder
2. Do any of the following:
X Select Track Names to change track names.
X Select Name, Num Notes to edit notes.
You can also edit a track name from its associated channel screen. For example:
To edit ISO track 1’s name:
1. Press Channel 1 knob.
2. Tap top left corner of the Channel screen.