® MixPre-3 Audio Recorder | Mixer | USB Audio Interface User Guide
Legal Notices Product specifications and features are subject to change without prior notification. Copyright © 2017 Sound Devices, LLC. All rights reserved. Revision History This table provides the revision history for this guide. Rev# Date This product is subject to the terms and conditions of a end-user license agreement provided in this guide, and may be used in accordance with the license agreement. Firmware Description Version 1-A April 2017 v1.00 Initial release 1-B April 2017 v1.
Table of Contents Intro Powering Flexible Powering Options. . . . . . . . . . . . . . 7 Panels Front Panel . . . . . . . . . . . . . . . . . . . . . . . . 9 Left Side Panel. . . . . . . . . . . . . . . . . . . . . . 9 Right Side Panel. . . . . . . . . . . . . . . . . . . . . 9 Back Panel. . . . . . . . . . . . . . . . . . . . . . . . 10 Touch Screen Home Screen. . . . . . . . . . . . . . . . . . . . . . 11 Main Menu Screen . . . . . . . . . . . . . . . . . . 12 Channel Screen . . . . . . . . . . . .
User Guide Files, Projects File Name Format. . . . . . . . . . . . . . . . . . . 39 Naming a Recording. . . . . . . . . . . . . . . . . 39 Track Names and Notes . . . . . . . . . . . . . . 40 Undo, Trash File. . . . . . . . . . . . . . . . . . . . 40 Projects. . . . . . . . . . . . . . . . . . . . . . . . . . 40 Remote Control Wingman Application . . . . . . . . . . . . . . . . 43 Connecting to a MixPre Recorder . . . . . . 44 HDMI Record Trigger. . . . . . . . . . . . . . . . .
Intro Hello and thank you for buying the MixPre-3! At Sound Devices, we are freaks about audio. We’ve unleashed our design and engineering team (most of whom are musicians) and let them create a device that we want to own ourselves. We think that you’ll find the unique mix of performance, ease-of-use, design and build quality to be an invaluable part of your life and creative passion for many years to come.
User Guide 6
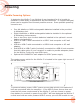
Powering Flexible Powering Options In designing the MixPre-3, we felt that it was important for it to be able to operate in a wide array of applications and environments. To support that goal, power can be supplied from several possible sources. Some possible powering scenarios are: • • • • • • • Four AA alkaline or NiMH rechargeable batteries installed in the provided 4-AA battery sled. Eight AA alkaline or NiMH rechargeable batteries installed in the optional 8-AA battery sled accessory.
User Guide two of the three channels with 48V phantom mics. The third channel can still be used with dynamic mics and line, aux, or USB sources.
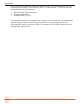
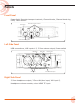
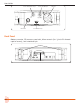
Panels Front Panel Power light, Recorder transport controls, Channel knobs, Channel knob ring LEDs, Touch screen Power Light Recorder Transport Controls LCD Channel Knobs Channel Knob Ring LEDs Left Side Panel USB connections, XLR inputs 1-2, 3.5mm stereo output, Power switch USB-A Port XLR Inputs USB-C Port Power Switch 3.5 mm Stereo Output Right Side Panel 3.5mm headphone output, 3.
User Guide 3.5 mm Headphone Output HP Encoder 3.
Touch Screen The MixPre-3 has a sunlight-viewable, high-resolution, touch-screen-based user interface, which consists of the Home screen, Main Menu screen, and Channel screen views. As you will notice, there are several touch zones on the touch screen for controls. As you become familiar with the user interface, changing settings for inputs, outputs, recording and metering will become fast and intuitive.
User Guide • Status bar ◦◦ SD card available recording time ◦◦ Headphone preset ◦◦ Sample rate and bit depth ◦◦ Date and time Main Menu Screen The Menu screen is where most of the features and functions are selected and set up. To enter the Menu screen: XX Tap on the Home screen. There are three Menu screen views. These views are indicated by the Dots icon . Tapping it will toggle between the three Menu views. The Menu has its own submenus that may be displayed by tapping them.
TOUCH SCREEN Page Sub-menu Description 1 Presets Lets you save and recall preset user settings to and from SD cards and internal memory. Also allows resetting all settings to factory default. 1 Project Provides the ability to create new, open and trash existing projects. 1 Inputs Provides settings for the Aux/Plug-in-power Mic/Timecode input/ Camera. 1 Outputs* 2 Timecode Lets you select timecode mode. 2 Tone Provides test tone settings.
User Guide Page Sub-menu Description 1 Solo Lets you solo the selected channel in the headphone output. Soloing by default is Individual (exclusive) in that only one input at a time will be soloed. When a channel is soloed, its light ring will flash orange. Soloing can be set to Multiple (non-exclusive) in the HP Preset submenu. 1 Arm* Allows pre-fade recording of the channel to its own isolated (ISO) track on the SD card. 1 Gain* Sets the sensitivity of the input.
Modes and Presets Setting the Mode We’ve designed the MixPre-3 to be easy to use for the novice without taking away truly professional-level features for the seasoned pro user. We want both the newcomer and the career professional to enjoy a quick, easy setup and foolproof results. To accommodate this, we’ve incorporated three modes of operation into the MixPre-3: Basic, Advanced and Custom. To set the mode: 1. Turn all channel knobs to Off (at full counter-clockwise position). 2. Tap 3.
User Guide Screen Sub-menu Description Channel Pan Pan the channel’s signal Left, Center or Right in the stereo LR mix and Stereo Out. Channel Input Select one of the available Mic, Line, Aux (only available if Aux In Mode is Mic or Line) or USB inputs to route to the selected channel. Channel Phantom Turn on 48V phantom power when using a condenser microphone in the selected channel. Channel Low Cut Select the frequency at which a low cut filter will be placed.
MODES AND PRESETS To configure Custom Setup: 1. Tap . 2. Tap System > Custom Setup. Custom Setup options are: Page Sub-menu Description 1 Channel Lets you access Solo, Track Arm, extended Pan, Input Select, Phantom and Low Cut, which is selectable by frequency. 1 Gain Lets you access to Channel Gain controls. 1 Headphone Lets you access extended headphone source select options including factory and user headphone presets, preset editing and Solo setup for Individual/Multiple channels.
User Guide To recall a Preset 18 1. Tap . 2. Tap Presets > Load Preset. 3. Select preset with encoder. 4. Tap OK.
Inputs The MixPre-3’s flexibility is enhanced by its ability to select various input types to its mixer channels. Each of the MixPre-3’s channels can be sourced from an XLR mic/line input, 3.5mm Aux or PiP (Plug in Power) Mic input or from either of the two USB audio paths from a computer. Channel Inputs BASIC MODE For quick and easy applications, access the channel’s input settings by pushing the desired channel’s channel knob. You will see the Channel screen displayed.
User Guide Are you working with a stereo source—a keyboard or stereo mic perhaps? To make it easy to adjust these types of sources, the MixPre-3 offers linking of channel pairs 1-2. To link channels 1-2: 1. Push the channel knob 1 to access that Channel screen. 2. Tap Linking. Do one of the following: XX Select 1-2 for a stereo source. XX Select 1-2ms for MS (Mid-Side) source. You’ll now be able to control the level of both channels 1 and 2 with the channel 1 knob.
INPUTS to your camera audio input, you will achieve far superior sound quality. Then by connecting the camera’s audio output to the MixPre-3’s Aux/Mic In, it allows you to check that the camera audio is noise and distortion-free. When this option is selected an additional setting appears in the Input Menu called Camera Gain. This allows you to adjust the gain of the incoming camera audio level. • You also gain camera monitoring options in the HP Presets menu.
User Guide 22
Outputs While we were carefully thinking about how to maximize flexibility with the inputs, we were doing the same with the outputs! Stereo Outs The Outputs menu is available in Advanced mode and accessed through the Main Menu. In the Outputs menu, you may send any channel, aux input, USB input or LR mix to either or both of the Stereo Outs. In addition, if you choose to send the channels to outputs, you can select either pre-fade (channel knob has no effect) or post-fade (channel knob controls level).
User Guide monitoring. Since the headphone amplifier is capable of very high output levels, please use caution when wearing headphones as hearing damage could result with inappropriate volume levels.
Metering LEDs and Meter Views There are five basic methods for observing input and output meters on the MixPre-3. • Channel knob ring LEDs - Each LED ring is capable of displaying green, orange and red colors. The brightness of the light ring tracks the level of the input. Green = signal present, red = signal peaking, orange = signal limiting. In addition, a channel’s ring LED will flash orange when in solo.
User Guide • LR, 1-3 multi-track meter view • LR, Returns (via Aux In) and USB 1,2 meter view Switching between the three main meter views is easy—just touch the meters and cycle through the different views. The meters will show not only signal levels, but also the current arm status of each track for the recorder and limiting activity for L,R and each channel.
Recording and Playback The MixPre-3 can record up to five audio tracks at 96kHz, 24-bit to SD cards (SD, SDHC, or SDXC) using the industry standard .WAV file format. The recorded .WAV files written to SD card can be imported or played back using any MAC, Windows, or Linux computer installed with a compatible audio application, such as Pro Tools, Reaper, Cubase, Garageband, Audacity, and many, many more. You can mix and record to the SD card even when using the MixPre-3 as a USB audio interface.
User Guide To format an SD card: 1. Insert an SD card in the slot located on the rear panel. 2. Tap 3. Tap SD Card > Edit > Format. 4. When asked to confirm the command to format the card, tap OK. . Cards with a capacity of 32 GB or less will be formatted with the FAT32 file system. Cards with a capacity greater than 32 GB will be formatted with the exFAT file system. LL The exFAT file system is not compatible with Windows XP or Mac OS X 10.6.4 and lower.
RECORDING AND PLAYBACK To arm a channel: 1. Press the channel knob. 2. Tap Arm. Armed channels are indicated in the meters view with red meter labels surrounding the channel number. If neighboring channels are stereo linked, their labels are merged to indicate that they are linked. See Channel Inputs for more information regarding stereo linking. Record Menu In Basic mode, the Rec Trigger function is used to automatically start and stop recording from a compatible HDMI source, such as a DSLR.
User Guide 30
USB USB Audio Interface The MixPre-3 has an integrated 5-in, 2-out core audio-compatible interface for use with a Mac or PC computer. For PC users, the MixPre-3 will appear as a 2x2 audio interface unless a specific ASIO driver is installed. The latest ASIO driver can be downloaded at www.sounddevices.com/support/downloads. See the MixPre Series Downloads page. When working with the USB audio from a host computer, it is necessary to route the USB 1 and USB 2 sources appropriately.
User Guide Low-latency Monitoring We’ve worked really hard with our hardware, logic and software design teams to minimize latency. We’ve found that in many scenarios, latency when monitoring through a DAW (digital audio workstation) is perfectly acceptable, depending upon DAW software, computer hardware and plug-ins. In situations where the throughput latency is higher than desired, the input to the MixPre-3 can be directly monitored in the headphone output.
USB USB Keyboard The use of standard USB computer keyboards is supported. When using the MixPre-3 in situations requiring extensive metadata entry, titling and wired remote control capability, a USB keyboard may be desirable. LL Keyboards with an embedded USB hub and Apple brand keyboards are not compatible. Additionally, some keyboards must be connected only after the recorder is turned on.
User Guide 34
Timecode Timecode Modes The MixPre-3 is not only a fantastic tool for audio enthusiasts. It was also conceived for all you video aficionados out there, whether you are a film or documentary maker or a YouTuber who wants no-compromise audio quality to go along with their video content. With that in mind, we have designed-in timecode capability to make it easy to lip-sync DSLR and other camera video with the MixPre-3’s audio.
User Guide HDMI TC In Use a DSLR camera that outputs timecode over its HDMI output connection. A few examples of cameras that do this are the Sony a7s and Panasonic GH4. Connect their HDMI output to the HDMI TC In port on the MixPre-3’s right hand panel and set Menu>Timecode>TC Mode to HDMI TC In. Refer to the camera’s user guide to determine how to output HDMI timecode from the camera since all cameras do it in a slightly different way.
TIMECODE Timecode Stamp Regardless of which timecode mode you use, each time you press record, the timecode value at that moment is embedded within the MixPre-3’s WAV file. Most popular video editing applications will be able to read this timecode value and sync the audio with the camera video. For those of you who are curious, WAV files that contain embedded timecode are called Broadcast WAV files.
User Guide 38
Files, Projects Each time you press record, the MixPre-3 creates a WAV audio file which can subsequently be played back on the MixPre or almost any computer audio application. The MixPre-3 is able to record up to 5 tracks (the stereo mix LR tracks plus three isolated tracks) into a single polyphonic WAV file. Polyphonic simply refers to the fact that the file contains multiple tracks.
User Guide In Advanced mode you can also rename a recording. To rename a recorded file: XX In the File List, select a file by pressing the encoder, and tap Rename. Track Names and Notes In Advanced mode, you also have the option to store track names and notes inside the WAV file. This is ideal for multitrack recording where you want to identify what or who is recorded on a particular track and for adding descriptive notes about the recording that might be useful to an editor at a later stage.
FILES, PROJECTS represented by a folder located at the root of the SD card. To create a new Project: 1. Tap . 2. Tap Project > New and choose to create a custom project name or project name based on the current date. To access files or record new files in a previously created project: 1. Tap . 2. Tap Project > Open. 3. Select the required project. This will load the File List with the selected Project’s files. To trash a Project: 1. Tap . 2. Tap Project > Trash. 3.
User Guide 42
Remote Control Wingman Application Sound Devices Wingman is a free app that allows wireless remote control of the Bluetooth Smart-enabled MixPre Series from iOS devices. To enable Bluetooth on the MixPre recorder: 1. Tap . 2. Tap System > Bluetooth. This toggles Bluetooth On and Off. LL If a remote password is configured on the recorder itself, Wingman will prompt for that password to be entered prior to making the connection.
User Guide with three main areas of interest: • Status - Shows device-specific status information. • Viewing area - Displays different screen views, such as the Transport view with its transport control buttons, metadata fields, and meters. Swiping vertically in this area can toggle to other meters. Swiping horizontally, toggles between Transport and Track views, handy when using Wingman app on devices with smaller screens.
REMOTE CONTROL When running Wingman, the Connection icon, which bears the Sound Devices logo, displays different colors.
User Guide Keyboard A connected USB keyboard may be used as a wired remote control for certain functions of the MixPre-3. See the table below for available USB keyboard shortcuts. USB Keyboard Shortcuts When a USB keyboard is attached, the following key-combinations or shortcuts are available. Keystrokes Action Escape Back.
Appendix A Basic/Advanced Mode Differences Screen Sub-Menu Basic Mode Advanced Mode Channel Solo - Channel Arm - Channel Gain - Channel Pan L, C, R Continuously Variable Channel Input - Channel Phantom Channel Low Cut Channel Linking - 40, 80, 120, 160 Hz Stereo, MidSide Menu Presets Menu Project Menu Inputs (Aux In) Mic, Line, Off Mic, Line, Camera, Timecode, Off Menu Outputs - Stereo out L/R source select, Stereo out gain Menu Timecode
User Guide System Settings Page 48 Sub-Menu Description 1 Mode Lets you switch the operating mode between Basic, Advanced and Custom. 1 USB-C Switches between Audio and Power Only USB modes. 1 File Transfer Lets you transfer files between the MixPre and a host computer. 1 Limiters Lets you turn limiters on/off (available only in Advanced or Custom modes). 2 Bluetooth Switches Bluetooth Smart on/off.
Specifications Specifications are subject to change without prior notice. For the latest information available on all Sound Devices products, visit our website at: www.sounddevices.com. Audio Inputs Name Frequency Response Description 10Hz to 40kHz +/- 0.5dB re 1kHz @ 96kHz sample rate Total Harmonic Distortion 0.
User Guide Audio Outputs Name Stereo Out Description 3.5mm TRS stereo unbalanced, 500 ohm output Z, +7.8dBu max output level DAC feeding Stereo Out, 32 bit precision; 115dB dynamic range (A-weighted) Headphone Out Headphone Out 3.5mm TRS stereo unbalanced, for use with any impedance headphones Output Limiters Digital Recorder Name Description Maximum Record Tracks 5 tracks (stereo mix + 3 ISOs) Sampling Frequency • 44.
SPECIFICATIONS Timecode Name Description Modes • Time of Day (file stamped w/current ToD) • LTC Input (file stamped w/incoming LTC on Aux 3.5mm) • HDMI TC (file stamped w/incoming TC from HDMI & sample clock slaved from HDMI sample clock. Only works on specific cameras that support HDMI TC Frame Rates Auto detects (fps): • 23.98 (same as 23.976) • 24 • 25 HDMI TC In From cameras that output timecode over HDMI • 29.97DF • 29.
User Guide Dimensions and Weight Name Description Size (H x W x D) • 1.4 in x 5.68 in x 4.35 in • 36 mm x 144 mm x 110 mm Weight • 16.8 oz (unpackaged, without batteries) • 0.
Glossary of Terms Arm Enables a track for recording Gain The ratio of output to input level. Gain is relevant at any point in the audio signal path where there is a stage of amplification, such as preamplifier, mixer, output, headphones. Pan The pan controls the spread of a monaural signal in a stereo or multi-channel sound field - it is critical to the makeup of the stereo image. Panning adds space in a mix through panning the sounds center, left and right.
User Guide Notes _______________________________________________________________ _______________________________________________________________ _______________________________________________________________ _______________________________________________________________ _______________________________________________________________ _______________________________________________________________ _______________________________________________________________ ______________________________________________
Software License End-user license agreement for Sound Devices MixPre Series Software / Embedded Firmware Important Read carefully: This Sound Devices, LLC end-user license agreement (“EULA”) is a legal agreement between you (either an individual or a single entity) and Sound Devices, LLC for the Sound Devices, LLC software product identified above, which includes computer software, embedded firmware, and may include associated media, printed materials, and “online” or electronic documentation (“SOFTWARE PRO
User Guide Devices, LLC product, even if Sound Devices, LLC has been advised of the possibility of such damages. In any case, Sound Devices, LLC’s entire liability under any provision of this evaluation license shall be limited to the greater of the amount actually paid by you for the SOFTWARE PRODUCT or U.S. $5.00. Because some states/jurisdictions do not allow the exclusion or limitation of liability for consequential or incidental damages, the above limitation may not apply to you.
® Sound Devices, LLC E7556 Road 23 and 33 Reedsburg, Wisconsin 53959 USA Phone: +1 (608) 524-0625 Fax: +1 (608) 524-0655 Customer Support Toll Free: (800) 505-0625 Email: support@sounddevices.com http://www.sounddevices.com/support http://forum.sounddevices.com Product Information For more information about products and accessories, visit us on the web at www.sounddevices.com. Report Documentation Error Email: techpubs@sounddevices.