
User guide


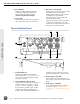


10) Record Button
Begins recording. Optional: Splits the
recording and begins writing a new
le when pressed while recording.
(System Rec Button File Split)
11) Power LED
Hold the Menu buon down, then press
the Control Knob to power on the unit.
12) Time Code / Charge LED
Flashing green: Accurate timecode is main-
tained by internal Li-Ion baery.
Flashing amber: baery charging. (Time-
code display has precedence)
Alternating Amber / Green: Fault with
internal timecode baery.
Solid Red (when PIX is powered up): Time-
code has been reset back to zero and
needs to be re-jammed due to PIX power
being o for more than 2 hours.
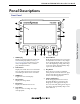
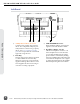
Top and Bottom Panel
3
2
1 4 87
65
1) CompactFlash Slot
Insert CompactFlash media with the
label-side up. Visit www.sounddevices.com/
approved for an up-to-date list of tested
and approved cards.
2) External DC Input (Hirose 4-pin)
Accepts 10–18 volts DC. Hirose 4-pin con-
nector is wired pin-1 negative (-), pin-4
positive (+).Pin-2 (-) and pin-3 (+) must
be connected in parallel to pins 1 and 4
respectively to charge attached Li-ion
batteries. The included XL-WPH3 power
supply provides positive DC on pins 3
and 4 and negative DC on pins 1 and 2.
3) Audio Output - 5-pin XLR
Two channels of active, balanced, line-
level output. Source selected in the Audio
Menu.
4) Audio Inputs - 3-pin XLR
Active, balanced, analog microphone
or line level inputs. PIX 240i only: can
be switched to accept AES digital input,
channels.
PIX 220i and PIX 240i Video Recorder User Guide
6
v. 3.52 Features and specifications are subject to change. Visit www.sounddevices.com for the latest documentation.
Panel Descriptions