USBPre 2 User Guide and Technical Information Sound Devices, LLC 300 Wengel Drive • Reedsburg, WI • USA +1 (608) 524-0625 • fax: +1 (608) 524-0655 Toll-Free: (800) 505-0625 www.sounddevices.com support@sounddevices.
USBPre 2 User Guide and Technical Information Table of Contents Table of Contents. . . . . . . . . . . . . . . . . . . . . . . . . . . . . .1 Computer System Requirements . . . . . . . . . . . . . . . . .2 Quick Start Guide . . . . . . . . . . . . . . . . . . . . . . . . . . . . .3 Sound Card Connection . . . . . . . . . . . . . . . . . . . . . . . . . . . . . .3 Front Panel Descriptions . . . . . . . . . . . . . . . . . . . . . . Input and Output Panel Descriptions . . . . . . . . . . . .
USBPre 2 User Guide and Technical Information Copyright and Release All rights reserved. No part of this publication may be reproduced, stored in a retrieval system, or transmitted in any form or by any means, electronic, mechanical, photocopying, recording, or otherwise, without the expressed written permission of SOUND DEVICES, LLC. SOUND DEVICES is not responsible for any use of this information.
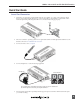
USBPre 2 User Guide and Technical Information Quick Start Guide Sound Card Connection 1. Attach the “A” plug of the (supplied) USB cable into an available “A” socket on the computer. Attach the “B” plug of the USB cable into the “B” socket on the USBPre 2. The USBPre 2’s meter LED’s will illuminate sequentially, indicating the USBPre 2 is connected and booting up properly. 2. Check to see that the operating system has recognized the USBPre 2 and designated the USBPre 2 as the default sound card.
USBPre 2 User Guide and Technical Information Input 1 set to Mic (XLR) Input 2 set to Line (1/4” TRS) 4 6. If the PRE Meter Source LED is not illuminated, press the Meter Source button to change the meter source to display input levels. 7. For analog input sources, adjust the Input Gain Control corresponding to the input being recorded. Input Gain Controls do not affect digital input levels. The meters will show the audio level of the input. 8. Launch an audio application on the computer.
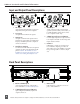
USBPre 2 User Guide and Technical Information Front Panel Descriptions 2 1 4 3 5 6 1) Input Gain Controls Adjusts input gain. Gain is minimized (not turned off) at full counter-clockwise setting. Gain control only affects analog input sources. 2) Low-Cut LED Illuminates when low-cut filter is engaged on either mic input. See DIP Switch Options. 3) 15 dB pad LED Illuminates when 15 dB pad is engaged on either mic input. See DIP Switch Options.
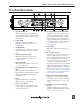
USBPre 2 User Guide and Technical Information Input and Output Panel Descriptions 1 2 4 3 1) Mic Inputs Active-balanced XLR inputs accept lowimpedance microphone-level signals. 5 6 7 5) AUX Output Audio output to feed powered loudspeakers, CD Recorders, Camcorders, or Portable DVD Recorders. RCA connectors. Computer audio only. 2) Line Inputs Accepts balanced line-level signals. 6) S/PDIF (Coaxial) Input and Output Coaxial digital input and output connectors.
USBPre 2 User Guide and Technical Information DIP Switch Options The DIP switches on the back panel of the USBPre 2 can control various features. To adjust an individual switch, carefully move the switch with a slender tool.
USBPre 2 User Guide and Technical Information Mac OS Installation and Connection Before connecting the USBPre 2, quit all open applications that use audio. An application that is running when the USBPre 2 is connected may not recognize the USBPre 2 until the application is restarted. When connecting the USBPre 2 to a computer with OS X 10.5 or earlier installed, hold down the Input 1 Source Select button while pluggin in the USBPre 2.
USBPre 2 User Guide and Technical Information 2. OS X 10.6 and later: Highlight the USBPre 2 item and adjust the sample rate and bit depth from the drop-down box labeled Format. OS X 10.5 and earlier: Select the USBPre 2 from the Properties For dropdown menu, then set the sample rate, channel count, and bit depth as desired from the dropdown menus in the Audio Input section and the Audio Output section. Windows Installation and Connection The USBPre 2 is an Audio Device Class USB standard peripheral.
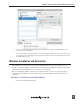
USBPre 2 User Guide and Technical Information 2. Click the Playback tab. 3. Click to select the item labeled “USBPre2” in the list of devices. 4. Click the Set Default button. A green check mark icon will appear next the the USBPre 2 entry and the phrase “Default Device” will appear below the entry, indicating that the USBPre 2 is now the default playback device. 5. Click the Recording tab and repeat and repeat steps 3 and 4 to make the USBPre 2 the default recording device.
USBPre 2 User Guide and Technical Information 3. Click the Advanced tab. Select the desired bit depth and sample rate from the dropdown menu. Windows XP Sound Control Panel 1. Follow Start> Control Panel. The control panel view will be be in either “Classic view” or “Category view”. 2. If category view is enabled, click Sounds, Speech, and Audio Devices, then click Sounds and Audio Devices. Skip to step number 4.
USBPre 2 User Guide and Technical Information 3. If classic view is enabled, click Sounds and Audio Devices. 4. Click the Audio tab. Select the USBPre 2 from the Default device dropdown menu in the Sound playback section. Select the USBPre 2 from the Default device dropdown menu in the Sound recording section. ASIO Driver The ASIO driver for the USBPre 2 allows for low-latency operation and sample rates up to 192 KHz on Windows computers.
USBPre 2 User Guide and Technical Information ASIO Driver Installation 5. Determine if your version of Windows is 32 or 64 bit by viewing the System information window. This window can be accessed by right-clicking Computer (located in the Start Menu or on the Desktop) and selecting Properties. It can also be accessed by the shortcut Windows Key + Pause/Break key. The operating system type will be listed in the “System” section of this window. 6. Proceed to http://www.sounddevices/download/usbpre2-asio.
USBPre 2 User Guide and Technical Information 13. The installation process will begin. If the USBre 2 is not plugged in, the installer will request that you do so. 14. The final window will appear. Click Exit. 15. Unplug the USB cable from the USBPre 2. 16. Plug the USB cable back in to the USBPre 2. Uninstalling ASIO Driver 1. Open the Programs and Features section (Windows 7 and Vista) or Add / Remove Programs (Windows XP) in the Control Panel (located in the Start menu). 2.
USBPre 2 User Guide and Technical Information 5. On the left sidebar of the System window, click Device Manager to open the Device Manager window. 6. Expand the Sound, video, and game controllers section. 7. Right-click the entry in this section titled USBPre 2.0 Audio 1.0.0 and select Uninstall. 8. Ensure that the checkbox titled Delete the driver software for this device is checked, then click OK. 9.
USBPre 2 User Guide and Technical Information Linux Installation and Connection The USBPre 2 is an Audio Device Class USB standard peripheral. No proprietary drivers are required to operate the USBPre 2 under Linux. The first time the USBPre 2 is plugged in, Linux will enable standard USB Audio Device Class drivers automatically (if necesarry). Current Linux audio drivers only support USB audio devices at “Full speed” USB rates.
USBPre 2 User Guide and Technical Information Line Inputs The Line Inputs use balanced, quarter-inch connectors and accept +4 dBu analog signal (sometimes referred to as “Professional” line level). Wiring is tip: signal (+), ring: signal (-), and sleeve: ground. Aux Inputs The Aux Inputs use unbalanced, RCA connectors and accept -10 dBu analog signal (sometimes referred to as “Consumer” line level).
USBPre 2 User Guide and Technical Information Headphone Mono mode sums the input signals from both inputs into a mono mix for the headphones. To toggle Headphone Mono mode, push the Headphone Mono button on the front panel. The Headphone Mono LED will illuminate when Headphone Mono mode is active. Optionally, the stereo signal from the computer can also be summed when Headphone Mono mode is engaged. See DIP Switch Options.
USBPre 2 User Guide and Technical Information not attached to a computer). The USBPre 2 can be forced into Stand-alone mode when connected to a computer supplying USB power by holding down the Meter Source button when attaching the USB cable. In Stand-Alone mode all front panel controls perform the same functions as when the USBPre 2 is in Interface mode, except that the Meter Source button is disabled and the meter mode is locked to PRE.
USBPre 2 User Guide and Technical Information To PA Input 1 set to Mic (XLR) Input 2 set to Loop High Performance Playback The USBPre 2 can provide high-quality audio output from a computer to reference monitors in a studio control room or a home stereo system. Depending on the connectivity of the monitors, the balanced XLR outputs, unbalanced RCA outputs, or digital S/PDIF outputs can be used to send computer audio to the monitors.
USBPre 2 User Guide and Technical Information Block Diagram 21
USBPre 2 User Guide and Technical Information Specifications 22 Frequency Response (reference 1 kHz tone. 192 kHz sample rate) Any input to PC recording: • 10 Hz - 40 kHz, +/- 0.5 dB • -3 dB at 65 kHz THD+N (22 Hz - 22 kHz measurement bandwidth) • 0.05% max (any input to PC recording, gain control at min, input driven to -6 dBFS) • 0.009% max (AUX output, 0 dB V output, 100k ohm load) • 0.05% max (HEADPHONES output, 2 V rms output, 600 ohm load) E.I.N.
USBPre 2 User Guide and Technical Information Warranty and Technical Support Warranty & Service Sound Devices, LLC warrants the USBPre 2 against defects in materials and workmanship for a period of ONE (1) year from date of original retail purchase. This is a non-transferable warranty that extends only to the original purchaser. Sound Devices, LLC will repair or replace the product at its discretion at no charge. Warranty claims due to severe service conditions will be addressed on an individual basis.
USBPre 2 User Guide and Technical Information CE Declaration of Conformity According to ISO/IEC Guide 22 Sound Devices, LLC 300 Wengel Drive Reedsburg, WI 53959 USA declares that the product, USBPre 2 Portable Computer Audio Interface is in conformity with and passes: EN55103-1, 1997 EMC-product family standard for audio, video, audio-visual and entertainment lighting control apparatus for professional use.
USBPre 2 User Guide and Technical Information 25
USBPre 2 Rev. 1.0b - Printed in the U.S.A.